• Hi Guest!
    You can help ensure that British Car Forum (BCF) continues to provide a great place to engage in the British car hobby! If you find BCF a beneficial community, please consider supporting our efforts with a subscription.

    There are some perks with a member upgrade!
    **Upgrade Now**
    (PS: Subscribers don't see this gawd-aweful banner
Tips
Tips

Crankshaft Dog Nut and Timing Chain Cover Removal

Ha; been there done that. I used a 2x4, and my pan had a perfect 2x4 indentation across it; a year or two later, I clanged the pan on the driveway curb and welding in place didn't work. Luckily, I found an almost pristine pan on eBay.
I used a 12” x 12” x 2” thick board under the oil pan. Worked great and no damage.

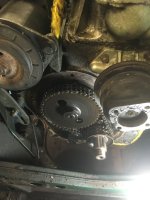
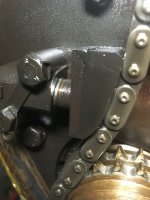
While You’re there, install the timing chain cover curved piece from BCS on the lower left side of the timing chain cover to take care of oil leaking in that area.
 
The harmonic balances have a rubber seal in them to hold the two pieces together. If yours has this it would be a good time to have it rebuilt. It’s OLD.
 
BCS has a timing cover 'girdle' that supposedly does a good job of stopping leaks around the periphery of the cover (used instead of the oval-shaped washers).

Oops .. redundant (didn't see the post above).
 
I installed the BCS timing cover reinforcement piece - with the oval washers. It seemed pretty thin, so using the bottom arc of it as a pattern, I made another piece from 1/8" x 2" cold rolled stock from the hardware store.

FWIW, Russ Thompson suggests installing extra bolts along the bottom arc, as they're pretty far apart.
 
As long as you're under there and working on the front of the engine now's a good time to purchase and install the timing cover stiffener sold by David Nock. It eliminated a persistent oil leak from the front of my engine that no amount of new gaskets, sealant or torque would cure.
 
I think I mentioned it before, but 2 things I wish I'd done on my last rebuild:

1) lightened flywheel

2) uprated timing chain tensioner from DWM (I have their flexible internal oil line in my BN2; another known potential failure point)
 
Well, I managed to strip the dog nut when reinstalling a new Pro Race harmonic damper (yes, I did preheat at 220 degrees F before trying to install it)
Any body know what the thread size is for the crankshaft / dog nut? I want to chase the threads on the crankshaft to see if they can still be used. Other than buying new dog nut and trying again, any other clues / advise on next steps?
British Car Specialist has them. When I overhauled my engine the machine shop just used a “thread chaser” to straighten up my crankshaft threads. They aren’t huge and you should be able to buy one. I think it doesn’t matters which thread it is, metric or sae.
 
Bob said: "I have their flexible internal oil line in my BN2; another known potential failure point"
----------------------------------
You can say that again. I caught an enormous break a few years back: I was making small changes in spark advance and went out for a run to see the effect, if any, on water temps. Only because I had my eyes on the safety gauge did I see the needle suddenly tank and was able to shut down immediately. I got towed home and when I ultimately dropped the pan I found that the original rigid hose had fractured at the block. I replaced it with a DWR flex hose as Bob suggests.
 
Well, I managed to strip the dog nut when reinstalling a new Pro Race harmonic damper (yes, I did preheat at 220 degrees F before trying to install it)
Any body know what the thread size is for the crankshaft / dog nut? I want to chase the threads on the crankshaft to see if they can still be used. Other than buying new dog nut and trying again, any other clues / advise on next steps?

Are the nut threads stripped or crankshaft threads?
 
The nut threads are stripped. Crankshaft threads have some material in it. Easy to buy a new nut. I am getting a thread chaser to see if I can salvage the crankshaft threads. Don't know why it was do difficult to get the harmonic balancer all the way on. I had a bout a half inch left to go.
 
I followed the above instructions with a few variations and it worked very well on my "67 BJ8. Using a chain hoist with a thick nylon tow rope around the bottom just behind the front plate, I had to raise the front of the engine enough to get the balancer straight off. (I also disconnected the exhaust pipes to avoid stress.) The proper impact socket for the dognut can be found online for about $32. Incidentally, I would advise not to advance the two bolts from the puller so far into the balancer that they come to bear on the front cover. Once it's off, it is a good time to consider repainting the cover and check the chain tensioner. Lastly, I followed some advice to use Hylomar-M gasket sealant as it allows a very long assembly time.
 

Attachments

  • P1010002.jpg
    P1010002.jpg
    545.4 KB · Views: 58
  • IMG_2536.JPG
    IMG_2536.JPG
    1.4 MB · Views: 54
  • IMG_2537.JPG
    IMG_2537.JPG
    1.3 MB · Views: 57
  • Chain tensioner 6-24.JPG
    Chain tensioner 6-24.JPG
    1.5 MB · Views: 57
I followed the above instructions with a few variations and it worked very well on my "67 BJ8. Using a chain hoist with a thick nylon tow rope around the bottom just behind the front plate, I had to raise the front of the engine enough to get the balancer straight off. (I also disconnected the exhaust pipes to avoid stress.) The proper impact socket for the dognut can be found online for about $32. Incidentally, I would advise not to advance the two bolts from the puller so far into the balancer that they come to bear on the front cover. Once it's off, it is a good time to consider repainting the cover and check the chain tensioner. Lastly, I followed some advice to use Hylomar-M gasket sealant as it allows a very long assembly time.
Could you post a link to the impact socket for us?
 
1-11/16" impact socket, 1/2" drive:

Hylomar-M (beware of an imitation (made in Ohio?) and different size quantities. This comes from the UK:
 
I'll plead ignorance to the differences between four and six-cylinder Healey engines but why is the work that Torrey describes and pictures in post # 32 seem so much more complicated than what I experienced on my 100?

Working from under the car with the front end jacked up I was able to remove the Big Nut and timing chain cover in order to replace the timing chain and tensioner. To be sure, refitting the pulley with the chain and tensioner belt installed was not easy but I did not have to raise the front of the engine in order to remove the Big Nut.
 
1-11/16" impact socket, 1/2" drive:

Hylomar-M (beware of an imitation (made in Ohio?) and different size quantities. This comes from the UK:
That’s a great buy!
 

Attachments

  • IMG_0684.png
    IMG_0684.png
    1.2 MB · Views: 51
I'll plead ignorance to the differences between four and six-cylinder Healey engines but why is the work that Torrey describes and pictures in post # 32 seem so much more complicated than what I experienced on my 100?
The pulley/damper hits the frame cross member before clearing the crank shaft on the longer engines.
crank damper.JPG
 
Last edited:
Thanks Greg--I suspected that would be the issue. I'm fitting a damper to my engine and though I renewed the chain and tensioner belt less than 5K miles ago I will do so again before reinstallation as it would bve a bummer to have to do it again with even tighter clearances than without the damper's being fitted.
 
Thanks for the info. Question: How did you lock up the engine to spin off the damper nut? Or did the impact wrench do the job without?

If I ever do this job again, I'll install an uprated tensioner; like BN2 oil lines they are alleged to fail. I'd also get the 'girdle' that BCS sells to get a better seal on the gasket.
 
I used an air-driven impact wrench with the transmission in 4th gear. It seems the jolts from the wrench are so brief that the crankshaft didn’t really turn. I couldn’t set a specific torque when reassembling but I think it’s supposed to be 70-100ft-lb. I matched the setting on the wrench that got the nut off.
 
Back
Top