• Hi Guest!
    You can help ensure that British Car Forum (BCF) continues to provide a great place to engage in the British car hobby! If you find BCF a beneficial community, please consider supporting our efforts with a subscription.

    There are some perks with a member upgrade!
    **Upgrade Now**
    (PS: Subscribers don't see this gawd-aweful banner
Tips
Tips

TR2/3/3A Rebuilding a tr3 transmission and second gear,

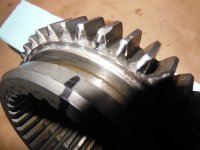
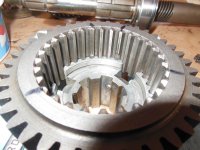
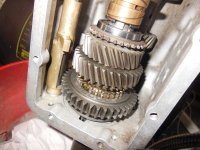
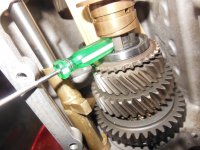
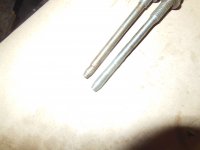
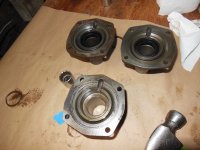
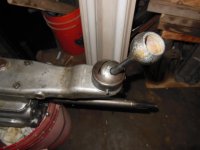
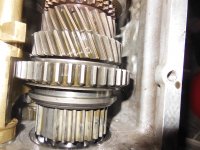
“Finally, if you put a new ring in, you should use 600 grit wet or dry paper to smooth the old grooves in the gear cone. The old synchro will have left slight grooves, so they must be removed or the new ring ridges cannot grab the cone properly. There are bad synchro's out of the box, too. If, after smoothing the cone the new ring will not tightly grab the gear, try another synchro ring. If none of them grab tightly, then the cone is worn and the gear has to replaced.”

Thanks for comment and information John. Yes I totally misunderstood your comment here. I actually thought you meant the brass rings were too sharp on the inside and I think I commented on that somewhere. When actually, you were talking about the gear cone getting those little lines on it. I just need to clarify. I am getting old.

Steve
 
Funny, I've been trying to think about what you were talking about when you wrote that, LOL. But, "yes", it's to smooth the cones on the gears. When you are done, the synchro blocker rings should grab the gears pretty tightly.
 
Replace the dammm second gear! They work the hardest and get the most abuse. I had a straight cut comp box that jumped out of second. A specialist said the gear looked Perfect….. I had a spare and put it in….. problem solved.
 
IMHO, the best place for a Tr3 transmission, is under the bench. They were always the
Achilles heal of the car. I can understand doing one with OD, or for a concourse car.
However ,a non OD Tr3 box is a useless releck .I have lost track of the number of these
I have scrapped .And they still infest my garage waiting for the price of scrap Alloy to go up!
Mad dog
 
The 4/6 box, when freshened up with the improved counter gear bearings ,is pretty solid
overall . If only there had been an OD standard on all American market cars !! Long stretches
of Interstate highway are no fun with the tach at 3800RPM and still getting passed by
large trucks.(as we are all aware)
Mad dog
 
They made up for it with the modern market. My 2017 Vette has a 7th gear that is overdriven so far as to be unusable. At 90MPH in 7th you are only doing 1200RPM, and it makes a monotonous drone doing it. Not to mention the car has a higher top end speed in 6th!?! The OD in the TR2 is nice for cruising, as in 4th it makes a loud 4-banger drone, which goes away nicely once you hit OD. I see why they added the resonator in the later cars...the noise is fun accelerating, but gets old on a long cruise.
 
On Overdrive and non-over drive transmissions all the gears are the same? After move investigation, I really do not like the first/ second slider I was going to use in this rebuild. It has a chip in one of the teeth about a 3/16 long and about 20% from the top is missing. The chip might grind down even and mesh fine. It seems to me there are many teeth on the slider and perhaps because there are many teeth, a grinding of one tooth might not be noticed.

I am still waiting for my fish scale puller deal to measure my sliding force on first/second slider. I believe it sets at 27pounds force. I have never tried one of those type measuring devices, like fish scale deal; it should be interesting.

Steve
 
Yes, all the ratios are the same, OD or not.

3/16" is a rather large chip. The problem with large chips is they serve as stress risers, which can start cracks. Of course, cracks eventually lead to a failed tooth, which would cause the real damage.
 
I cannot get a real good picture of the chip, but here in the best. I am going to use a different gear and slider anyway, so not too important. Taking a drumel and feathering the chip might be doable never did it before. I started looking at the sides of all the teeth, and can see what I believe to be some kind of stress fracture or something, maybe wear.

Anyway, I put the gears on the shaft and started to slide on the circlip using an old Top Hat bushing and piece of pipe. I thought heck, if this circlip goes on, it could take some real fun time to get the clip off if anything is wrong. So, I am back at the computer thinking what did I forget. there is only hand full of gears.

steve
 

Attachments

  • DSCN1608.JPG
    DSCN1608.JPG
    3.1 MB · Views: 65
  • DSCN1621.JPG
    DSCN1621.JPG
    3.4 MB · Views: 63
For you guys that cannot sleep until I push the circlip down, I went ahead and push it into place.

Does anyone know if on the long 6 inch bolt that holds the lay shaft still, would mig welding and grinding be sufficient to fill in the gap on the long bolt?. I would think so, but I do not know. Every stock bolt I have is missing a big chunk of the bolt. They do sell one for 20.00.

Steve
 

Attachments

  • DSCN1624.JPG
    DSCN1624.JPG
    3.3 MB · Views: 54
  • DSCN1625.JPG
    DSCN1625.JPG
    3.4 MB · Views: 59
  • DSCN1628.JPG
    DSCN1628.JPG
    2.6 MB · Views: 65
Looking good! All the wear on the long bolt shows how much that shaft tries to roll. Mig will be tricky, but I am sure it can be done, then just grind it back to shape.
 
I am having difficulty removing the front seal. What are some of the ways other have removed these seal.

Thanks Steve
 

Attachments

  • DSCN1629.JPG
    DSCN1629.JPG
    3.4 MB · Views: 56
I think I've done it a couple of ways. I usually start by trying to catch the edge with a punch from inside the slip collar to loosen it. Once that just rounds the lip of the seal, I go with holding the cover in soft jaws and then using a big screwdriver to pry.
 
I did get the seal out with collateral damage. It is difficult for me to go caveman with a screw driver sometimes. Years ago I scratched a diff seal and it leaked, bummer. I tried all the stuff on line and none of it worked. I am thinking one of the pry tools might work if it is sharp and longer. Mine broke trying to get a seal out.

Now I am thinking perhaps some kind of tube cutter at a 45 degree angle going around the outside and scoring the seal metal at the bottom inside with all the rubber cuts removed might weaken the seal metal enough to pull it out.

Or I am thinking burn the cuts out of the seal and see if I can weaken it enough with heat. Those seals are so stuck; it is like a pressed in tin can bottom.

Steve
 
When I have removed them, like others I have pried and punched. The seal itself was a total mess by the time I got it out.
Charley
 
I got the trans put together and mounted the shifting tower that came with that transmission. When I was working on the transmission, I worked with the dedent balls and tried to get a fish scale tool to help calibrate the force. The tool came damaged a little, and I could tell right away this was not going to work me. I decide to replace the balls and springs and call it good.

I Pulled the tower off carefully after I shifted into second. When I shift into second, there is a good holding force, I trust that is going to be enough. There is a small gap between first and second gear maybe a 1/16 or so seems like there should be some, right. The gears shift fine and tight when it is not running, but it needs to be driven to understand the quality of the rebuild. I probably should put new springs in the shifting tower assembly before I quit.

steve
 

Attachments

  • DSCN1635.JPG
    DSCN1635.JPG
    3.2 MB · Views: 50
  • DSCN1636.JPG
    DSCN1636.JPG
    3.3 MB · Views: 51
Well, that finally answers that question. The answer has to lie within the shift cover balls and detents.
 
Back
Top