Hey Guest!

 Hey - did you know if you click on the title of a thread it will take you to the first unread post since you last visited that thread?
 but were afraid to ask:
  STOP!! Never post your email address in open forums. Bots can "harvest" your email! If you must share your email use a Private Message or use the
  smilie in place of the real @
 Pretty Please - add it to our Events forum(s) and add to the calendar! >>
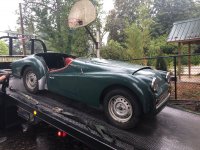
Hello everyone, so many random question, spent a day off in the sun going over this car I'm restoring (body on). I thought it might be better to list them here rather than gum up the site with too many threads. Any suggestions or input you have is sincerely appreciated, really trying to learn about this car.
(1962 TR3B TCF 794L)
1. I'm rebuilding all the interior trim pieces. Originals were hardboard - why was this? More pliable or more resistant to moisture or cheaper? Would thin plywood be better or stick with hardboard?
2. Before I reach out to local upholstery shops is there a vinyl anyone recommends? What about the thin padding for the doors and wheel wells, coming up blank on those.
3. The wheel wells are the only interior part that requires a sewn seam. Suggestions? Should I have an upholstery place do this or is there a secret DIY I'm unaware of? Not doing piping.
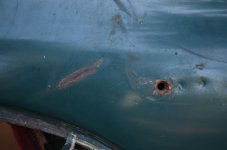
4. There are a lot of deep scratches on this car down to the metal with surface rust. Looking for some direction here. I can sand it down and prime, then the car is going to look like crap. Or leave the surface rust/scratches? It will be a long while before I can afford to repaint this car, all y money is going into getting it drivable. See photo.
5. The engine is out and being rebuilt. Suggestions on things I can/should do in the engine compartment? I don't want to start removing things that will make the mechanics job harder when the engine is re-installed, but there are a lot of items to address - engine mounts? Master cylinders? Lots of things we're going to have to repair/replace - if there are things I can be doing I'd like to.
6. Trim: On the door trim pieces do the round end caps come out? The vinyl is wrapped around it, so I assume so, but I don't see how to remove the caps?
7. Front supension (with body on) - is there anyone who has a walkthrough? I have some experience with brakes/pads rotors - I know all the rubber needs to be replaced. Really love to tackle this with the engine out but wary of just starting to remove parts without knowing I'm being thorough.
8. I need to replace the front 30% of the floor pans. It seems to me buying replacement pans and then cutting the bad parts to fit would be MUCH easier and MUCH better than trying to replace the entire pans. The last 50-60% of the pans I have are solid as are the rockers and inner/outer sills. I don't want to make more work for myself than I need nor do I want to cut out good metal. Any advice on this would really be appreciated. I'm not 100% on how they meet up in the front (I think under the bulkhead?) I am a beginner welder but feel confident I can tackle this. It seems more of a patch job than anything and if I order replacement floors then the flanges are in and it should be pretty straightforward. Replacing the fulls pans seems like a much bigger job and we're headed into cold weather. . . .
Anything else I should consider? Engine out, Trans out, gas tank and radiator sent to shop for inspection.
I have limited funds, don't plan on worrying about cosmetics until later. Want a safe and drivable car. I really appreciate you guys and your experience.
(1962 TR3B TCF 794L)
1. I'm rebuilding all the interior trim pieces. Originals were hardboard - why was this? More pliable or more resistant to moisture or cheaper? Would thin plywood be better or stick with hardboard?
2. Before I reach out to local upholstery shops is there a vinyl anyone recommends? What about the thin padding for the doors and wheel wells, coming up blank on those.
3. The wheel wells are the only interior part that requires a sewn seam. Suggestions? Should I have an upholstery place do this or is there a secret DIY I'm unaware of? Not doing piping.
4. There are a lot of deep scratches on this car down to the metal with surface rust. Looking for some direction here. I can sand it down and prime, then the car is going to look like crap. Or leave the surface rust/scratches? It will be a long while before I can afford to repaint this car, all y money is going into getting it drivable. See photo.
5. The engine is out and being rebuilt. Suggestions on things I can/should do in the engine compartment? I don't want to start removing things that will make the mechanics job harder when the engine is re-installed, but there are a lot of items to address - engine mounts? Master cylinders? Lots of things we're going to have to repair/replace - if there are things I can be doing I'd like to.
6. Trim: On the door trim pieces do the round end caps come out? The vinyl is wrapped around it, so I assume so, but I don't see how to remove the caps?
7. Front supension (with body on) - is there anyone who has a walkthrough? I have some experience with brakes/pads rotors - I know all the rubber needs to be replaced. Really love to tackle this with the engine out but wary of just starting to remove parts without knowing I'm being thorough.
8. I need to replace the front 30% of the floor pans. It seems to me buying replacement pans and then cutting the bad parts to fit would be MUCH easier and MUCH better than trying to replace the entire pans. The last 50-60% of the pans I have are solid as are the rockers and inner/outer sills. I don't want to make more work for myself than I need nor do I want to cut out good metal. Any advice on this would really be appreciated. I'm not 100% on how they meet up in the front (I think under the bulkhead?) I am a beginner welder but feel confident I can tackle this. It seems more of a patch job than anything and if I order replacement floors then the flanges are in and it should be pretty straightforward. Replacing the fulls pans seems like a much bigger job and we're headed into cold weather. . . .
Anything else I should consider? Engine out, Trans out, gas tank and radiator sent to shop for inspection.
I have limited funds, don't plan on worrying about cosmetics until later. Want a safe and drivable car. I really appreciate you guys and your experience.