• Hi Guest!
    You can help ensure that British Car Forum (BCF) continues to provide a great place to engage in the British car hobby! If you find BCF a beneficial community, please consider supporting our efforts with a subscription.

    There are some perks with a member upgrade!
    **Upgrade Now**
    (PS: Subscribers don't see this gawd-aweful banner
Tips
Tips

TR2/3/3A Apron installation 1960 tr3 a

Tinkerman

Darth Vader
Offline
Afternoon everyone! I'm at the point that I feel ready to install the front apron. My question is, what should I be prepared to deal with during that installation? Also what should be installed before the apron? All the big and small obvious things are installed, such as: engine, front end, cooling sytem, some electrical and etc.
Your thoughts and ideas are greatly appreciated!

Thanks, Tinkerman
 
The apron is a big step. Before I put mine on, I made sure the engine ran, and the radiator and all the hoses did not leak. I suppose your front fenders are on. And the beading is ready. I think the horns are easier to install before the apron, but definitely the radiator cross supports. The tub can be loose from those two bolts at the front, and the 4 bolts (2 per side) to allow a little wiggle room. It is a tight fit, and before you completely tighten the 8 million bolts, be sure to see if the hood will fit and is aligned. A little masking tape can help things from getting chipped. If you still have the hole in your radiator for the hand crank, now would be a good time to check that the handle will actually fit into the crank, or if the radiator needs raised/lowered. Take your time and eventually it will fall together with a little persuasion.

Enjoy the progress.
 
Thanks, Yep all that stuff's in and it is running. The guy that re-cored my radiator put a small hole in and it will not line up. After I read your post I went and looked and sure enough it needs to be adjusted side to side not up and down, sigh.
Thanks for the info. I look forward to doing this job because it will start to look like a car.

Cheers, Dick
 
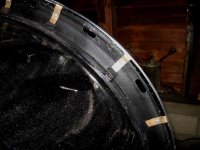
I'm a big fan of pop riveting the fender beads onto the wings to hold them in place on the curve from the top to the bottom. You have to leave all of the front and top screws of the wings loose (you may have to remove a couple) so you can keep the wings spread out far enough to get the apron in place. There's more then enough movement to give you plenty of clearance. Once the apron is in place, just push the wings back into position and tighten up.

And, if you ever have to remove the apron in the future, you will thank yourself for doing this.

IMG_0639.JPG
 
I did not pop rivet the tabs to the curve, but don't see a problem if you get the rear end of the bead exactly right with the rear of the fender to start before any riveting on the front tabs. You may find that the long flange of the bead that meets the inside top of the fender does not match the shape of the fender, necessitating cuts across the flange to correct the fit. If you go with putting the bead on after the front cap is all in place, put some low stick painters tape on the tabs to avoid scratching
Bob
 
Hi Art, Bob!
I'm kinda getting the impression that I should put the fenders on first. Is that correct?

Thanks, Dick
 
Dick
Yes!
 
C'mon Marv, I need all the help I can get! Heh!

Dick
 
Thanks for the super nice picture of the pop rivet installation on the fender bead! Do you do this for the rear beading as well?
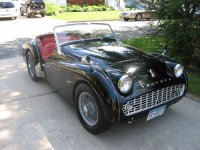
Is your car painted black, or is that sprayed on undercoating on the inside of the fender?
Thanks!
 
Thanks for the super nice picture of the pop rivet installation on the fender bead! Do you do this for the rear beading as well?
Is your car painted black, or is that sprayed on undercoating on the inside of the fender?
Thanks!

My car is painted black. I did it myself, along with all the body work...in my one car garage.

IMG_0809C.JPG
 
Back
Top