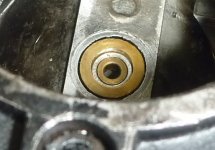
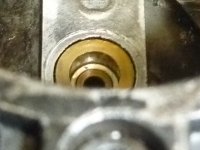
My '60 BN7 is reluctant to start when it gets cool here in North Florida, which can be as low as 50F. This car's intake manifold identifies it as one of the cars that had AH's failed automatic choke device. There are three siamized ports into the top of the intake manifold where that choke originally fed fuel to the engine. Those are blocked and a conventional pull choke is mounted on the dash and connected to the dual carbs by the usual wire and housing system. I have recently re-lubricated the wire and fiddled the attachment at the carbs to make sure that I am getting full choke motion at the connection. However, I find it necessary to give the car a squirt of of starting fluid before I can get the first sign of fuel ignition. Once that happens, the car quickly begins to run normally as the choke is gradually shut down. Is this a mixture issue? I have not monkeyed with the carbs, as the car runs perfectly once the engine starts. I have yet to check the ignition timing
-
 Hi Guest!
If you appreciate British Car Forum and our 25 years of supporting British car enthusiasts with technical and anicdotal information, collected from our thousands of great members, please support us with a low-cost subscription. You can become a supporting member for less than the dues of most car clubs.
There are some perks with a member upgrade!**Upgrade Now**
(PS: Subscribers don't see this gawd-aweful banner

Tips
- We have a special forum called "Member Articles" where you can submit actual articles for consideration for publication. Learn More
- Don't have an Avatar? If not, your avatar will default to the 1st character in your username. Go into "Account Details" to change your Avatar.
- Some basic forum navigation info: click
Hey - did you know if you click on the title of a thread it will take you to the first unread post since you last visited that thread?
- Hey Guest - Is your British Car Club in our Clubs database? If not, send me a PM - Basil

- Looking for a local club? Click the "Clubs" tab above and browse hundreds of clubs world-wide.
- Add Android or iPhone APP: click
- Did you know - any picture or video you add in your posts in any marque-specific forum will also get added to the Media Gallery automatically.
- A few more tips about posting and replying: click
- Hey there Guest - be sure to keep your profile page up to date with interesting info about yourself: learn more
- More tips and tricks on Posting and Replying: click
 STOP!! Never post your email address in open forums. Bots can "harvest" your email! If you must share your email use a Private Message or use the
  smilie in place of the real @
- Want to mention another member in a post & get their attention? WATCH THIS

- So, you created a "Group" here at BCF and would like to invite other members to join? Watch this!
- Hey Guest - A post a day keeps Basil from visiting you in the small hours and putting a bat up your nightdress!
- Hey Guest - do you know of an upcoming British car event?
 Pretty Please - add it to our Events forum(s) and add to the calendar! >> Here's How <<
- Hey Guest - you be stylin'
Change the look and feel of the forum to fit your taste. Check it out
- If you run across an inappropriate post, for example a post that breaks our rules or looks like it might be spam, you can report the post to the moderators: Learn More
- If you would like to try some different "looks" or styles for the site, scroll to the very bottom, on the left and click the Style Selector.
You are using an out of date browser. It may not display this or other websites correctly.
You should upgrade or use an alternative browser.
You should upgrade or use an alternative browser.
Choke Not Working In Cool Weather
- Thread starter RDKeysor
- Start date
No, I haven't removed the domes, which I assume to be the polished aluminum "pots" atop the carbs. I understand that I should observe whether the jets move lower, and I'm guessing that means whether the pistons with the needles attached move downward when the choke is operated. I'm guessing I may not be right regards the jets/pistons.
busybrit
Jedi Hopeful
Offline
I have this problem with many of my customers cars when I first work on them, MG's, Triumphs, anything with SU carbs, they won't start easy.
Not always, but many times they are pulling the choke cable but nothing, or not enough movement is actually happening at the business end.
The easiest way to identify this is to have someone pull the choke while you watch the bottom of the carbs. The jet assembly should move down as the linkage/cable is operated. If the jet moves down about 1/4" it is right on the cusp of not starting. It needs to be able to be pulled down a little more. An easy test is to operate the linkage at the carbs by hand until you get the maximum movement on the jets, they should be the same, while holding the linkage, have someone start the car with the key. Chances are it will fire. You need then to adjust the linkage to get the same increased movement on the choke.
www.britishcarmechanic.com
I'm looking at an illustration of an H.S.4 carb at page DDD.6 in the Healey 100-6/3000 shop manual. It shows the jet locking nut, etc. How does one open the carb to view the jet as shown in your photos? I have had the "domes" off of mine for polishing, but have never tampered with the inner workings. I can see that the adjustment is made on the jet locking nut on the underside of this particular carb, but I don't want to tamper with that until I see if I do or don't get the movement your photos show when I operate the choke knob.
Offline
I'm looking at an illustration of an H.S.4 carb at page DDD.6 in the Healey 100-6/3000 shop manual. It shows the jet locking nut, etc. How does one open the carb to view the jet as shown in your photos? I have had the "domes" off of mine for polishing, but have never tampered with the inner workings. I can see that the adjustment is made on the jet locking nut on the underside of this particular carb, but I don't want to tamper with that until I see if I do or don't get the movement your photos show when I operate the choke knob.
Refer to the Moss Catalog, "Triple HS4 Type Carburetors BN7/BT7" page for item numbers:
Unscrew the screws (10) and remove the suction chambers (3). Remove springs (7). Lift the pistons with their jets* out (3). Be sure to keep each piston with its matched chamber.
Now you'll be able to observe the jets similar to the pictures.
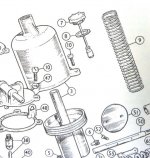 *Correction - should read: "needles"
Last edited:
Thanks for the very clear instructions. I'll also check to make sure that I have the HS4 carbs, though I suspect they are the HD6 twins. The procedure you explain appears the same on both carbs. I'm guessing that part 19, the jet adjusting screw, will need to be turned down (clockwise in this application) if the jet movement is less than you show and describe with your photos. I'll also do the "busybrit"-suggested check on the jet movement. Merry Christmas and Happy Hanukah.
I have now pulled the chambers and the pistons from both of my carbs. They conform to the HD6 carbs. As mentioned earlier the now-blocked ports on the intake manifold tell me this car was originally fitted with the briefly used "Auxiliary Enrichment Carburettor". The rear carb is marked AUC 2044, and below that IGN. That's not in accord with what I find in the manuals. This ID is at the point where the distributor vacuum line attaches, as found on the rear HD6 carb. The front carb is identical but not marked. With the choke off, I found that the jets on both carbs were nearly flush with the brass bits that they move up and down in--the jet bearing kit, according to my Moss catalog. After some fiddling with the cable and housing that operate the choke, I was able to get the rear jet to retract down about .143" with the choke pulled full out. The front carb jet had not moved noticeably less. Looping a string under the wire attachment assembly and lifting hard, I was able to pull the jet at the rear carb jet down to about .240". But this lifted the throttle stop screw away from its stop and couldn't be maintained by the choke pullout knob, no matter how high I adjusted the pinch device I have gripping the wire below the choke lever. The jet movement was measured with the depth rod that protrudes from the end of my dial calipers. Should I try adjusting the jet adjusting screws on each carburretor? Busbrit's suggestion that I measure the jet movement under the carb doesn't work with the HD6, as there is no visible movement under the carb, unlike the HS4. Hey, I'm getting an education on SUs. Some may criticize the SUs, but I have had them on quite a few cars of various makes, and I remain ignorant of their management because I never, ever had any trouble with them. Well, a needle did drop free on a Volvo, but nothing's perfect.
Offline
Refer to Moss catalog page for HD6:
Make sure #123 connecting rod is lowering the front jet carrier when you pull the choke out. If not, adjust the fork, #124 to take up the slack. You'll need to undo the locknut #125 and pull the clevis pin #126 in order to tighten the fork. You may want to pull the pin and operate the choke lever #23 on the front carb to make sure the jet carrier descends as it's supposed to.
Make sure #123 connecting rod is lowering the front jet carrier when you pull the choke out. If not, adjust the fork, #124 to take up the slack. You'll need to undo the locknut #125 and pull the clevis pin #126 in order to tighten the fork. You may want to pull the pin and operate the choke lever #23 on the front carb to make sure the jet carrier descends as it's supposed to.
I have completed the jet adjustment steveg suggests, bringing the front jet to the same elevation as the one on the rear carb, essentially level at the top with what Moss identifies as the jet assembly (part 20) with the choke in repose. Despite repeated efforts to adjust the choke wire connection to get full movement of the jets, I find I don't seem to have sufficient mechanical leverage to overcome the return spring pressure that holds the jets at their upper position. I'm assuming that part 20 on the Moss HD6 line drawing provides the resistance to pull on the choke wire. Incidentally, I found the same resistance at the rear carb when part 123, the rod connecting the jets on the two carbs, was disconnected, i.e. I was pulling against only one return spring. I am considering hooking a generic choke wire and housing from the inside the cockpit on a direct line with the carb connection to see whether I can gain more mechanical advantage. Since the car runs perfectly once started, I'm not anxious to do any more disassembly trying to solve a cool weather starting problem.
bob hughes
Luke Skywalker
Offline
For what it's worth, I had similar problems for years, after my engine rebuild in 2013 the problems still existed and I found that not only were my chokes not operating properly, my distributer needed some careful TLC. Problems with cold starting have all gone away.

Bob

Bob
I originated this discussion and think that, thanks to the forum responders, particularly steveg, I have resolved the problem. First, I took steveg's suggestion that I insure that both carb jets were pulling down with the operation of the manual choke. The front one wasn't moving, necessitating an adjustment of the rod that interconnects the two carbs when using the choke. You can read his explanation of this above. I made the adjustment as he recommended. The unresolved problem was my inability to get the jet-lowering mechanism to work. Despite every effort, lubrication, adjustment, etc., it was difficult to pull the choke knob hard enough to budge the jet mechanism. That knob had a long and somewhat tortured run to the carbs. So, I went to Advance Auto and bought a generic manual choke set for about $7. I added a rubber ring around the choke knob to enlarge it for easy grasping, shortened the cable and housing, and mounted the knob in a leftover under-dash cigar lighter bracket from Moss. I ran the new wire and housing through the firewall grommet used by the original choke, insuring that I had a nice gradual loop down to the bracket on the rear carb that accepts the cable housing, and snugged the business end of the cable to the choke lever. I left the original choke knob with its wire/housing disconnected, looped and tied out of the way under the dash. I mounted my new knob out of sight under the dash, drilling a hole in the steel stabilizing rod that runs from the firewall to the bottom of the dash to mount the bracket. Since that put the knob directly ahead of my right knew, I added a flat metal extension to offset it to the right a couple of inches. By now I had checked that my new cable actually moved the jets--I still had the carb jets exposed--and both jets did indeed move down at least 1/8" with a firm pull. With the carbs back together, I let the fuel pump run a few minutes (the car hadn't been driven for a couple of weeks), pulled the choke and started the car immediately. I must confess that it was a 75 degree day here in Florida, and my original objective was to get the car to start in cool weather, but it had never previously started easily on the first try unless the engine was warm from running. Then it always started immediately. And as every sunny day has a cloud or two, I confess that I ran out of gas on my test drive and had to walk half a mile home to retrieve my gas can. This was the second time in my 77 years that I have run out of gas, and this was not as traumatic at the time my Volvo coasted to a stop on Dranesville Pike in Fairfax County, VA, at the height of the Northern Virginia traffic hour. Maybe steveg can guide me to a fix on my gas gauge, which shows empty after eight gallons are gone. I now await a really cold day here in North Florida to be doubly sure this fix works in lower temperatures. Thanks all.
Offline
RD,
Thank you for your kind comments - I assure you they will go directly to my head!
Lift up your boot floor and make sure the tank sender is properly oriented: the gauge wire should be coming off the rear of the sender - not the front.
If coming off the front, that means your sender is incorrectly oriented, which causes the float to hang up and the gauge to stop working at 1/4 tank, allowing you to run out of gas with the gauge still showing 1/4 tank.
With the sender properly oriented, the float drops into the well in the tank bottom. Otherwise it gets hung up higher on the floor of the tank, causing the false 1/4 tank display.
If the above isn't the gauge problem, you'll need to have your sender and gauge calibrated together.
I think we may have another Eureka moment on the fuel gauge. The green wire is at the front, meaning the end toward the front of the car, and the black ground wire is on the left side, standing facing the front. I've had this out previously, once to replace a leaking gasket, and I would have put it back in the way in came out. If the fuel level isn't too high, I will check it tomorrow. I had just filled the tank after my brain fade the other day, and it will certainly read full at this point. Maybe landing on my face after losing the bars on my De Rosa bike last week injured my brain, this in addition to the 12 stitches and countless bruises and contusions. Worst fall in 40 years of adult bike riding.
Offline
Scuderia Silva has a video on sender replacement on a BJ8:
https://youtu.be/AtOJ_pS9GwE
Evidently the BJ8 sender has both the float and electrical connection to the rear; the older models have the float to the front and rear electrical.
The important thing is for the float to drop into the well of the tank you have -- regardless of the orientation of the electrical connection. From these pictures, it can be seen that the well must be slightly to the front of the sender opening. With the float to the rear it would hang on the floor of the tank, showing 1/4 full.
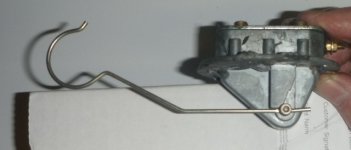 full
full
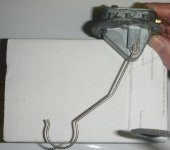 empty
empty
https://youtu.be/AtOJ_pS9GwE
Evidently the BJ8 sender has both the float and electrical connection to the rear; the older models have the float to the front and rear electrical.
The important thing is for the float to drop into the well of the tank you have -- regardless of the orientation of the electrical connection. From these pictures, it can be seen that the well must be slightly to the front of the sender opening. With the float to the rear it would hang on the floor of the tank, showing 1/4 full.
 full
full empty
empty


