• Hi Guest!
    You can help ensure that British Car Forum (BCF) continues to provide a great place to engage in the British car hobby! If you find BCF a beneficial community, please consider supporting our efforts with a subscription.

    There are some perks with a member upgrade!
    **Upgrade Now**
    (PS: Subscribers don't see this gawd-aweful banner
Tips
Tips

Alternator Conversion - Gutting the RB340 Regulator What must be done?

jjs64bj8

Senior Member
Offline
We are converting to an alternator on our 64BJ8. I have read the numerous posts on doing this and understand all but the following. What modification must be done (if any) to the RB340 regulator other than NOT RE-CONNECTING the "F" terminal wire? Some say the regulator needs gutted, if so what is done? I want to retain the regulator and use it a a connector block as many have suggested. There are several wiring diagrams as to what goes where when using an alternator which we understand. But what we do not know is the internal wiring diagram of the regulator itself. We are using a Delco 10SI alternator which many recommend.

So can I use the regulator as is as long as the F terminal is not used, or must there also be some snipping (gutting) inside? Please advise.

Thanks

jjs64bj8
 
Although I would like to say yes to your question, I actually eliminated the interior of my regulator before using it as my distribution center. My reasoning for doing so was that I did not want any possibility of causing an inadvertent electrical path I was not cognizant of or wanted. Since I expected to depend on the built-in regulator of the alternator, my regulator was faulty to begin with, and gutting the regulator was the recommended approach, I had no issue in doing so to eliminated any chance of unexpected consequence.
Ray (64BJ8P1)
 
My regulator as far as I remember (it has only been 25 years) was working with the old generator so why destroy it if I do not have to. When I finally sell the car I want the new owner to have the capability to return to the stock arrangement. I do realize new regulators are not that expensive, so for safety sake as RAC68 advises maybe the best thing to do is to eliminate any possible scenarios that could fry the new alternator system.

Thanks

jjs64bj8
 
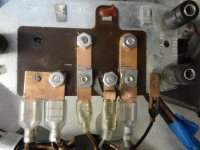
On my car with Alternator and Negative ground, regulator is intact in good shape- BUT i followed two step precaution before to utilize it as connector
1) elimination of ground contact BLACK wire (in the photos are still in place)
2) insert a hard paper piece to separate all the electrical contact of the relays
https://picasaweb.google.com/lh/photo/tp8P85mXVQhtJvG6kCO_jtMTjNZETYmyPJy0liipFm0?feat=directlink
Wiring- Follow the useful instruction of the article linked under the photo
 
We are converting to an alternator on our 64BJ8. I have read the numerous posts on doing this and understand all but the following. What modification must be done (if any) to the RB340 regulator other than NOT RE-CONNECTING the "F" terminal wire? Some say the regulator needs gutted, if so what is done? I want to retain the regulator and use it a a connector block as many have suggested. There are several wiring diagrams as to what goes where when using an alternator which we understand. But what we do not know is the internal wiring diagram of the regulator itself. We are using a Delco 10SI alternator which many recommend.

So can I use the regulator as is as long as the F terminal is not used, or must there also be some snipping (gutting) inside? Please advise.

Thanks

jjs64bj8
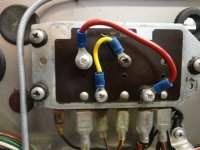
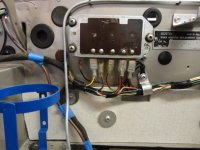
Here's mine. Also was switched to Neg ground. A New wiring harness was installed. Dash "red" light works normal. A sticker is on the Regulator cover that says "Negative Ground".
 

Attachments

  • DSC00508.JPG
    DSC00508.JPG
    141.7 KB · Views: 264
  • DSC00509.JPG
    DSC00509.JPG
    145.8 KB · Views: 241
  • DSC00495.JPG
    DSC00495.JPG
    143.4 KB · Views: 276
Thanks to all that have replied thus far. To make sure of no issues I did gut the regulator and did a similar rewire as did Patrick67BJ8. All done and installed to a new harness. Next to get motor in after 20 plus years of waiting.

jjs64bj8
 
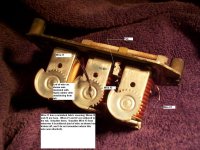
Apparently, I'm too late with my response to do you any good, but I did NOT gut the original regulator. I try to make all modifications to my car reversible so that the next owner (when I'm long dead and cold) can take it back to original if he/she wants. There are only two connections inside the regulator that need to be unsoldered to deactivate the regulator (the bare ends of the wires need to be insulated. I used liquid rubber for that). No problems after 15 years.
 
There are only two connections inside the regulator that need to be unsoldered to deactivate the regulator (the bare ends of the wires need to be insulated. I used liquid rubber for that). No problems after 15 years.

What two wires Steve???
 
Steve,

I totally agree in the ability to reverse to original and have provided that all my modification can be reversed except the installation of a large number of in-line fuses. My gutted regulator was secured from a friend that had thrown it away after screwing it up while trying to make adjustments. However, as I see it, anyone inheriting my Healey will probably not revert back to original in total and, if they wanted to, not expect to install my original generator and regulator without double checking the function. Also, I would expect that, since these are relatively common units, a replacement would be available ... as they are today.

If I did not find a faulty unit to gut, I would have gutted my original because of my lack of regulator-knowledge and insecurity of having an unthought-of path remain that could kill my alternator, start a fire, or cause an issue with the regulator's new function as a power distribution center.

All the best,
Ray (64BJ8P1)
 
Congratulations Andrea,

That seems to be the most cogent explanation of how to reposition the original regulator that I have read. As mentioned, most installations I was aware of when making my installation suggested a gutted box for secure and safe distribution although I could not see destroying my original. I was lucky enough to have access to a faulty unit for gutting and retained my original for retro-installation if ever desired. Although I appreciate you have a working alternator installation, I still see the security in gutting the regulator and eliminating any possible of external regulator inadvertent involvement. Additionally, since a replacement original-type regulators have been used by many other period cars and are still available at reasonable prices, retro-installations if ever desired should not be that costly or difficult.

good post,
Ray (64BJ8P1)
 
Hi Ray
I understand your perplexity, (joint to a good technical knowledge),
after a year of service my RV electrical system are very reliable with no issues, only the RED light need a determined sped up, to turn off--your articles and the BCForum helped me a lot
Steve continue to astonish me with brilliant solutions, the utilization of the oldest RV as relays box, for Head lights and Driver Lights exchanges, are the better solution
 
There are only two connections inside the regulator that need to be unsoldered to deactivate the regulator (the bare ends of the wires need to be insulated. I used liquid rubber for that). No problems after 15 years.

What two wires Steve???

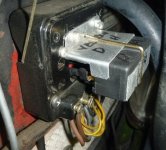
My mistake: there are three wires to unsolder, now that I look at the photograph. This was taken with a first-generation digital camera that had been dropped, so I apologize for the fuzzy quality.
 

Attachments

  • Voltage Regulator modification for alternator installation.jpg
    Voltage Regulator modification for alternator installation.jpg
    74.2 KB · Views: 312
Ray, I think most of us would agree that the quality of available replacements for just about anything on a Healey is not as good as the originals, and I doubt that would change for the better in the future. I would prefer to re-activate a de-activated original than replace it with something less; but all of that is a matter of opinion.
 
Back
Top