• Hi Guest!
    If you appreciate British Car Forum and our 25 years of supporting British car enthusiasts with technical and anicdotal information, collected from our thousands of great members, please support us with a low-cost subscription. You can become a supporting member for less than the dues of most car clubs.

    There are some perks with a member upgrade!
    **Upgrade Now**
    (PS: Subscribers don't see this gawd-aweful banner
Tips
Tips

Starting issues....

rjfoster03

Member
Offline
I have a 67" Sprite and ran into a first time issue with it.

Turned the key, cranked for about a second. Nothing after that. No clicking or turning of the engine.

I checked the battery and battery connections and these are good. No head lights, no wiper and no gages on the dash work.

I checked the fuses and none are blown and I am able to turn the engine over by jumping the connections off of the starter solenoid.

My car knowledge is limited, so I wanted to get any suggestions as to what I should check next.
 
Did you check the other end of the battery connections, i.e. where the ground cable attaches to the body and where the battery cable goes to the wiring block?
 
Might want to check the connections at the ignition switch, too. Especially if jumping the battery to the starter works. IIRC, the lead to the lights and ancillaries runs through the switch. Lose the main brown lead at the switch, and you got nothin'.
 
Or could be the Bendix drive on the front if the starter. Get a 1/4" wrench or a stubby adjustable wrench and check to see if the square shaft at the end of the starter is sticking way out. They sometimes get stuck. Wind it back in with the wrench turn hey and it will start. Keep that 1/4" with you for when it happens again.
 
Can you actuate the solenoid by supplying power to the low tension connector? If so, the problem pretty much has to be in the ignition switch or the wires to it.
 
Thanks for all the responses and suggestions. I will check the other ends of the connections to make sure that they are good, then move onto the ignition switch. From there, I will check the Bendix drive on the starter.

Is there a way to connect a meter to the ignition switch to see if it is good?

As for actuating the solenoid by supplying power to the low tension connector?
Not really sure what this refers to...... I can turn the engine over by connecting a screw driver from one side of the starter solenoid to the other end.

If you can make the engine turn over by shorting across the two high tension connections (the fat ones) then I think your starter is fine. You should also be able to turn the engine over by shorting from the non-ground post of the battery to the low tension lead on the solenoid (the small wire). This is really all that the ignition switch does to turn the engine over. If that doesn't work, then the problem is with the solenoid. If it does work, the problem is with your switch or the wires to it. The fact that other stuff doesn't come on when you turn on the ignition switch makes me think it's the switch or the wires to and from it.
 
Keith M,

Thanks for the clarification. I will see how the day goes later today and try and spend some time taking a look at things. Thanks for the response and suggestions.
 
The ignition switch is easy to remove, and once you have it in-hand, it's a snap to take apart. You can check continuity from the multi-connector through the switch connections and get a conclusive answer that way.

The inside of the switch uses spring-loaded sliding connections and wee ball bearings in detents, so be aware there are some small parts inside the switch that can fall out. A little polishing of the copper bits inside can do a world of good.

Coincidentally, I've done this very project a few weeks ago. I can upload some pics of the process if you want.
 
Wouldn't the fact that he has no headlights working suggest that the problem is with the battery ground [does the Sprite's screw into the bulkhead like a Midget's?]. The headlights should go directly from the headlight switch without having to go through through the ignition, right? The gauges, directionals, etc, would run through the ignition switch, but not the headlights. Is this correct?

Thanks,

Jeff
 
Jeff,
In my '65 Sprite the headlights do not run through the ignition switch; I don't know about a '67. I agree that the headlights not working is a little confusing, but if he can turn the engine over by shorting across the solenoid, I think that means his battery ground is OK.
 
I'd suspect the brown lead that powers up just about every thing. I like the little "ice pick" continuity tester for most work like this and I would expect a corroded connection somewhere.

Kurt.
 
bthompson,

Just in case I need to play with the ignition switch, please feel free to either upload some pictures or email any to me..... rjfoster03 (at) yahoo (dot) com.

I was hoping to get outside and re-check all connections / ground connections last night, but somehow digging a drainage ditch took over.
 
No problem, I'm glad to post them. Even if it turns out you won't need 'em, someone else might; and more pics are always better!

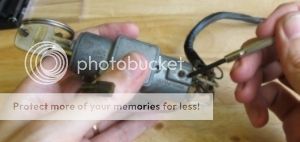
To remove the switch from the ignition lock, there's a teeny Phillips head screw on the bottom. Remove that...

IMG_2055.jpg


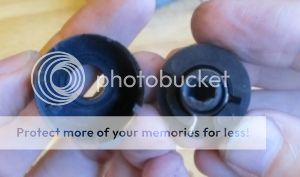
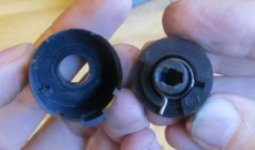
...and the plastic switch insert pulls straight out. The key tumbler ends in a small toggle, which engages a rubberized keyway on the back of the switch. With time, the keyway can get chewed up a bit.

IMG_2057.jpg


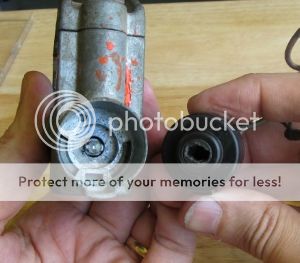
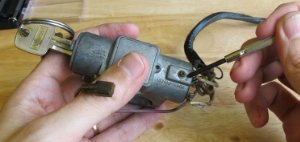
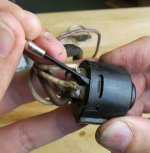
To remove the guts of the switch, there are two small plastic tangs that need to be released. A small screwdriver works well to coax the cap out of the sleeve. (Of course, pull the cap out by the terminals, not the wires!)

IMG_2058.jpg


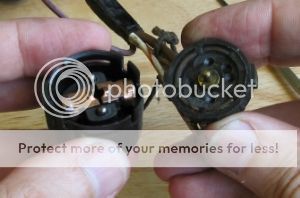
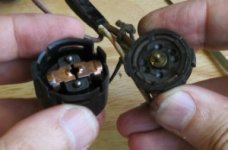
The cap removed from the switch. Three things to see here -- the current is taken from the center terminal and distributed to both sides determined by the switch position; the connections can get grungy; and there are loose bits that will probably fall everywhere in the cap removal process. This is how it's supposed to look with all in place. The balls are spring-loaded and seat into detents in the cap. That's what you feel when you "notch" the key into different positions.

IMG_2059.jpg


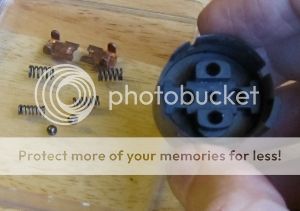
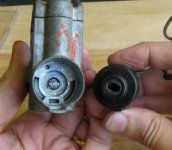
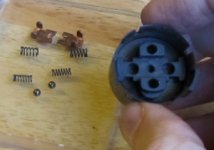
The inner switch disassembled. (Note there are two spring sizes. The smaller ones go underneath the balls.) Now the inner switch can be withdrawn.

IMG_2060.jpg


The front face of the inner switch has a spring that catches against a stop inside the shell. This is what you're pushing against when you turn the key to the start position. The stop also limits the turn of the switch. Incidentally, if your keyway is chewed up like mine was, I've had good results by trimming down toothpicks for shims and gluing them in place down in the keyway with JBWeld.

IMG_2061.jpg


With the switch apart, you can check continuity through all the wires, and make sure the connections are being made in the different positions. It's a good opportunity to take a piece of emery paper to the copper connections and shine things up, put a schmear of dielectric grease within, and button things up knowing that at least this component is working properly. Here's the same switch as before after cleaning:

IMG_2063.jpg
 

Attachments

  • IMG_2055.jpg
    IMG_2055.jpg
    38.1 KB · Views: 70
  • IMG_2061.jpg
    IMG_2061.jpg
    89.8 KB · Views: 71
  • IMG_2057.jpg
    IMG_2057.jpg
    63.5 KB · Views: 69
  • IMG_2058.jpg
    IMG_2058.jpg
    70.1 KB · Views: 75
  • IMG_2059.jpg
    IMG_2059.jpg
    47.5 KB · Views: 71
  • IMG_2060.jpg
    IMG_2060.jpg
    46.2 KB · Views: 72
Just a quick follow-up... found the issue with the starting. When I started looking at the wiring under the dash, I found an inline fuse connected onto the Red wire going into the main wiring harness was toast. Replaced the fuse and fuse holder and we are now good to go.

Thanks for all the all the responses and suggestions.
 
Those inline fuses can be quite a pain in the tush! I spent hours trying to troubleshoot why I had no rear running lights or tag lights, but brake and turn signals were okay, only to find that I, too, had a toasted inline fuse under the dash. I had to invent a whole new yoga position to get to the fuse holder and replace the fuse.
 
Back
Top