• Hi Guest!
    You can help ensure that British Car Forum (BCF) continues to provide a great place to engage in the British car hobby! If you find BCF a beneficial community, please consider supporting our efforts with a subscription.

    There are some perks with a member upgrade!
    **Upgrade Now**
    (PS: Subscribers don't see this gawd-aweful banner
Tips
Tips

Front Suspension Rebuild

JDMTX

Freshman Member
Country flag
Offline
Hello Everyone,

I'm working on the front suspension of my 1960 Mark I and have run into a few issues (the suspension unit, upper and lower arms, hub, and brake unit have all been removed from the vehicle):

1. I am unable to remove the nut on the top of the kingpin. I have tried heating it and but with force this only turns the entire kingpin within the lower trunion;

2. I am unable to remove the nuts from the 5 bolts that hold the brake disk to the hub. The nuts appear to have some sort of locking washer on the top of the nut that holds the nut in place and I can't find a way to remove the lock washer; and

3. I do not have the tool to remove the dust cap inside the front hub. I'm thinking there has to be a way to do this without the special tool.

I appreciate any advice you all can offer on any or all of these items. Thanks,
 

1. I am unable to remove the nut on the top of the kingpin. I have tried heating it and but with force this only turns the entire kingpin within the lower trunion;
These nuts are either castellated with a cotter pin inside or nylock. If castellated, did you remove the cotter? If pin removed or nylock, apply plenty of heat until cherry red and use a long breaker bar while holding the kingpin in one position. It should come off.

2. I am unable to remove the nuts from the 5 bolts that hold the brake disk to the hub. The nuts appear to have some sort of locking washer on the top of the nut that holds the nut in place and I can't find a way to remove the lock washer; and

Not sure about lock washer, might help if you posted a picture. Otherwise, same thing heat and a big breaker bar

3. I do not have the tool to remove the dust cap inside the front hub. I'm thinking there has to be a way to do this without the special tool.
A 5/16 = 24 coupling nut will fit on the bolt end of the dustcap. Thread a long 5/16=24 bolt in the other end and use a pair of vise grips or a claw hammer to yank it out. May help to squirt some penetrating oil inside the hub first.


Best of Luck


AN impact wrench might help
 
Sounds like you need a penetrating agent like Kroil or PBblaster.

3. Using the coupling per Healey Rick above, you can make a slide hammer with a large socket:

DustCapSlideHammer.jpg


Modify slightly for installer. Combo of washer and socket holds cap straight when tapping in with hammer:

DustCapInstaller.jpg
 
Last edited:
Alternatively:

I just added a large fender washer to mine then a nut which you tighten down and it will pull the cap off.


I could not find my picture but it is similar to the one shown above
 
Having just had the fun of doing mine.
when you remove the hub unit with the disc, you will find there are nuts on the back.
i wondered until I removed the hub from the king pin.
 
Another tip, when doing the bushing for the bearings, try the dry build of the car, easier to fit the thin spacers than when on the car working from the side.
 
Thanks everyone for your insight; it is greatly appreciated.

HealeyRick, the nut on the top of the kingpin is castellated and I have removed the pin. I'll try to heat it up to a higher temp. I have a 24 inch breaker bar but so far it has not moved.

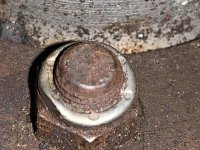
Here is a picture of the lock washer on top of the nut holding the disk to the hub. As you can see, one side has a small flat area but the other side doesn't so I have not been able to get a good grasp on it; plus it's a tight work area. I think once I'm able to get the lock washer off I'll be able to break the nut loose and remove the disk.

IMG_0553.jpg
 
Here is a picture of the lock washer on top of the nut holding the disk to the hub. As you can see, one side has a small flat area but the other side doesn't so I have not been able to get a good grasp on it; plus it's a tight work area. I think once I'm able to get the lock washer off I'll be able to break the nut loose and remove the disk.

View attachment 64758

JDMTX, that silvery ring is permanently attached to the nut and holds nylon or some other material designed to grip the threads, commonly referred to as a nylock nut - it is not a separate part. The silvery ring is small enough diameter for a socket that fits the nut to go right on over it. Just ignore it and grip the nut below (probably 9/16") and remove.

Dave

Yes, it's a Nyloc. Looks like it's pretty rusted on as well. I'd first soak it with a penetrant for a couple of days and then apply plenty of heat to cherry red to melt the nylon and loosen the rust. Slip a long length of pipe over that 24" breaker bar for both the wheel and kingpin nuts. Leverage is your friend.
 
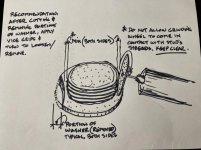
This is another approach I would do if washer was too stubborn to remove. If worse comes to worse, those little dremels work wonders. You will need to exercise care to protect yourself and avoid scarring/damaging stud threads, etc, in the process. Further, articulation is the key. You want to remove as much of the washer at the stud without cutting into the stud threads, thereby creating adequate weak points to the washer, only.

I have used this method in the past with success. I also suggested cutting into the washer and close to the stud threads in order to create two weak points opposite each other (on the washer). What has happened for me is the washer (or nut, etc.) will fail (break apart) upon twisting/turning of the *vice grips.

*no need to over tighten.

Washer removal at stud (800x600).jpg
 
This is another approach I would do if washer was too stubborn to remove. If worse comes to worse, those little dremels work wonders. You will need to exercise care to protect yourself and avoid scarring/damaging stud threads, etc, in the process.

I have used this method in the past with success. I also suggested cutting into the washer and close to the stud threads in order to create two weak points opposite each other (on the washer). What has happened for me is the washer (or nut, etc.) will fail (break apart) upon twisting/turning of the *vice grips.


*no need to over tighten.

View attachment 64771

Your hand must be steadier than mine. I have difficulty doing this without munging up the threads on the stud. Maybe you could run a die on them afterwards to restore, but I'd only try it as a last resort.
 
Ok, Healey Rick, fair enough.

Guess I have used this approach and the use of a dremel so many times, I forget how steady a hand is needed.

I only need to worry about eye protection (first and foremost) when working away!
 
Ok, Healey Rick, fair enough.

Guess I have used this approach and the use of a dremel so many times, I forget how steady a hand is needed.

I only need to worry about eye protection (first and foremost) when working away!

At least we'll give JDMTX a couple of options to try and see what works best for him.
 
Back
Top