Hey Guest!

 Hey - did you know if you click on the title of a thread it will take you to the first unread post since you last visited that thread?
 but were afraid to ask:
  STOP!! Never post your email address in open forums. Bots can "harvest" your email! If you must share your email use a Private Message or use the
  smilie in place of the real @
 Pretty Please - add it to our Events forum(s) and add to the calendar! >>
SteveBones
Jedi Trainee
Offline
Hello,
First I will start with some background. This is a newer for me 1958 TR3A. I have owned the car for close to a year and have been working on a number of things. The way I would describe it, the car is in great condition, was repainted some time ago, and I expect during reassembly, there was not an experience TR3 person involved in the process. I have found a number of things reassembled incorrectly and not working correctly. I am now working on the wiper motor. It was working when removed, but the park location was not working and the wipers were rotationing 4 or more inches past the windshield frame. I decided to remove the wiper to clean up and repaint the center section wrinkle black as original.
Prior to removing, I tried resetting the park unsuccessfully. I do not even recall that the park was working at all. So I really need to take a start from the beginning approach to setting up the wiper motor and park position correctly. Please see below for questions I have and also please add key items I have missed:
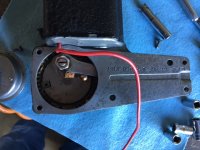
1) With the wiper motor gear cover removed, their is what looks like a brass contact (see picture). What is the correct positioning for this contact? And what is the reference for positioning? Do I use the gear cover raised spot as the reference (see picture)?
2) Regarding the wiper motor gear cover, I noticed the small "bump" pointing close to where the wiper shaft hooks up in some photos on some TR3A pictures on the internet and about 180 degrees the other direction in others. Is there a good starting point for positioning this gear cover "bump" when I reassemble the wiper motor?
3) Another issue is with a ground wire. As mentioned my TR3A is a 1958. I only noticed the two green wires connected to the wiper motor. I have seen pictures of TR3A's that also include a ground wire connected to the third screw to the wiper side cover plate. I recall that this might also be needed in order for park to work (please confirm). My TR3A did not have this black wire connected. Is this black ground wire separate from the wiring harness? Meaning can this be added? If it can be added, is one end connected to the screw on the side over plate and the other end to one of the wiper motor bolts on the car body?
Thanks in advance for your help in correctly setting up my wiper motor.
First I will start with some background. This is a newer for me 1958 TR3A. I have owned the car for close to a year and have been working on a number of things. The way I would describe it, the car is in great condition, was repainted some time ago, and I expect during reassembly, there was not an experience TR3 person involved in the process. I have found a number of things reassembled incorrectly and not working correctly. I am now working on the wiper motor. It was working when removed, but the park location was not working and the wipers were rotationing 4 or more inches past the windshield frame. I decided to remove the wiper to clean up and repaint the center section wrinkle black as original.
Prior to removing, I tried resetting the park unsuccessfully. I do not even recall that the park was working at all. So I really need to take a start from the beginning approach to setting up the wiper motor and park position correctly. Please see below for questions I have and also please add key items I have missed:
1) With the wiper motor gear cover removed, their is what looks like a brass contact (see picture). What is the correct positioning for this contact? And what is the reference for positioning? Do I use the gear cover raised spot as the reference (see picture)?
2) Regarding the wiper motor gear cover, I noticed the small "bump" pointing close to where the wiper shaft hooks up in some photos on some TR3A pictures on the internet and about 180 degrees the other direction in others. Is there a good starting point for positioning this gear cover "bump" when I reassemble the wiper motor?
3) Another issue is with a ground wire. As mentioned my TR3A is a 1958. I only noticed the two green wires connected to the wiper motor. I have seen pictures of TR3A's that also include a ground wire connected to the third screw to the wiper side cover plate. I recall that this might also be needed in order for park to work (please confirm). My TR3A did not have this black wire connected. Is this black ground wire separate from the wiring harness? Meaning can this be added? If it can be added, is one end connected to the screw on the side over plate and the other end to one of the wiper motor bolts on the car body?
Thanks in advance for your help in correctly setting up my wiper motor.