• The Roadster Factory Recovery Fund - Friends, as you may have heard, The Roadster Factory, a respected British Car Parts business in PA, suffered a total loss in a fire on Christmas Day. Read about it, discuss or ask questions >> HERE. The Triumph Register of America is sponsoring a fund raiser to help TRF get back on their feet. If you can help, vist >> their GoFundMe page.
  • Hey there Guest!
    If you enjoy BCF and find our forum a useful resource, if you appreciate not having ads pop up all over the place and you want to ensure we can stay online - Please consider supporting with an "optional" low-cost annual subscription.
    **Upgrade Now**
    (PS: Subscribers don't see this UGLY banner)
Tips
Tips

Starter field coil for BN1

moremonkey

Senior Member
Country flag
Offline
About a year ago I replaced the modern gear reduction starter in my car with the original starter. (I prefer the look and sound of the original starter even though it has a lot less oomph.)

Anyway, I had what I think was a solenoid issue last summer, and I finally replaced the solenoid today. When I tried to start the car, however, the starter was sluggish and the cable running from solenoid to starter got warm. Ok, it got hot.

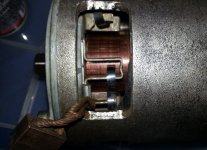
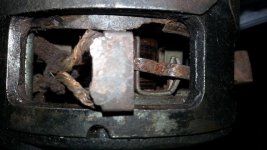
I disconnected the battery and pulled the starter. It's been making me a little nervous since I installed it...I'd had it rebuilt but when I installed it last year (hmm, maybe two years ago) the copper post was loose. I let myself think that was ok.

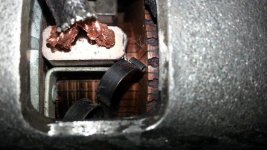
So today when I opened the starter it looks like I spun the post and kinked the copper ribbon of the field coil. Monkeying with the starter cable and solenoid today must have made the field coil move a bit and it contacted/shorted on the armature. Thus the hot cable and sluggish starter. Ok, and the smoke.

Here are my questions:

1) Is there a source for replacement field coils?

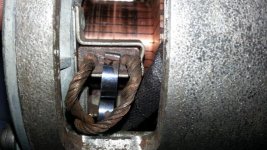
1a) If not, what should I use to rewrap the coils...the cotton tape is disintegrating.

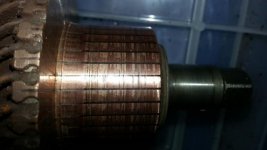
2) When I'm all done, how do I get the brushes to push back to seat on the armature so the starter can go back together?

It it isn't a particularly complicated piece of equipment and I suspect there is an easy way to get it back together. This job seems like one where finesse and experience will carry the day.

-Jonathan
 

Bob_Spidell

Yoda
Gold
Country flag
Offline
I just had my generator rebuilt by Star Auto Electric. I had several email exchanges with owner Mike Martinez, who told me he replaces the field coils (new) and armature (rebuilt; new not available) as standard practice. You might contact him and ask if he does the same for starters. I know you just had yours rebuilt, but since you had an internal short and other damage it probably needs a thorough going-through. Turnaround was about 3 days not counting shipping.

NFI: starautoelectric.com

ps. If Star did your rebuild and left the post loose, well, nevermind (and please let us know).
 

Keoke

Great Pumpkin
Country flag
Offline
N Then again you might put old starter ina bin and buy new!:playful:
 
OP
M

moremonkey

Senior Member
Country flag
Offline
Thanks for the helpful reply Keoke. But isn't there anyone out in the British Car Forum world who has rebuilt one of these things at home? I figure Healey people, of all people, would not embrace the "throw it away and buy a new one" mindset.

Bob, the rebuild was done by a local guy. My expectation was that he would do more than put in new brushes. Clearly he and I had different ideas of what a rebuild encompassed. I don't mind learning a new skill but would like to avoid reinventing the wheel here.

As for the loose post, I think it was a combination of already loose, already a little galled, and too much wrench on my part.
 

CraigC

Jedi Trainee
Country flag
Offline
About a year ago I installed a gear reduction starter. While I like the way it performs, I, too, miss the old Lucas starter noises and dislike the sound of the new starter. Might be partly because it sounds just like the Toyotas I make a living servicing. :wink-new:


For a long time, I kept a spare original starter on hand. When it came time to install that one, I decided to repair the one I removed. Since it looked like the only real problem was with the field coil insulation disintegrating and the coils shorting out, and they were(and still are) available from Moss, I took a shot at just installing just the coils. Didn't work out too well. As an auto repair professional, I knew that reinstalling the coils and field shoes required a proper tool for pressing them into position while tightening the mounting screws, but figured I could just "wing it".

Since I have replaced the Lucas starter with a gear reduction unit, I have been meaning to revisit the issue, putting the armature and brush assembly from the working unit into the case that has the new coils. This might tell me that the coil install was actually OK.
At this point, if I had it to do over, I would have acquired the field coils and sent them, along with the starter, to a rebuilder. I would suggest you do the same.

Also, since the aforementioned Star Auto Electric is only 15 miles from me, mine just may end up there in the long run.
 
OP
M

moremonkey

Senior Member
Country flag
Offline
Craig, you may have scared me off from messing around in the starter too much. Right now my plan is to see if I can push the copper ribbon back into position properly and get the starter to work without shorting. If I can do it, great. If not, I'll look into sending the starter to Star Auto Electric for some love.

I guess one benefit of living in Maine is that I have months and months of winter to get this issue sorted before the weather is right for a Healey. In the meantime I've given myself until the weekend to get the starter to work. After that deadline I'll push the Healey out of the "working on the car" garage spot and shuffle in the next winter project. (Shifter bushings for a 2004 BMW 330ci. That's a task: need to remove the exhaust and driveshaft to get to the bushings.)

-Jonathan
 
OP
M

moremonkey

Senior Member
Country flag
Offline
Craig, one more question: do you remember any special technique, besides patience and a poking tool, that is necessary in order to get the armature to slide past the spring-loaded brushes when I put the starter back together?
 

Bob_Spidell

Yoda
Gold
Country flag
Offline
Craig, one more question: do you remember any special technique, besides patience and a poking tool, that is necessary in order to get the armature to slide past the spring-loaded brushes when I put the starter back together?

I seem to recall, when I was futzing around with my generator, that there was a means to do this. Look for a hole or something in the brackets that hold the brushes in which you could insert a small drill bit or similar to hold the brushes back. If not, you might be able to '****' the brushes in the brackets--effectively jamming them--to be released after you've got the armature installed. Wish I could recall exactly what I figured would work, but I do recall being confident it could be done.
 

CraigC

Jedi Trainee
Country flag
Offline
Interesting. The Star Auto Electric Bob referred to is in Monrovia, CA

Down in the LA area. Unfortunately, shipping ain't cheap; it was about $40 from San Jose via UPS.

You guys are right. When I Googled the name a similar one came up that was local to me and I didn't catch the difference. I should have known better as I do recall looking them up several years back.

Craig, one more question: do you remember any special technique, besides patience and a poking tool, that is necessary in order to get the armature to slide past the spring-loaded brushes when I put the starter back together?

What I have done in the past is lift the spring up and push the brush back and under it. Release the spring so it sits on top of the brush and holds it in place during assembly. Once the end plate is installed, put the spring back in its normal location at the end of the brush. I'll see if I can get a picture of this later today.
 

RAC68

Darth Vader
Offline
Hi Jonathan,

I applaud your interest and intent on fixing rather than replacing ... at least till you find it is unsalvageable. Although I do intend to replace my starter with a gear reduction starter soon, and did replace my generator with an alternator, I keep the original components and design all changes and new mountings to be 100% reversible in both appearance and components (except the installation of key circuit in-line fuses). Although finding someone to rebuild a "LUCAS" starter locally is not easy, I have found that there are many local organizations that will rebuild electric industrial motors and have the expertise, equipment, and supplies to do the job. I had my Triumph starter rebuilt and, a while back, my Healey's starter.

Also, check the engine ground strap for good continuity. In 1989, when finally coming to the end of my Healey's refresh and first starting the engine, I noticed some smoke coming from the protective lubrication I placed on my carburetor linkage. As it turned out, I had forgotten to reconnect the engine ground strap to the frame and caused the starter to turn slowly as a result of using the carburetor linkage as its path to ground.

All the best of New Year Luck,
Ray(64BJ8P1)
 

CraigC

Jedi Trainee
Country flag
Offline
Spent some time in the garage with my original starters, swapping the armature/shaft/bearing from one case w/coils & brushes to the other. Tested the most recently used starter and remembered immediately why I changed it out. There was a serious bushing noise whenever the starter was slowing down. After the parts swap that noise followed the brush end from that starter. The brushes from that one were also very heavily worn. Might have been 1/2 the size of new. See pics below.

While I did use the method I described above, I found a little problem that I had forgotten. If you look at the pics, there is one that shows the brush spring moved off the top of the brush and towards the armature. Comes apart fine but leaves two potential problems for assembly. The first problem is that the spring can fall off the corner of the brush holder and now you have to get it back to that same angled position. The other is that it can be trapped between the holder and the armature. I suggest scrapping that method entirely.

THE BETTER METHOD. It is pretty easy to just pull the brushes up and out of their holders. The spring will move out of the way by itself or may need a little "help" from a 90 degree pick(see tool pic). You can the just let the springs rest on the side of the brush holder. For reassembly, lift spring with the pick, guide brush into holder and let spring back down onto the brush. Make an effort to ensure that the spring is sitting directly on the brush, not on the wires.

COMMUTATOR. The commutator I have pictured is not what they should look like. This one will work, put is quite worn and will wear out the brushes fairly quickly. Servicing a commutator like this one is best left to a professional rebuilder. A rebuilder should also test the armature on a tool we called a "growler". It is used to test the electrical integrity of the windings.

BRUSH. The 2nd to last pic is the side view of a worn brush. It's about 1/2 the normal height. When they get worn this badly, the brush spring is almost at the point where it is resting on the holder, not on the brush. This starter had the original field coils that I had attempted to re-insulate many years ago. Should have had new field coils and brushes fitted.

TOOLS. Those two items are all that is needed to remove and install an armature/shaft/bearing plate assembly from the case w/brush holder end plate. If you want to remove the brush holder/end plate, you will also need the appropriate wrench to remove the nuts from the cable stud. Pay very close attention to the washers on this stud. They serve to isolate the stud from the metal of the end plate. Get them wrong and you will have a dead short when power is applied to the starter!
 

Attachments

  • brush3SM.jpg
    brush3SM.jpg
    53.8 KB · Views: 71
  • Brush4SM.jpg
    Brush4SM.jpg
    166.8 KB · Views: 75
  • BrushSM.jpg
    BrushSM.jpg
    69.1 KB · Views: 75
  • CommutatorSM.jpg
    CommutatorSM.jpg
    34.1 KB · Views: 72
  • WornBrushSM.jpg
    WornBrushSM.jpg
    51.9 KB · Views: 71
  • ToolsSM.jpg
    ToolsSM.jpg
    117.5 KB · Views: 69
OP
M

moremonkey

Senior Member
Country flag
Offline
Well, the pictures were a revelation. When I first saw them I figured something was wrong because my starter didn't have the access ports. Then I realized "aha! The big metal band isn't a giant hose clamp, it is what covers the access to the brushes." So I got the starter back together pretty swiftly and will test it tomorrow.

I also think I've figured out what went wrong in the first place. It's one of those, "for want of a nail the shoe was lost, for want of a shoe the horse was lost" situations. It seems the guy who rebuilt the starter for me returned it with A too-small nut on the stud. So when I installed the starter I never realized I was spinning the stud until it was too late. By then the field coil was disturbed and intermittently shorted, and the cable from the solenoid was never truly snug anyway.

I'll get get a proper nut tomorrow and give it a go. Right now it is all back together, thanks to the newly discovered access ports.

Finally, although I do not lose sleep over this kind of detail, should the starter be green or black? Mine is black, which has the benefit of hiding all the grime it picks up. But Craig's glossy green starter sure does look nice.

image.jpgimage.jpg
 

CraigC

Jedi Trainee
Country flag
Offline
What you are referring to as "glossy green" in my photos is actually bare metal. I cant remember if there was Healey Green under the black when I stripped it. I'll take a scraping off of the other one and see what is under the black paint.
 
OP
M

moremonkey

Senior Member
Country flag
Offline
Oh I wouldn't go to the trouble of scraping the paint. The most my starter can expect from me is a wipe down with a moderately clean rag. The day I take steps to make sure my starter is the correct color is the day I've completely run out of legitimate ways to occupy my time.
 

CraigC

Jedi Trainee
Country flag
Offline
It's actually something I was wondering about as I put them back on the shelf. The one with paint has a date code of 8/57, is currently black but it is in really poor shape. Scraping some off to see the color "history" is no biggie. I did notice in the "worn brush" pic what looks like some green on the long housing screw.
 
Similar threads
Thread starter Title Forum Replies Date
D Lucas starter motor field assembly Jaguar 3
R TR6 Starter Solenoid Conection Triumph 11
R TR6 Lucas Starter 2M100 - Extra Part? Triumph 2
G TR2/3/3A TS37903F Is my engine a TR3A engine because my starter says no. Triumph 3
Frameman 1949 Engine Misfiring & Starter Cranks Slowly When Hot Austin Healey 8
G TR2/3/3A TR3 starter disassembly rebuild early M428G bomb Triumph 6
N TR5/TR250 Starter Box Assembly Leak Triumph 14
P TR2/3/3A British High Torque starter Triumph 6
W General Tech 2500S starter motor and fuse box questions Triumph 3
EWD For Sale ‘74 TR6 original starter Triumph Classifieds 0
M High-Torque Starter Austin Healey 10
W Generator and Starter Long Bolts Spridgets 0
H Lucas Starter Model for 3000 Mark II, BT7 Austin Healey 3
R Bugeye Starter Switch Spridgets 7
B General MG Remote Starter Switch MG 6
S MGB MGB Starter Woes MG 13
M TR6 Starter Relay on a 73 TR6?? Triumph 22
edkap2002 TR6 starter motor advice Triumph 12
algot1901 1950 Prefect starter Other British Cars 1
Martinld123 High-Torque Starter Austin Healey 4
R TR6 Starter wiring question Triumph 6
S TR2/3/3A Rebuilding the early tr3 starter Triumph 5
RichB4493 TR2/3/3A TR3 not starting - Slow/Weak Starter Triumph 33
B TR4/4A High Torque Starter Wiring Triumph 9
algot1901 1950 Prefect Starter Other British Cars 10
S Starter Solenoid Nut Size for BJ8 Austin Healey 1
B High-Torque Starter Rattling Noise Austin Healey 3
EWD TR6 ‘74 TR6 Starter & Trans Cover Triumph 13
Jim_Stevens TR2/3/3A Starter/ring gear engagement Triumph 11
J TR6 72 TR6 starter problem Triumph 10
A TR2/3/3A Early TR3 starter (bomb style) bushings sizes Triumph 7
C MGA Change a pull starter to a push button system MG 6
Michael Oritt Starter Button Austin Healey 19
D WOSP Starter Austin Healey 9
DrEntropy MGB Replacement starter MG 7
steveg TR6 '74 - Where is the Starter Relay located? Triumph 1
AUSMHLY Crankshaft Starter Nut Austin Healey 10
K For Sale Triumph TR3 Bullnose Starter Triumph Classifieds 0
B TR4/4A Starter dog bolt Triumph 15
D Starter Austin Healey 26
red57 What starter is this? Austin Healey 6
S TR2/3/3A Correct Starter Triumph 4
Jim_Stevens TR2/3/3A No Ignition light and no starter Triumph 11
R TR6 Is this a starter issue? Triumph 6
Got_All_4 TR2/3/3A Gear reduction starter problems Triumph 5
John_Mc TR6 Starter not engaging consistently Triumph 9
R TR2/3/3A Starter rear plate 54 TR-2 Triumph 12
M TR6 Starter lagging issue Triumph 2
Gliderman8 Starter keeps running TVR 20
B TR2/3/3A Starter catches 50% of the time Triumph 15

Similar threads

Top