• Hey Guest!
    British Car Forum has been supporting enthusiasts for over 25 years by providing a great place to share our love for British cars. You can support our efforts by upgrading your membership for less than the dues of most car clubs. There are some perks with a member upgrade!

    **Upgrade Now**
    (PS: Upgraded members don't see this banner, nor will you see the Google ads that appear on the site.)
Tips
Tips

TR4/4A This head gasket doesn't look right to me - cooling passanges partially blocked?

tdskip

Yoda
Country flag
Offline
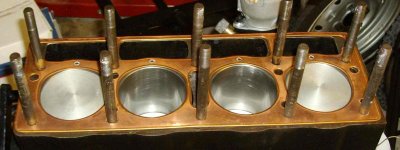
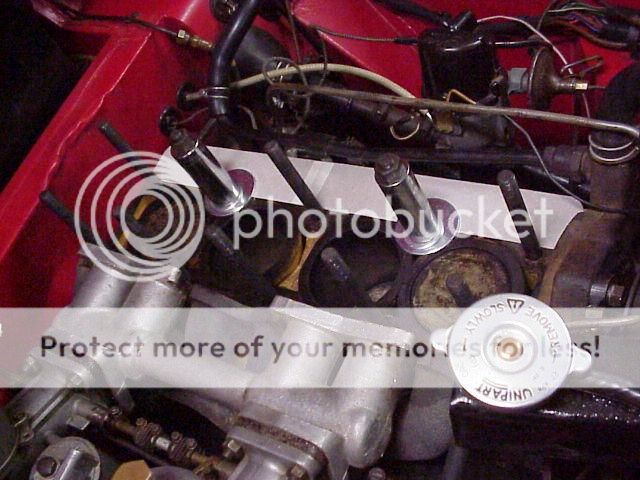
Hi folks - finally got the head off the '67 TR4a that was blowing coolant out the expansion tank, running hot, and where I found coolant in the oil. I didn't see any coolant pooled in the pistons, but I did find several places where the head gasket appears to partially block coolant passages.

Here are some pictures of what I found;

July and August 2016 196.jpg

July and August 2016 198.jpg

July and August 2016 192.jpg

July and August 2016 199.jpg

I also found what I think is an issue with one of the heads studs - grove on the threads,

July and August 2016 190.jpg
 
Head gasket mismatch may be pretty typical. I have certainly noted before the difference between those long curved head passages and the little hole in the gasket:

attachment.php
 
The groove on the stud threads is normal; intended to ensure that any oil in the blind hole doesn't keep the stud from bottoming. I'm not sure if they were all like that, but many of them were. (The groove is often filled with gunk and not obvious.)

I've always seen some misalignment between gasket holes and passages, not sure why. Yours do seem more extreme than I recall, but I doubt that is the problem.

I have seen several cases now where the head gasket only leaks one way (combustion into the water jacket), and only while the engine is running under power. Haven't fixed the Stag yet, but on the TR3/A the problem was lack of liner protrusion only on one side. Suggest you check it carefully.

This is a "shade tree" fix, but works for me.


PS, where I've seen trouble with studs is always the threads just under the nut. Clean but don't chase them, then try spinning a new nut down the threads. If it binds about 2/3 down, the threads are stretched and the stud should be discarded.
 
Thanks guys.

Is there a way to better match openings/passage ways?

I know I need to check liners, but anything else I shoukd be thinking about at this point?

Thank you!
 
Apart from the above....Be careful when you purchase a new head gasket . Do not assume that it is made correctly. I had to buy a couple off different sources before I found one that fitted properly.
 
Going from my unreliable memory, it seems that some of the older head gaskets only went on one way and were marked "front" on the gasket, but perhaps I'm thinking of something else.
Tom
 
So had a chance to look more closely at the head gasket today and it looks to me like the gasket actually covered part of the piston area - in other words the gasket overlapped the open cylinder;


I found wetness here in the well that the stud went into - stud on intake/exhaust side closest to the firewall - is that normal? I did spray penetrating oil on it several times.


Thanks for the coaching and info!
 
Certainly not right. However, I think I'd measure the cylinder heights, get a new gasket, inspect the head for damage and flatness, then put it back together.
Tom
 
Thanks Tom.

Can I check the head at home or does it need to go to a machine shop for that?

Andrew - looks like they used a poorly fitting one here, ugh.
 
You can check it with a straight edge but if you have any doubts a machine shop would be the best bet.

I thought mine looked fine but when the shop skimmed it they found some small low areas. As much work as it was to get it off.

David
 
Thanks David.

Curious - when I check my liners what happens next if they are not the correct height? Too low = next steps? Too high = next steps of? Thinking that fixed depth issues on the liners is nontrivial....

Thanks for all of the help - engine internals are new to me so thank you all for he education!
 
I wouldn't worry too much about the old gasket -you can't re-use it anyway. But just to be sure you know, do not turn the engine over with the head off, unless you secure the liners (by removing a stud and bolting them down) or you could possibly move a liner and disturb the figure-of-8 gaskets under the liner. In my opinion, it's not healthy to start thinking about 'what if' until you know you have an issue with liner protrusion. Just check it, and move on.

Here's a pic of my gasket before I put the head on. You will notice the hole around the cylinder is not round. Gaskets are made for numerous configurations, including piston liner size, so don't be too alarmed by what looks odd. Sometimes 'odd' is normal (I should know). One important thing to see is the thin area between the flats of the neighboring liners -the gasket is very thin there. That spot is another good thing to worry about...
 

Attachments

  • head_gasket.jpg
    head_gasket.jpg
    40.2 KB · Views: 130
...But just to be sure you know, do not turn the engine over with the head off, unless you secure the liners (by removing a stud and bolting them down) or you could possibly move a liner and disturb the figure-of-8 gaskets under the liner...

A couple of big washers and two long sockets can be also be used to clamp the liners prior to turning the engine. I also put cardboard over the wells for the pushrods because I know how clumsy I can be:

head1_zpswsciuhzi.jpg
 
Curious - when I check my liners what happens next if they are not the correct height? Too low = next steps? Too high = next steps of? Thinking that fixed depth issues on the liners is nontrivial....
Sometimes, just replacing the "figure 8" gaskets will fix the problem.

In addition to the workaround I gave above, you can buy Fo8 gaskets in various thicknesses. Gasketworks (Mordy Dunst) is one source, no doubt there are others https://www.headgasket.com/index.html (I don't see them on the web site, but I know Mordy does them. IIRC cost was around $80/pair, with a lot of different thicknesses available.)

Another solution is to have either the block top surface machined (to bring the liners higher), or the liner seats machined (to take them lower). Machining the block surface is also the way to correct the problem I found, of the liner tops not being square to the block surface. Machining the top surface (known as "decking the block") is a common operation, any auto machine shop should be able to handle that. Remachining the seats may be a bit trickier since it's a much less common operation and I suspect will require a special cutter.
 
I would clamp them down with washers before I checked the liner height. Used thick washers and pieces of black iron pipe cut to the appropriate length. It is good practice and insurance to clamp them down as soon as the head comes off to insure they do not get disturbed.
If you have to replace the Fo8 Gaskets make sure the block walls are very clean so that no particles get disturbed when you reinstall the liners.

David
 

Hi guys - hope it was a good week for everyone.

These studs had some resistance when I threaded the nut down, the position of the nut is where the resistance was felt. Per Randalls coaching above, do these need to be discarded?

If these do need to go, should I just replace them all with performance ones to be on the safe side or is that just needless work?

Also - I did take a flat ruler and check the head and it appears flat.

Thanks!


I'd replace them, since you're having sealing problems. Whether to go with ARP or stock is up to you & your pocketbook; I seem to be getting by with originals. But if you do go with ARP, replace the entire set.
 
Back
Top