• Hi Guest!
    You can help ensure that British Car Forum (BCF) continues to provide a great place to engage in the British car hobby! If you find BCF a beneficial community, please consider supporting our efforts with a subscription.

    There are some perks with a member upgrade!
    **Upgrade Now**
    (PS: Subscribers don't see this gawd-aweful banner
Tips
Tips

Front Wheel Clearing of BN7

Seems like lowering the spring pan by two inches is an awful lot. Might as well put in the correct springs while you are at it.

I think we are forgetting something
If we want to lower the car 2" it would only require dropping the pan 1"

However ,I agree with Cleah.
 
Before buying new springs, you may want to try lowering the front spring pans by inserting some spacers between the A arms and the pans.
I share the opinion of CLEAH that lowering the car by the spacers is a lot, although I must admit that I also thought about this alternative.
 
Well, since you have a high probability that you will be buying new springs I suggest for a trial and maybe a permanent modification that you cut 1/2 of a coil out of your springs. This was routinely done by the early "Hot Rodders" here in the states and is still routinely done even now. If the spring rate is not too harsh after this is done you can just keep it that way. Only cut 1/2 of a coil at a time. The drop is proportionately fast.
 
Gents,

got new coils from the stock as you suggested. Please see the attached picture: according to the catalogue the left one is for early BN6 cars, the right one for later BN6 cars and all following models.

Currently I have the right one in my car. This is 26 cm (i.e. about 10 inches). The left one is 30 cm (i.e. close to 12 inches). Should I give the longer coils (the left one fr early BN6) a try in order to "lower" my car or does this make no sense?

Volker

IMG_0851.jpg
 

Attachments

  • IMG_0851.jpg
    IMG_0851.jpg
    70 KB · Views: 88
Volker,
Since the spring is removed from the front end, and the anti- sway bar is detached, it is a good time to check the movement of what is s left. Check to see if you have the correct range of motion ( upward, especially ). Something might have been incorrectly positioned before tightening. Send more pictures of what you have, please.
Bob
 
Volker,

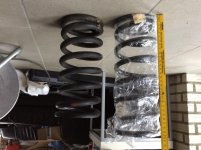
Although the length of the left spring in the picture is longer, it may be weaker in resistance to deflection and, when compressed in the car and under load, could cause the car to drop further. Since the spring is held to a fixed length when installed in the car, its initial free length has little significance to its compression potential. Your current (right pictured) spring has been compressed over years of deflections and lost some of its length. However, the new unused left spring has not been compressed and will compress when installed to provide proper resistance. Additionally, as with new rear springs, you may expect that the new front springs may take time to settle in to a final height.

One last thought. Have you rebuilt your front suspension. If so, I would check to see if your bushings (upper and lower sets) are not binding and causing the suspension not to fully settle.

Ray(64BJ8P1)
 
What I notice from the photos is that the wire for your springs is noticeably thicker than the wire on the new springs. That makes them much stiffer and they will compress less than the new ones.
 
One last thought. Have you rebuilt your front suspension. If so, I would check to see if your bushings (upper and lower sets) are not binding and causing the suspension not to fully settle.

Ray,

what do you exactly mean by "are not binding"? Shouldn't I tighten the nuts not so hard? The bushing itself are new. I rebuold the fr t suspensin last year without changing the coil springs.

Volker
 
Check out the Moss diagram. Part # 65 in the picture is the fulcrum pin. The bushes ( threaded caps ) are # 68 and # 70.
The up and down movement of the suspension rotates the caps on the threads of the fulcrum pin. It is not the tightening of these caps, but the centering along the threads, that allows full range of motion. They are locked in place after adjustment, with the collar pins. Workshop manual needed for correct sequence.
Bob
 
Hi Volker,

Bob has it correct. the bushings must allow the pins to move through the full travel of the suspension. If binding does happen after installation, it is not uncommon for the suspension to be held higher then appropriate and not settle down. If you had rebuilt your suspension and immediately after, experienced the problem, I would lean toward an improper suspension rebuild and binding bushings. However, if your issue appeared without a suspension rebuild or the rebuild happened a while before with the car performing properly after, then I would eliminate consideration of that potential link.

Hope this helps,
Ray (64BJ8P1)
 
Gents,

at the current state (front suspension assembled without coil springs attached) it is very hard for me to move the suspension up and down. Is this a sign that the nuts at the Trunnion (#42) and the nuts of the lower link (#76) are tighten too fast? Or is this expected due to th strength of the shick absorber?

Volker
 
It is a good time to check the shocks. Disconnect the top trunnions from the arm of the shock and move it up and down. Check for correct shock fluid and fill if needed. Moving the arm through the full range with the plug out can get rid of any air too. Then check the axle, keeping it vertical, for ease of movement and full travel.
Not much left to check then.
Bob
 
Installed the new coil springs (the longer ones of my picture above) and it works. Now approximately 2,8 inch betwenn wngs and tires.
 
Back
Top