• Hey there Guest!
    If you enjoy BCF and find our forum a useful resource, if you appreciate not having ads pop up all over the place and you want to ensure we can stay online - Please consider supporting with an "optional" low-cost annual subscription.
    **Upgrade Now**
    (PS: Subscribers don't see this UGLY banner)
Tips
Tips

TR6 My TR6 Project

OP
Scot1966

Scot1966

Jedi Hopeful
Country flag
Offline
I had a day off today so I was able to get the passenger side of the frame all patched and ground flush. This side was tricky - the tail end of the frame was very sensitive to the welding. I had a piece of angle iron clamped down the length of the frame ending at the back edge. I monitered the drop closely, making sure it stayed equal to the other side. The ends if the frame are within 1/16" of each other, so I think I am in the clear because everything I've read says there is 1/4" of tolerance in the frames.
556082_116004185198881_100003679008519_90047_1242290574_n.jpg

This is the last mess I have to clean up before I can the trailing arm mount welded in.
575811_116031288529504_100003679008519_90245_1687883170_n.jpg
 
OP
Scot1966

Scot1966

Jedi Hopeful
Country flag
Offline
Well it has been a week, but I finally got in the garage today. I finished welding the 2nd trailing arm mount in. Here are a few pics of the process.
First I spent a couple hours grinding and fitting the outside of the frame to accept the mount. I think I must have flipped the frame over at least 6 times during the day!
Here is the jig I made to make sure I had the right angle before tacking it up...
528472_122803041185662_100003679008519_113529_1890778490_n.jpg
522014_122804077852225_100003679008519_113530_748713459_n.jpg
319823_122804237852209_100003679008519_113531_1170906255_n.jpg

Then welding complete...
582568_122805394518760_100003679008519_113533_1254529784_n.jpg
383381_122807371185229_100003679008519_113536_93310289_n.jpg
Next up is the lower "T Shirt". Good Night
 

John_Mc

Jedi Knight
Country flag
Offline
Fantastic work, Scot! I'll be sending you my frame in the mail!
 
OP
Scot1966

Scot1966

Jedi Hopeful
Country flag
Offline
John_Mc said:
Fantastic work, Scot! I'll be sending you my frame in the mail!

Thank you John, but a California frame with rust?
 
OP
Scot1966

Scot1966

Jedi Hopeful
Country flag
Offline
Although this car will not likely see any more water, (while I own it anyway) unless I get caught in the rain sometime, I don't like bare unpainted metal to metal contact. I used POR-15 to coat the frame, and underside of the T-Shirt where they will be welded together. Notice the small strip of the old T-Shirt I left at the rear. The new Moss T-Shirt does not come with the rear reinforcement, so it will be welded to the old piece. Luckily it is in good shape...

294901_124168631049103_100003679008519_117202_1498392533_n.jpg


I made the reinforcement plates for the front differential mounts out of 1/8" stainless. They got the same POR-15 treatment before I weld them in.

525962_124177124381587_100003679008519_117315_2033224887_n.jpg
 

sundown

Jedi Hopeful
Offline
Wow Scot, nice to know there are actually PO,s out there instead of the DPO's. Looking forward to see the end result. Great Job!
 
OP
Scot1966

Scot1966

Jedi Hopeful
Country flag
Offline
I found a hood off a '74 on the local Craigslist for a good price. My original hood is in good shape on the outside, there is rust around the areas where the hinges mount. I had planned on repairing it, but for the price, the new hood saved me alot of time !
557721_124607614338538_100003679008519_119343_1798789693_n.jpg

This is the area on my original hood that is rusted
581367_124611654338134_100003679008519_119351_571319323_n.jpg
 
OP
Scot1966

Scot1966

Jedi Hopeful
Country flag
Offline
I decided to cut off what was left of the upper T-Shirt and weld the top one on first so I could get to the inside and duplicate the welds that the factory had. I am happy with the results...
521761_124615411004425_100003679008519_119357_1089921751_n.jpg
577231_124620967670536_100003679008519_119368_1133209728_n.jpg

I use the small cans of POR-15 because I usually use them up before they dry out. They are perfect to have around. Very fitting name, don't you think ?
319703_124623471003619_100003679008519_119377_1001558579_n.jpg

One last coat of POR-15 before I weld it together tomorrow...
536415_124627951003171_100003679008519_119394_1978702452_n.jpg
528934_124629271003039_100003679008519_119397_196635733_n.jpg
Good Night Everyone....
 
OP
Scot1966

Scot1966

Jedi Hopeful
Country flag
Offline
Well,today I finished welding the lower T-shirt in and am officially done with the repairs to the frame! I have to reinforce the differential mounts, and the frame is off to be blasted...

156489_125998544199445_100003679008519_123712_931701785_n.jpg
 

big6

Jedi Trainee
Country flag
Offline
I did the same work to my 76 TR6 frame about 20 years ago. At that time the replacement frame parts were not available so all replacement frame parts were reverse engineered and parts formed from sheet stock.
I would advise you to look closely at the factory welds for the front suspension. The factory welds were poor so with a little grinding and re-welding completed the frame work.

Another step you may consider is having the frame shot peened instead of sand-blasting. This will stress relieve the frame from earlier driving use and welding. I had my frame shot peened prior to applying the finish. For finish, all that was available when painting my frame was zinc-chromate followed by black enamel frame paint. Zinc Chromate was a very nasty product to use… health wise. The frame has held up very well since the repairs were completed. Other TR6 owners that have driven my TR6 comment about the lack of frame flex in mine as compared to theirs.

I was trying to locate my copy of the Triumph factory performance booklet that indicates the reinforcement welding needed for the front suspension. The 76 frame did not require front suspension reinforcement parts added as the earlier TR6 frames. The Triumph performance booklet also has very good information about engine, cylinder head, and camshaft data as well as horsepower curves for each modification.
 
OP
Scot1966

Scot1966

Jedi Hopeful
Country flag
Offline
big6 said:
I would advise you to look closely at the factory welds for the front suspension. The factory welds were poor so with a little grinding and re-welding completed the frame work.
I defininitely will go over the front suspension before blasting. I noticed a couple cracks in the factory welds around the shock mounts. So it will get a thorough going over.

big6 said:
Another step you may consider is having the frame shot peened instead of sand-blasting. This will stress relieve the frame from earlier driving use and welding.
I'd never thought of a stress relieving the frame, but I like the idea! At work, almost everything we make gets sent out for stress relief, so maybe they won't notice if a TR6 frame is on the truck with the aircraft parts!? Seriously, I don't know if there is anyone in my area who does shot peening, but It is worth looking into. Thanks for the info!
 
OP
Scot1966

Scot1966

Jedi Hopeful
Country flag
Offline
Is been a while since I posted, so here's a quick update. The frame has been POR15'd, the trailing arms have been cleaned back to aluminum, goodparts adjustable brackets, urethane bushings front and rear, seals in the differential, seals and gaskets in the transmission, the engine has been taken apart and re-assembled ( gaskets and seals, thrust washers ), Nickle/copper brake lines and fuel lines, brake hoses.
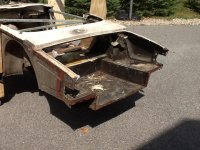
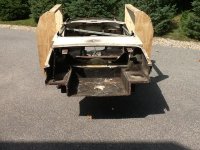
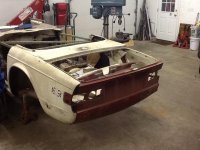
The chassis is together basically waiting for the tub. The tub has had sheet metal repairs....new floors, rockers have been repaired, battery tray, and many small rust spots have been repaired. Today I started the last thing to do to the tub before getting it ready for primer ; the rear valance. I got the old valance off, and all the mating surfaces have been prepped. There were many spot welds to drill and alot of grinding to clean the old spot welds !
 

Attachments

  • image.jpg
    image.jpg
    86.2 KB · Views: 97
  • image.jpg
    image.jpg
    86.1 KB · Views: 90
OP
Scot1966

Scot1966

Jedi Hopeful
Country flag
Offline
I fit up the three pieces that make up the tail light panel today. ( Nothing is welded yet, just checking the fit with the wings before welding). I am happy to say it all goes together well. The fit of the British Heritage inner lower valance is impressive. All the holes for the fasteners line up. The outer valance is NOS so the fit is good, as I would expect. Now to treat the backside of what I can't get to later, and weld it up.
Ed - Feel free to stop by with that beautiful spot welder !

attachment.php
 

Attachments

  • image.jpg
    image.jpg
    63.6 KB · Views: 168
OP
Scot1966

Scot1966

Jedi Hopeful
Country flag
Offline
I welded the lower inner valance on today. All the plug welds have been flushed. I am happy with the fit - everything lines up well. Unlike Triumph, I'll be giving the rearmost side a couple coats of paint before putting the outer valance on. Slowly progressing. :encouragement:

image.jpg
 
OP
Scot1966

Scot1966

Jedi Hopeful
Country flag
Offline
Thanks Ed. I wish my tub was tucked nicely in the corner of the garage all painted like yours. But I'll get there !
 
OP
Scot1966

Scot1966

Jedi Hopeful
Country flag
Offline
After lots of fitting, mounting / unmounting fenders, adjusting doors, trunk lid, checking all the gaps, ( many times ) my rear valance is welded on ! :cool:

Clamped...

image.jpgimage.jpg

Welded...

image.jpgimage.jpg
 
Similar threads
Thread starter Title Forum Replies Date
L For Sale TR6 1976 (restorable project) and TR4 1966 for parts Triumph Classifieds 4
T For Sale 1970 TR6 project car Triumph Classifieds 0
oldbagpipe For Sale Early 1969 TR6 'Stalled Project' $4500 Triumph Classifieds 0
oldbagpipe For Sale Early 1969 TR6 Project for sale Triumph Classifieds 10
D TR6 Researching potential next project car - Looking into TR6 Triumph 5
C TR6 72 TR6 Project. A few new pics Triumph 5
Decado TR6 TR6 project Triumph 6
S TR6 TR6 project back together- turn the key and CLICK Triumph 7
A TR6 New project -73 TR6 Triumph 7
T TR6 TR6 resto project/parts car in SE Mass Triumph 2
hondo402000 TR6 71 TR6 Rewiring project Triumph 11
M TR6 A video on how my TR6 project is doing Triumph 7
hondo402000 TR6 Rewiring Project for TR6 Triumph 7
G TR6 Possible TR6 Project ? ? Triumph 1
A TR6 Finding TR6 Project? Triumph 22
G TR6 Possible TR6 project? Triumph 2
L TR6 TR6 Front Suspension Resto Project Part One Triumph 11
beaulieu TR6 TR6 project with one dead cylinder ? Triumph 10
Steve TR6 TR6 Project available, WI Triumph 2
Steve_S TR6 Wanted: TR6 wheels for test project Triumph 0
milemarker60 TR6 TR6/M3 Project Up-date Triumph 15
H TR6 New TR6 project... where to begin? Triumph 27
Brosky TR6 Another V-8 TR6 Project Car.......... Triumph 1
Steve TR6 TR6 Project Car for sale Triumph 0
T TR6 Wanted project TR6 in the south Triumph 0
D TR6 Rotisserie for a TR6 restoration project Triumph 12
C For Sale 69 Triumph TR6 Racecar Triumph Classifieds 0
R TR6 Crazy Ignition Failure in TR6 engine… Triumph 7
mctriumph For Sale 69 Tr6 Triumph Classifieds 1
B TR6 TR6 block decking Triumph 2
A TR6 How many fuel filters-TR6 Triumph 25
Got_All_4 General Tech TR6 Transmission Troubles Pops Out of 3rd gear Triumph 2
J TR6 Repadding TR6 frame Triumph 0
S Wanted Need an HVDA conversion kit for 73 TR6 Triumph Classifieds 3
M TR6 Sorting out new TR6 Triumph 10
tr6nitjulius For Sale TR6 Clutch Master Cylinder $40 Triumph Classifieds 0
S TR6 '72 TR6 distributor issues Triumph 3
R TR6 Limit Mechanical Advance on TR6 distributor? Triumph 8
RonC General TR TR3 Shifter on TR6 Triumph 8
B TR6 TR6 convertible top frame Triumph 0
K TR2/3/3A The TR6 gearbox Ist gear.... Triumph 1
tr6nitjulius For Sale TR6 tail light assemby & Resurfaced/New Ring Gear Flywheel Triumph Classifieds 0
tr6nitjulius TR6 TRIUMPH TR6 Triumph 7
S TR6 New tr6 purchase Triumph 31
Jim_Stevens TR6 Barn find of TR6 and many TR3 parts Triumph 9
nichola TR6 Hot spot on cylinder head - 1973 TR6 Triumph 2
R TR6 Heater control bezels TR6 Triumph 2
L For Sale 1974 Tr6 for sale Triumph Classifieds 0
tr6nitjulius TR6 TR6 Parts Visualization Triumph 0
Got_All_4 For Sale 1969 TR6 Driver Seat Triumph Classifieds 0

Similar threads

Top