• Hey there Guest!
    If you enjoy BCF and find our forum a useful resource, if you appreciate not having ads pop up all over the place and you want to ensure we can stay online - Please consider supporting with an "optional" low-cost annual subscription.
    **Upgrade Now**
    (PS: Subscribers don't see this UGLY banner)
Tips
Tips

dash refinish

floyd

Senior Member
Offline
Well my TR winter projects went just like my house winter projects. Not a one of them done. So.....being that TR season is coming around the corner. If I would decide to remove my dash to refinish it. How much time can I figure that the car would be out of commission if I didn't get around to it till Tr season was here. Excluding refinishing time how long generally does it take to remove it and reinstall it. Thank you much
 

Brosky

Great Pumpkin
Offline
You may want to put this project back on hold for the late fall. Doing refinishing with clear coat materials in a closed house is not what makes wives happy when it starts to smell for days on end.

Also, nothing worse than a dash in pieces when it's 75 and sunny outside.
 

poolboy

Yoda
Country flag
Offline
When you say refinishing, did you mean trying to actually refinish, as in sand and apply a finish coat or two to the existing veneer or strip off the old veneer and apply a new veneer?
 
T

Tinster

Guest
Guest
Offline
My car was on jackstands for 5 months, upon removing the dash.
A few DPO wiring problems and broken gauges needed fixing.
The car also required a new dash be fabricated.

d
 

2wrench

Luke Skywalker
Country flag
Offline
Tough to give an estimate because every guy's
time and abilities are different.

Suffice it to say, though, that this is not a project
that you want to rush in any way. Be psychologically
prepared to have her down till it is done right.

Mark every single wire as it is removed; take the time
to make notes; draw diagrams and most valuable to me
-- take digital photos of every move you make.
All of the above in culmination saved my behind.

This is not a weekend project, by any stretch, in my
opinion. Patience and perseverance on 'ya.
 

kodanja

Obi Wan
Country flag
Offline
Patience is the Key!

Make sure you clearly mark all wires prior to installtion.
tape works well!

Be prepared to crawl under the dash on your back, if you've been under there before you know what I mean!

TR631-1.jpg

TR653.jpg

tr6.jpg


alot yourself more than a weekend for this installation,
but then again maybe you'll get lucky

Good Luck
 
T

Tinster

Guest
Guest
Offline
Well, FWIW- I say this should be a project to tackle
over the winter months in Ohio. It truly is a nightmare
of a project. Even though I prewired all the dash lights
and installed a dash ground wire harness, it took me five
months from the time I pulled the old dash out until the
new dash was finally installed. I worked on the dash project
almost every day for those 5 months.

Just truly one of the most difficult TR6 projects I attempted,
as a non-mechanic car owner.

best of luck! Take yer seats out if ya try this project.

dale

manywires2.jpg


manyWires.jpg


NewDash1.jpg
 
V

vagt6

Guest
Guest
Offline
BUT . . .

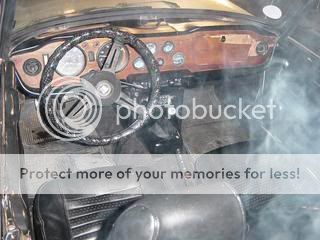
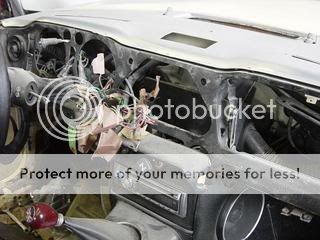
If your behind-the-dash wiring is, 1)original, or worse; 2) it's been attacked and defeated by a DPO (most likely), it is in desperate need of rewiring.

Under dash rewiring is a tremendous safety upgrade, IMHO. Many, many electrical fires have their origin under the dash area.

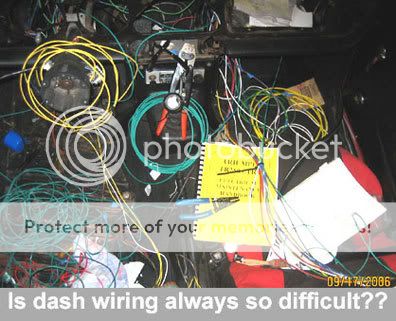
Hard to accomplish? Umm, well, maybe so. Depends on the condition of your car, and your skill level, as always.

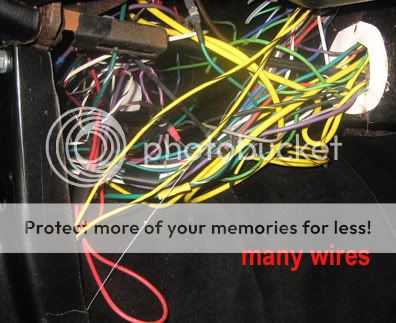
Label everything as you remove it; get the right tools for the job (a good wire splicer/cutter, etc); solder what you can; use modern connectors (unless you're concerned with originality, then the bullet types are okay); use appropriate wiring gauge for the job and NEW wire; use dielectric grease on connectors. Folks like British Wiring Specialists can provide the correct stuff, if you're interested. It's not terribly expensive and well worth the price.

While you're at it, install (and hide) a modern, blade-type fuse box and use modern fuses. You can keep the old box for the sake of originality, if needed. I suggest to put relays on both headlamp circuits, and on auxillary lamps as well. Very big safety issue, IMHO. Use Bosch relays, they're cheap as dirt and easy to hide.

Under dash rewiring is the second thing I do to an old car, right after rehabbing the brake system. Both are critically important for safety and peace of mind as we howl around those twisties at 60 MPH!

It's not a terribly difficult project. Just accept the fact that it's intricate work, and set aside plenty of time to accomplish it (this reduces stress, I've found).

Then plan ahead and block out the appropriate time required; buy and get all your stuff organized, and don't get in a hurry.

Good luck!
 

TR4nut

Yoda
Country flag
Offline
Ignoring the complexity of the wiring for the moment, if you were at a junkyard and found a donor car I'd bet the dash would come off in about an hour. Unplug lots of wires, pull the speedo and tach gauges, disconnect the vents, take off a couple of front screws and you are done..

As has been said, though, the pain is in the details of the wiring and making sure you know how to put it back together. Labeling can be the most time consuming part.

Randy
 
V

vagt6

Guest
Guest
Offline
Dale, where did you purchase the "rain forest teak"? It looks pretty close to original.

Is it a bit lighter shade than the OEM??
 
T

Tinster

Guest
Guest
Offline
vagt6 said:
Dale, where did you purchase the "rain forest teak"? It looks pretty close to original.

Is it a bit lighter shade than the OEM??


Not being a smart a$$ Mark-

I purchased it locally. It grows in our rain forests,
here on the island. Yes, quite pricey $$.

dale
 

hondo402000

Darth Vader
Offline
if you sand and re finish, I would say a day per coat, if you take off the old veneer and re apply new veneer at least a week, I used a 2 part clear for the finish, applied 4 coats, wet sand between coats and spray again I think it took me about 1 week for the whole process
 

Attachments

  • 10523.jpg
    10523.jpg
    93.4 KB · Views: 228

Popeye

Darth Vader
Bronze
Country flag
Offline
hondo402000 said:
if you sand and re finish, I would say a day per coat, if you take off the old veneer and re apply new veneer at least a week, I used a 2 part clear for the finish, applied 4 coats, wet sand between coats and spray again I think it took me about 1 week for the whole process

Nice!!

What type of finish did you use? ("two part clear... spray[ed on]")

I'm using good old polyeurethane (spelling?) mixed with tung oil. I'm up to many many coats (wetsanding inbetween), and once complete I will let it dry for two or three weeks, then wetsand with 2000 grit paper and polish and wax to get a good shine/sheen.
 
V

vagt6

Guest
Guest
Offline
GT6/Spit wood dash facia was originally made of "French Walnut" and may be reproduced with several types of wood. These dashes were not shiny but had a "satin" finish.

I sanded mine with very fine sandpaper and fine steel wool, then rubbed and rubbed and rubbed and rubbed with "Swedish oil" or something similar and a soft cloth.

Did I say I rubbed a lot? Looked great, BTW.

Refinished a worn dash really sets these cars off, nothing like it IMHO.
 

jjbunn

Jedi Knight
Offline
I don't think I am as exacting as others. Removing the dash, stripping off the old cracked coating on top of the veneer, then sanding lightly, staining, and several coats of poly. gloss clearcoat took me a couple of days. Then the refitting of the gauges, switches and wires was about an afternoon.

The thing is about this project that it's extremely satisfying, so that tends to be good motivation to finish :smile:

Before:
1280790438_b9a7a4f636.jpg


After:
2213356216_9a56bb5796.jpg
 

eejay56

Jedi Warrior
Offline
I was driving mine while I did it so I did one section at a time. It took about 4 weeks to relaminate and refinish. Since these were taken I cleaned the paint off the gauge rims and they are nice pretty chrome.
Dash009-1.jpg
 

PeterK

Yoda
Offline
Mark, Maybe it was (Watco brand) Danish Tung Oil? It soaks in and allows multiple coats to build up a real nice finish. I use it on hand made furniture and refinishing antiques. Probably not the best for UV protection but easy to touch up. When it starts to look a little bad, just polish on another layer, and rub rub rub!

English Walnut is also listed as original dash material for TR4As. Just a little different color and grain from American Walnut.

* * * * *

Dale, I made a set of custom gunwales from teak for a friends island hopper. I loved the smell when I milled it, just like frest cut leather.
 

BobbyD

Jedi Knight
Offline
Floyd,
Removing the dash itself is no big deal. Just label every wire and I even mark the back of the gauges showing what wire hooks up where. It might be easier with the driver seat removed as you spend a lot on time on your back in the driver foot well. I did it in a day when I replaced my dash https://tr6.danielsonfamily.org/Restoration_May_1999.htm. As to actually refinishing a dash.......well that depends on your woodworking and refinishing skills.
 
Similar threads
Thread starter Title Forum Replies Date
KVH TR4/4A Refinish Wood Dash Triumph 7
S TR6 TR6 Dash refinish: a nice surprise Triumph 4
S TR6 Removing TR6 dash [and suggestions on refinish] Triumph 12
K TR4/4A How difficult is to remove 4A dash for refinish? Triumph 8
J Spitfire Dash refinish and gauges 78 Spitfire Triumph 4
jjbunn Dash Refinish Progress Triumph 7
tahoe healey wood dash refinish Austin Healey 6
J For Sale TR 3 dash warning light lens, used Triumph Classifieds 0
J Spitfire No start after fiddling with dash Triumph 2
Patrick67BJ8 Custom BJ8 Dash Switch Panel Austin Healey 7
K TR2/3/3A Switching to green LED dash panel bulbs? Triumph 3
R For Sale TR3 Dash Triumph Classifieds 0
V For Sale Hard Top and Solid Walnut Dash for Sale Triumph Classifieds 2
KVH General TR Green Turn Signal Dash Indicator Triumph 8
timsgolf Center Dash Switch Plate Painting Austin Healey 5
C MGA Dash removal MG 0
C For Sale BJ8 original dash Austin Healey Classifieds 3
rjc157 For Sale Dash Austin Healey Classifieds 1
Bocaray TR2/3/3A Headlight Dimmer conversion to dash switch Triumph 6
M MGA RHD MGA dash finisher MG 0
A MGB MGB dash painted MG 13
Rob Glasgow LED Dash Light Upgrade Austin Healey 28
jfarris TR2/3/3A Removing choke cable from dash insert Triumph 3
BoyRacer Blue Vinyl Dash Material Austin Healey 3
jfarris TR2/3/3A Dash Lights Triumph 3
E Wanted wanted Austin healey 3000 adjustable steering wheel & dash pad Austin Healey Classifieds 2
R Ground wires under dash Spridgets 5
EWD TR6 74 TR6 Renegade Dash Wire Triumph 7
B TR4/4A Dash Color? Triumph 3
EWD TR6 TR6 top dash trim paint Triumph 2
TomMull Dash wiring Plus 2 S Lotus 16
I TR6 Dash light issues Triumph 19
J Attaching BT7 Dash Facia Panel Austin Healey 2
EWD TR6 Dash Pad Replacement Triumph 3
longbridgehealey Bugeye dash Spridgets 6
J TR2/3/3A Wooden piece under scuttle with dash Triumph 6
Basil New Dash Cover in the Telly Other Cars 3
oldbagpipe Wanted Early TR4 Silver [Aluminum] Dash Cluster Triumph Classifieds 1
steveg TR6 Metal Dash - does anyone make one? Triumph 13
charleyf TR2/3/3A Under dash fuse Triumph 7
F TR2/3/3A Dash repair Triumph 7
M Getting behind the dash on BJ8 Austin Healey 4
Rut TR4/4A Dash color Triumph 9
Rut TR4/4A TR4 wood dash Triumph 26
J Walnut veneer for the dash, Look what I found! Austin Healey 12
I TR6 Thickness of original TR6 dash Triumph 2
S TR2/3/3A Dash Pot Oil Triumph 14
TRMark T-Series Dash for Sports/Racer MG 5
S BJ8 Choke Cable- How to tighten the nut behind the dash? Austin Healey 6
TomMull replacing walnut veneeron the dash Lotus 17

Similar threads

Top