Hi again Dale,
Geez. This is getting overly complicated. I think I may have had a hand in making it sound more difficult than it is. I hope I can help clear up some of that. But I'm a little at a disadvantage because it sounds like you have bought *a lot* of parts and I don't know what you have in hand.
I wouldn't say that a conversion to a Toyota 5-speed is necessary, by any means. TR gearboxes are darned good. Not that the Toyota conversions are bad, but we are just repairing a clutch here, right? Not replacing the entire gearbox, I hope! (I suspect the previous post was meant to point out that for roughly $2000-2500 it's feasible to replace the entire gearbox with a modern Toyota, i.e. the dollar amount seems a lot for a relatively straight-forward clutch replacement.)
*If* you want the shaft with the retaining groove and grease drillings, it's $35 at The Roadster Factory. Part #108887. *If* using that, you'll also want the matched bushing with the slot for the side with the bolt. $3.50, #36997. The other, plain bushing you already have. These parts will fit your car, I assure you. All the TR gearboxes are quite similar in this area.
You might want to replace the spring on the clutch shaft: part #105752, $3.25. I don't know if that spring was used on the later cross shafts like the one you have in hand.
The only other thing needed when fitting the earlier style shaft is the two grease zerks: Triumph part #500098, $.95 ea. However, these are standard 90 degree zerks you could probably buy locally if you wished. I bet all this is way cheaper than sending out the shaft you have for special machining.
But, you don't absolutely *have to* use the shaft with the groove in it, unless you really want to. It's optional. Personally I think the grooved shaft is better for locating the shaft and preventing any sideways stresses on the clutch fork, but a lot of cars were built without it and seem to work pretty well. I suspect the mid-production change to a shaft without the grease zerks, groove and bolt was an economic move by Triumph, fewer parts = lower cost and faster assembly. Plus there is "no regular servicing required"... at least theoretically. Here again, I'd personally rather have a greasable bushing in there, for longer term reliability, but many cars are driving around with the greaseless type. The narrower bushings were probably deemed "adequate" by Triumph, but IMHO the wider ones will last longer and help avoid play in the shaft. Again, there are lots of cars on the road with the narrow bushings, though.
Let's move on to a few other things:
You mention the broken taper pin. Way too common a problem. Search here for many previous discussions.
One strong recommendation is to be sure to get the hardened version of this pin whenever replacing it. There were some non-hardened ones around that snapped off way too easily. I honestly don't know if those are still on suppliers' shelves. Just to be sure, TRF has superceded the original #56965 with part #158777 which is a high tensile steel version. It costs $9.50. Be sure to install new safety wire there, too. It's standard .040" stainless wire available locally. Also, before installing it on the shaft I recommend pre-drilling the release fork on the back side, sort of in line with the taper pin, in case it ever breaks again and needs to be tapped out. This hole needs to be accessible to some degree, to push a broken pin end out of the hole, so might need to be angled a little. An 1/8" hole is generally adequate.
Optional but highly recommended is to install a 1/4" Grade 8 bolt (UNF or fine thread recommended) as a backup for the taper pin. This is done by drilling all the way through the fork and cross shaft. Some care has to be taken that the drilling is a good fit to the bolt. The hole can be placed in the middle or off to one side of the fork. Just pick a point with a reasonable amount of metal as a stronger anchoring point. Use a bolt that's long enough the unthreaded shank passes all the way through fork and shaft, so that no threads are inside the hole where they will ream it out. This may mean putting one or two washers under the nut and bolt. Use a self-locking nut on this bolt, either a nylok or even better an all-metal jetnut.
The flywheel should probably be refaced. So, it needs to come off anyway. The old bolts might be very tight, might need to be gently heated with a torch to release Locktite. When reinstalling, use Locktite. Refacing is a pretty standard machine shop job and shouldn't be terribly expensive. Also have the shop check it for balance! (They might check the clutch pressure plate for balance, too. I recommend that be done separately, not while mounted on the flywheel.) At the flywheel, I suggest not reusing the bolts. Some are the stretch type, meant only for one full torque use (particularly on later TRs like your 6). A clue is if they don't have tab locking washers under them. There are stronger, upgraded bolts like those made by ARP, possibly through some of the vendors.
While the flywheel is off for refacing is an opportunity to replace the rear main seal. Others who are more familiar with that procedure on the 6-cyl. engine should advise you.
The next considerations involve the linkage between the slave cylinder and the release lever. If there is significant wear on it, the clevis pin might best be replaced. Although I'm sure the various vendors offer one, this is another locally available item It's simply a 1/4" clevis that might need to be cut down and drilled to the right length. Also check for wear in the holes of the pushrod from the slave cylinder. If you end up replacing it, It is part #138572, $11.50 at TRF. Or, there are special versions of the pushrod available that are adjustable and a useful upgrade over the non-adjustable orginals. I don't have a source for these, but they seemn to appear on EBay quite often and some of the suppliers might carry them.
Another thing that you can upgrade here, if you wish, is to install a TR4-style secondary return spring. This just helps to insure the slave cylinder fully retracts. The spring is part #43929 at TRF, $1.95. To fit it, you would need a special little part that fits under the clevis pin to give an anchor point for one end of the spring, part #106347 is $2.95 at TRF. The other end of the spring attaches in a hole in the slave cylinder mounting plate.
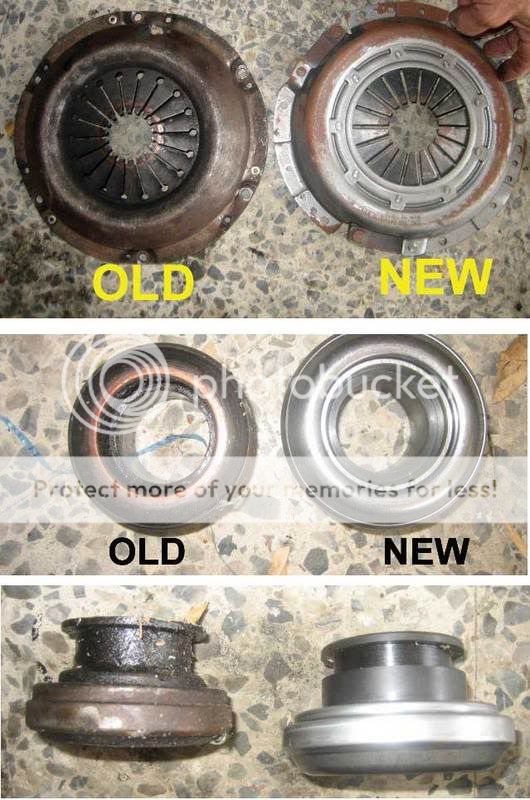
If you bought a new clutch kit, you'll generally find it includes a driven plate, a pressure plate and a throwout bearing. Don't throw away your old pressure plate! If it's the original from your car, it's rebuildable and is likely better than anything currently on the market! Unfortnuately, the only place I know for certain rebuilds them is in England.
Today's replacement pressure plates are homologated from similar parts in other cars. I.e., whree the manufacturers used to make several with slightly different specs they now offer "one size fits all". I think what's most generally sold for TRs is actually a Saab or Volvo clutch. It's got slightly stronger springs than the original. For a while, there was one being sold that had way stronger springs, and caused problems such as rapid throw out bearing failures and hard wear on the various linkage. Here the vendor who supplies it needs to advise you. Hopefully it's something they've had little or no trouble with when installed in TR6. Not an area I've had much opportunity to compare different options, other than noting that there has been a lot of discussion and various solutions proposed, here and elsewhere on the Internet and in a number of books.
One place it's easy to get in trouble is when installing the throw out bearing onto its carrier. With many cars, it's just a matter of putting the two pieces in a vise and pressing the bearing onto the carrier. But, when that's done with TR throwout bearings, it often distorts the bearing surfaces and causes the bearing to fail way too fast. I am mentioning this because many installers aren't aware of this and just go ahead and use the "usual" method, then end up having to replace the TO bearing in just a few thousand miles. A solution that generally works well is lube the bearing, then rotate it while squarely pressing it into place on its carrier. To facilitate this, TRF sells a tool #RFT118 for about $30, with instructions how to use it. An alternative is to buy a pre-installed bearing and carrier assembly such as TRF's RFK1121, for about $90. There are also a couple different upgraded throwout bearings which some people like, others don't. The "Gunst" is one of these, but I suggest researching any of these before spending the extra dollars.
I was unclear if you were installing a new release fork or reusing the old one. If reusing the old one, please look closely at the two pins that ride in the slot in the throw out bearing carrier. Likely those pins are worn flat on the sides that contact the carrier and will give some slop when actuating the throw out bearign, that can lead to some problems. One simple and cheap solution is just to rotate the two pins so that fresh, unworn areas are in contact with the slot of the carrier. That should eliminate any slop. Alternatively, the pins can be replaced in an old fork, two ea. #100164, $2.50 apiece at TRF. If, on the other hand, you replace the entire fork (#106022, $49.95 at TRF), it probably will come with new pins already installed.
I suggest reading TRF's notes about gearbox installation at
https://www.zeni.net/trf/TR6-250GC/54.php, and perhaps passing them along to the installer if using a mechanic instead of doing the job yourself.
One other part you might want to replace while the flywheel is off is the bronze pilot bushing in the tail of the crankshaft. Here it's helpful to know your engine and gearbox are early versions and use part #47246, $4.50 at TRF. Be sure to smear a little grease in there during installation, too. The front protrusion of the gearbox input shaft rides in the pilot bushing.
The above should help put the car back together and get it on the road. There are other things that can optionally be done, now or later, to help insure a long lived clutch. It's not so much that any of the parts are expensive or difficult, just that it's not fun to do the job more often than absolutely necessary!
One possible upgrade is at the clutch master cylinder. Triumph went to a .70" MC on TR6 (maybe earlier). This was done to make the pedal a little easier. Unfortunately, it also reduces the movement at the release lever and leaves very little room for error (compounded by the fact that the original parts there were also no longer adjustable). For a bit of added security, I suggest a .75" bore master cylinder, should you ever rebuild or replace it. If rebuilding, it's possible to have the original bored out to the slightly larger size (or perhaps sleeved, if that's needed,
https://www.applehydraulics.com and others do this sort of repair).
Note, a key reason I use TRF and a couple other vendors is that they mostly use the original Triumph parts numbering system for reference. Heck, some parts had these number cast into or stamped onto them. Even if that isn't the case, with the correct TR "Stanpart Spares" catalog in hand, finding the right parts is pretty easy and many of the mid-production changes are noted right there.
On the other hand, I do like that Moss has so many of the catalog pages online for quick and easy reference. I see that Revington TR in England is gradually adding these too.
 Hey there Guest!
 Hey - did you know if you click on the title of a thread it will take you to the first unread post since you last visited that thread?
 but were afraid to ask:
  STOP!! Never post your email address in open forums. Bots can "harvest" your email! If you must share your email use a Private Message or use the
  smilie in place of the real @
 Pretty Please - add it to our Events forum(s) and add to the calendar! >>

.jpg)
 A friendly reminder - be careful what links you click on here. If a link is posted by someone you don't know, or the URL looks fishy, DON'T CLICK. Spammers sometimes post links that lead to sites that can infect your computer, so be mindful what you click.