• The Roadster Factory Recovery Fund - Friends, as you may have heard, The Roadster Factory, a respected British Car Parts business in PA, suffered a total loss in a fire on Christmas Day. Read about it, discuss or ask questions >> HERE. The Triumph Register of America is sponsoring a fund raiser to help TRF get back on their feet. If you can help, vist >> their GoFundMe page.
  • Hey there Guest!
    If you enjoy BCF and find our forum a useful resource, if you appreciate not having ads pop up all over the place and you want to ensure we can stay online - Please consider supporting with an "optional" low-cost annual subscription.
    **Upgrade Now**
    (PS: Subscribers don't see this UGLY banner)
Tips
Tips

Bugeye garage paint job - start to finish [almost] with lessons along the way

TulsaFred

Jedi Warrior
Country flag
Offline
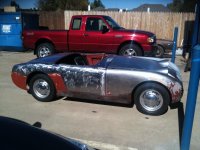
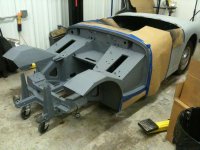
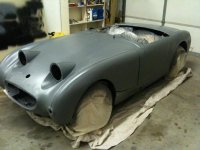
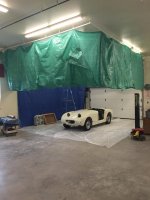
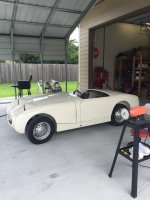
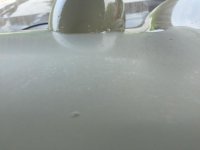
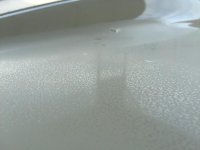
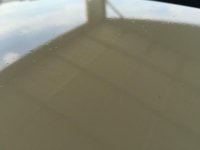
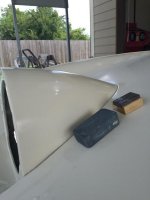
I painted the BE last fall, after taking down to bare metal. Looked good at 5 ft, but on closer inspection was a mess of orange peel, a couple runs, and some trash in the paint since I didn't have a booth. Orange peel was by far the biggest issue. I researched this out the ying yang, sanded it all flat and resprayed it last week.
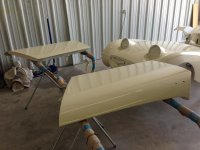
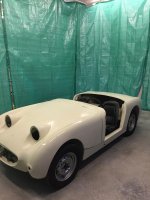
A little better, but same problems!

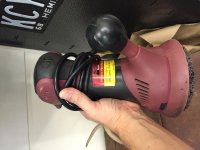
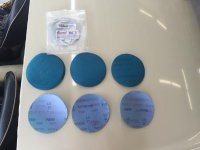
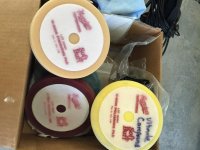
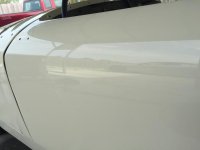
I have determined, for me at least, that the KEY to a quality home garage paint job is in the FIXING after paint. I think for most of us, with no more than moderate experience, a perfect paint job is elusive. So many variables - equipment, technique, temperature, humidity, paint, activator, reducer and the various permutations of all of this and more - make experience the only thing that can improve your odds. If you don't have the experience - YOU CAN FIX IT.

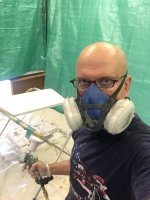
I'll lay out a pictorial of my journey for your edification and amusement.
 

Attachments

  • IMG_7476.jpg
    IMG_7476.jpg
    51.9 KB · Views: 131
  • IMG_7479.jpg
    IMG_7479.jpg
    59 KB · Views: 130
  • IMG_1288.jpg
    IMG_1288.jpg
    65.7 KB · Views: 131
OP
TulsaFred

TulsaFred

Jedi Warrior
Country flag
Offline
Primer

I used Summit Racing branded paint, which was cheap and had good reviews. I used their Epoxy Primer over the bare metal. I really liked it. It sanded well and didn't clog the paper. I got orange peel, but it didn't matter, it was easy to sand flat with 180 grit on a hand block. The gray epoxy goes on dark gray, but when block sanded it gets light gray, which makes it easy to know where you have already sanded.
 

Attachments

  • IMG_2084.jpg
    IMG_2084.jpg
    65.7 KB · Views: 108
  • IMG_0241.jpg
    IMG_0241.jpg
    43 KB · Views: 116
  • IMG_1600.jpg
    IMG_1600.jpg
    54 KB · Views: 111
OP
TulsaFred

TulsaFred

Jedi Warrior
Country flag
Offline
Paint

I used Summit Racing single stage 2K urethane in Wimbledon White, a suitable substitute for the original "Old English White" according to my heritage certificate.

As I said, orange peel was my Achilles heel. After sanding and respraying with appropriate adjustments made (controlled cool temp around 70 degrees ambient, using "slow reducer" and "slow activator", and reducing the paint beyond the 10 % max reduction recommended ( I used 4:1:1, paint:activator:reducer). I also bought a new DeVilbiss finish line gun for the second spray to upgrade from my Harbor Freight model. After the second spray with less but still significant orange peel, I again called Summit. The paint tech said to reduce it even more. I suppose this would be my next step, if I were to respray, which I'm not.
 

Attachments

  • IMG_3937.jpg
    IMG_3937.jpg
    57.2 KB · Views: 115
  • IMG_7433.jpg
    IMG_7433.jpg
    34.8 KB · Views: 111
  • IMG_7431.jpg
    IMG_7431.jpg
    34.5 KB · Views: 113
  • IMG_7456.jpg
    IMG_7456.jpg
    32.6 KB · Views: 113
  • IMG_7457.jpg
    IMG_7457.jpg
    36 KB · Views: 114
OP
TulsaFred

TulsaFred

Jedi Warrior
Country flag
Offline
Paint Problems

Orange peel along with a few small runs and some "trash" (dust) in the paint despite two full sprays.
These issues are difficult to photograph, but not so difficult for a car guy to spot at the local cruise-in!

The first pic is to show the orange peel as best as possible. The other photos show what the peel looks like after several passes with 1000 grit on a DA sander (flattens the hills, leaves the valleys), and a pic of some trash/dust.
 

Attachments

  • IMG_7460.jpg
    IMG_7460.jpg
    9.7 KB · Views: 118
  • IMG_7462.jpg
    IMG_7462.jpg
    22 KB · Views: 117
  • IMG_7463.jpg
    IMG_7463.jpg
    33 KB · Views: 112
  • IMG_7471.jpg
    IMG_7471.jpg
    15.4 KB · Views: 110
OP
TulsaFred

TulsaFred

Jedi Warrior
Country flag
Offline
The KEY is in the FIXING.

I have learned not to be afraid or timid when it comes to fixing the paint. It can be done very well and turn an amateur job into a very respectable beauty. Single stage is easier to fix, IMHO, because you don't have to worry about going through the clear coat. Just put enough coats on to allow some to be sanded off.
My process after quite a bit of trial and error, is the following:
1. Air 6 inch DA sander (HF of course!) using 1000 grit, 1500 grit, then 2000 grit (Summit racing brand discs -excellent and cheap).
2. Compounding with DA polisher (I have a nice Meguiars unit) using progressively finer compounds. I used 3M perfect it 1-2-3 (rubbing compound, polishing compound, ultra-fine polishing compound). Each compound went on it's own foam pad, also progressive from a cutting pad (rubbing compound), to a polishing pad (polishing compound) and finally to a finishing pad (ultra-fine compound).

The end result is great. Again difficult to show, but the close up of the door is the end result. There is no peel, trash, run or anything else untoward. Flat and glossy. Nearly flawless!

BTW, I did burn through the paint on a couple edges, you have to be really careful at the edges of panels. However, I found that I could correct this using a Harbor Freight air brush and some compound to blend. Worked great. I found that it works best if you airbrush without any tape to make a sharp line.
 

Attachments

  • IMG_7467.jpg
    IMG_7467.jpg
    18.2 KB · Views: 94
  • IMG_7470.jpg
    IMG_7470.jpg
    35.3 KB · Views: 95
  • IMG_7472.jpg
    IMG_7472.jpg
    42.6 KB · Views: 95
  • IMG_7473.jpg
    IMG_7473.jpg
    36.5 KB · Views: 101
  • IMG_7474.jpg
    IMG_7474.jpg
    55.3 KB · Views: 98
  • IMG_7475.jpg
    IMG_7475.jpg
    23.9 KB · Views: 111
OP
TulsaFred

TulsaFred

Jedi Warrior
Country flag
Offline

Attachments

  • IMG_7481.jpg
    IMG_7481.jpg
    24.8 KB · Views: 108
  • IMG_7480.jpg
    IMG_7480.jpg
    23.2 KB · Views: 104
OP
TulsaFred

TulsaFred

Jedi Warrior
Country flag
Offline
Total cost was around $300-500

A gallon of 2K single stage paint at summit racing with activator and reducer is around $100.
Primer adds a little more, plus sandpaper and supplies.
The harbor freight paint gun (around $35) seemed to work as well as the more expensive DeVilbiss finish line gun. I suppose it's like a painting. A true artist will get a better painting using an old crappy brush than a hack with a $1000 finest quality instrument. Likewise the pro can probably get more out of the fine quality gun, but an amateur can probably do as well (or poorly) with the cheap gun. I actually found that the harbor freight paint guns work quite well.

I wasted a lot of paint and materials with the repeated painting. I also wasted a lot of time with trial and error.

In the end, it costs very little in money (though a fair investment of time) to get a good home garage paint job you can be proud of.
 
Country flag
Offline
I know a lot of people do their color sanding with a DA, but I still prefer to do it by hand with durablocks. Anyway, thanks for the excellent overview of your experiences ... they just opened a new HF near me ... I'm not brave enough to try their spray guns, but I like the cheap disposable gloves. I have an Eastwood Concours spray gun that I purchased on sale. Other than a flaky cup ... it works very well.
 
OP
TulsaFred

TulsaFred

Jedi Warrior
Country flag
Offline
Trevor,
color sanding by hand would have been very difficult. White paint is extremely hard in urethane (titanium dioxide is the white pigment and it is very hard, and urethane is the hardest paint). Even with the DA it took hours. Next time I might start with 600 grit.
As far as the paint gun, I get ya, but I'm telling you the harbor freight guns do great (somewhat surprising given the cost). At Christmas, I got the DeVilbiss gun which cost 10 x as much. It gets excellent reviews, and is a fine product, but it didn't really seem to work better for me.
 

dklawson

Yoda
Offline
White or not, I agree with Trevor. When I have done painting outside without a booth I use single stage urethane and build enough that I can sand away blemishes followed by polishing compounds and finally a glazing compound. I typically start with 1500 grit paper, then move up to 2000 and finally 2500 grit. It does not take that long and is worth the effort. For the edges of panels I put some blue painter's tape in place and remove it so I can do detail sanding at the edges. The tape goes back on when buffing and is removed again for final hand polishing at the end.
 

Boink

Yoda
Bronze
Country flag
Offline
Very informative. Thanks for the series.
 
Country flag
Offline
There is definitely a "good" time window for color sanding. Too early and the paper loads and you ruin the finish ... too late and it feels like you can't crack the surface.
 

Rut

Obi Wan
Country flag
Offline
Fred,
Im impressed! I wish I had the gonads to take on final paint, but it scares me to death!
Rut
 
OP
TulsaFred

TulsaFred

Jedi Warrior
Country flag
Offline
Rut,
That's the whole point of this post. It does take some 'nads , but in the end it's not very difficult. It takes a lot of hours and a willingness to go through all the steps and back up and fix the problems created by mistakes along the way.
However, as I said, I believe the KEY to the hobbyist is in FIXING the paint mistakes, not laying down perfect paint. This doesn't take much skill. It's all in the cut and buff. Others said that to me during my research, and everyone talked about color sanding and compounding, but it wasn't emphasized that these steps can really turn around a bad paint job. It didn't sink in until I saw how I could take a fairly crappy paint job and make it great.
This fact will hopefully inspire others to take the leap.
My steps, tools and materials represent a LOT of trial and error. I left out all the failures, money wasters, and trying this and that.
 

Rut

Obi Wan
Country flag
Offline
Fred,
My Bugeye is currently at the body shop being prepped for paint, but I do have a '67 TR4a that may be a good candidate. After if finish putting the Bugeye together I'll be able to turn my attention to the Triumphs body.
Rut
 

sqbsprite

Jedi Trainee
Country flag
Offline
Great post Fred. Very informative. I agree that the do-it -yourselfer will need to do some work to get show results, but it can be done. Even the pros usually sand and buff. It's the only way to get it perfect. I usually start with 1000 then 1200 or 1500 and finish with 2000 grit by hand. I really like the Meguiars products for polishing. The Fine Cut Cleaner and Swirl Remover work really well. As for the orange peel, my first job was terrible. For me, I found that you have to really get a feel for how much you can put on in one coat to get it to flow out just before running. Also, if you get too close with the gun, the air pressure will affect the finish. My mentor always told me it's a fine line between a perfect job and a complete f*** up. I have found that to be true.
 
OP
TulsaFred

TulsaFred

Jedi Warrior
Country flag
Offline
Steve, excellent points. I also found a very fine line between perfect and hatchet job. I also suspect, based on the panels that came out best, that laying down almost to the point of a run is what gets it to lay out. My orange peel may well have been due to not laying on enough paint because of fear of a run.

One thing for sure, the only way to get the required experience is to get busy and try. The fact that the mistakes are fixable makes it worth a try.

I also like the Meguiars products and have many of them. I finally settled on 3M products because that's what most pros use and their products are professional, though not as heavily marketed.

Rut: I'm jealous of the TR4a - love 'em. I have a TR6 that is in line for a resto after my bugeye is done. I like the TR4s and 6s, but not the TR3s, and forget the 7s (doorstops). Give the paint a go. The satisfaction will be worth it!
 

Bayless

Yoda
Silver
Country flag
Offline
Nice work Fred and thanks for all the pointers. You are right on as to "fixing" the flawed paint job. There is no way to get a professional looking job straight out of the gun in your garage. You have to do as you did with the elbow grease. I have a good friend who restores classics professionally and even with all the right stuff, he still finishes the job the same way. And he can lay down paint that looks better than most new cars before he even touches it.
 

glemon

Yoda
Country flag
Offline
Nice post Fred, your amateur paint experience is pretty much the same as mine, went through the same steps, except I sanded and polished by hand. It was a lot of work. Working with the single stage polyurethane there is definitely a sweet spot for these activities, too short and, as mentioned you can mess up the paint, also hard to get a good shine, it worked best for me to sand a day or two after painting, but final polish, for a really good shine, worked better after a week or more as the paint hardened up.

The great thing about the single stage urethane is how workable it is. Not only can you sand out runs and orange peal and polish to a great finish, you can spot touch up and it will blend perfectly (with a polish) with the already laid out finish for some time (weeks definitely, couple months maybe, a year or more, no) as the paint slowly cures.

By the way, the hand sanding and polishing, it worked well, no burn through anywhere, but I wouldn't do it again, I had serious pain in my elbow joints (I alternated arms) for about a year after.
 
Similar threads
Thread starter Title Forum Replies Date
6 New Home for the Bugeye, Pop's Garage Spridgets 24
R Bugeye ignition switch Spridgets 2
T Music Video with a Bugeye, plus a hill climb video Spridgets 1
D For Sale 1958 Bugeye Sprite Austin Healey Classifieds 3
Todd78d Bugeye carpet Spridgets 7
L For Sale original Bugeye SU H1-1 1/8 Carbs Spridgets Classified 0
Todd78d Bugeye choke linkage Spridgets 5
J Installing Adapter Hubs for Wire Wheels on a Bugeye Austin Healey 5
R Wanted Bugeye ignition switch Spridgets Classified 2
drooartz Replacing Bugeye windshield rubber Spridgets 6
CARSINC 1965 Sprite Bugeye Spridgets 5
drooartz The great Gordon Murray has a Bugeye! Spridgets 0
W Bugeye Tudor Wash Bottle Decal Spridgets 0
R Bugeye drum brakes Spridgets 7
SNClocks Moss Motors 5-speed install in a Bugeye Sprite Spridgets 2
SNClocks Bugeye Alignment Spridgets 4
R Wanted Looking For A Rear Glass For A Bugeye Hardtop Spridgets Classified 0
S For Sale Bugeye wheels, steel with round holes set of 5 available Spridgets Classified 0
D Wanted Bugeye bonnet (hood) fiberglass or steel Austin Healey Classifieds 0
M Wanted Need 59 Bugeye Dashboard. LHD. Spridgets Classified 1
J Finally getting (re) started on the Bugeye Spridgets 27
drooartz Restoring Penny the Bugeye Spridgets 22
drooartz Bugeye jack points to remove rear axle Spridgets 18
B Wanted Bugeye front bonnet fender mirror like this Spridgets Classified 5
SNClocks Bugeye axle limit straps Spridgets 5
R Wanted BUGEYE SHIFT LEVER Spridgets Classified 6
R Bugeye Starter Switch Spridgets 7
Lin Bugeye Axle Hub & Bearings Austin Healey 1
G For Sale 1960 BugEye..Very Good..$20,500 Austin Healey Classifieds 0
Lou E Finally a Bugeye of my very own Spridgets 41
5 Sold My 1960 Bugeye Spridgets 10
SNClocks Goings on with our new Bugeye Spridgets 1
F 59 bugeye spring bushing bolt Spridgets 8
Rut 3 point belts in a Bugeye? Spridgets 9
JPSmit gluing a panel on to a bugeye Restoration & Tools 2
I Bugeye oil leak help Spridgets 4
I Bugeye lack of power Spridgets 1
I Bugeye charging issues Spridgets 8
I Bugeye smoking Spridgets 9
I Bugeye valve rebuild suggestions Spridgets 8
jfarris Immaculate 1958 Bugeye Spotted 4
drooartz Leno's Bugeye Spridgets 12
R BUGEYE SOFT TOP FIT Spridgets 2
R Bugeye splined wheels Spridgets 0
T Wanted Bugeye Sprite RHD tonneau cover. Austin Healey Classifieds 0
Jim_Gruber Bugeye Seat Pans needed Spridgets 1
B Fluctuating Fuel Gauge 1960 Bugeye Spridgets 4
Basil For you Bugeye/ Frogeye fans Spridgets 5
B Bugeye Electrical Diagram with additions Spridgets 6
R 59 Bugeye rib cage tranny hard shift into reverse Spridgets 0

Similar threads

Top