• The Roadster Factory Recovery Fund - Friends, as you may have heard, The Roadster Factory, a respected British Car Parts business in PA, suffered a total loss in a fire on Christmas Day. Read about it, discuss or ask questions >> HERE. The Triumph Register of America is sponsoring a fund raiser to help TRF get back on their feet. If you can help, vist >> their GoFundMe page.
  • Hey there Guest!
    If you enjoy BCF and find our forum a useful resource, if you appreciate not having ads pop up all over the place and you want to ensure we can stay online - Please consider supporting with an "optional" low-cost annual subscription.
    **Upgrade Now**
    (PS: Subscribers don't see this UGLY banner)
Tips
Tips

BN1 with H6 carbs : what setting ?

CraigC

Jedi Trainee
Country flag
Offline
Thank you for the picture Steve.


2) there is a short boss on the right side of the two carbs, and it appears that the front carb's one has been extended to support the cam's pivot... What a mess !

Matt

I'm an M owner who also has a second set of H6 M carbs on a"LeMans" kitted engine I came across 40 years ago. The M carbs are casting number AUC 6040. Mine have suffix "AA". They have no mounting boss on front side(towards float bowl). The boss for the fast idle cam is 0.575". I also have a Triumph spec H6 body as a spare. Also an AUC 6040. As these carbs are mounted on the opposite side of the motor, they are basically mirror image to the M carbs. These carbs have mounting bosses on both sides of the bodies. The unused boss(forward in TR application and would be rear side in 100 application) is also 0.575".

With this information, I would suggest that you try to located an H6 carb from a TR3 or TR4 and modify to suit. You will need to tap the boss used for the fast idle cam, swap over your throttle shaft, and, if present, plug the vacuum port on the underside near the mounting flange. From there you swap over all of the external parts

Make sure that the fast idle cam pivot bolt is the correct shouldered bolt!

As SteveG said, post a picture of your carb, preferably looking straight down at the fast idle cam area.
 

steveg

Yoda
Gold
Country flag
Offline
Matt,
The Burlen catalogue is an invaluable reference (see below). IIRC it is free with your order. I'm trying to highlight EU suppliers here, possibly more accessible in France. Not sure what your situation would be when dealing with, say, Joe Curto in the US.

For instance, here's your fast idle kit from Burlen:

screenshot.2199.jpg


http://sucarb.co.uk/catalogues-manuals-books/su-reference-catalogue/su-reference-catalogue-8895.html

screenshot.2198.jpg
 
OP
M

matt78

Senior Member
Offline
Once again, thank you for this information. Summing it up, my carbs' bodies are the exact opposite of what they should be.
Good thing is that I'm now fully aware of the "SU salad" lying under the bonnet and I better understand why things don't work as described in the book :blue:

Steve, I know Burlen. They could support by fully rebuilding my carbs, but as I already have the kit, the first step for me is to try to do the job.

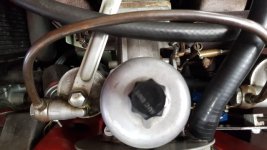
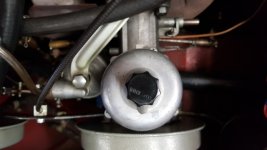
Here are two pictures of front and rear carbs (the bodies are stamped AUC 6040, too):

Front carb (640x360).jpg
Rear carb (640x360).jpg

By now, the only solution is to dismantle everything for an overhaul and try to fix the leak, in order to keep the cam's boss functional and avoid modifying too many things. Should I fail repairing the body, I will try to find another one - an AH one, of course.

I hope that I will be able to fit the new throttle shafts w/o the (costly) reamer...

Matt
 

CraigC

Jedi Trainee
Country flag
Offline
Matt, your carbs are laid out exactly as they should be, but they don't appear to be original 100M carbs. They are not "the exact opposite of what they should be". It would be nice to know their origin. They could be TR3/TR4 bodies converted to 100M application or perhaps they were one of the 100M sets that were reproduced by SU some years back and were available through all the usual AH suppliers. For grins, can you see/read any etched numbers below the "AUC 6040" casting number?

From the image of your front carb, there is one thing different from the 100M H6 and that is the combination idle speed/fast idle lever. Your lever has the idle speed screw offset further forward than the 100M configuration. It appears it MAY be the same lever used on the 100 H4 carb. It requires that the mounting boss for the cam be slightly shorter-- approx 0.450" total length.

Again, everything is laid out correctly. If your front carb is damaged and unrepairable, you need only source another AUC 6040 main body and fit all your existing parts to it, along with shortening the cam boss to make sure it lines the cam up properly with fast idle screw.

I will try to get a couple images up to illustrate the different levers.

EDIT: as I look more closely at your front carb pic and compare it to my front carb, the idle/fast idle lever on yours may be correct. The number is cast into the rear facing side of the lever and is AUC 4713. Moving the heater hose out of the way to get a straighter shot at that area would help.
 
OP
M

matt78

Senior Member
Offline
OK, I don't assert that they are genuine 100 M carbs : my only conclusion is that the front one is from an unknown type, has been modified and, due to this mod, is leaking...

The lever # is the one you mentionned.

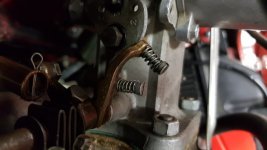
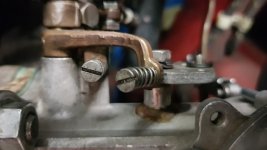
Here are some additional pictures of the carb lever :

carb lever_1 (360x640).jpg

carb lever_2 (640x360).jpg

The modified boss can be seen easily (not a good quality job).

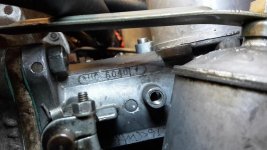
And the carb side with a # under 6040 :

carb side_2.jpg

Don't know if this is of interest...

Matt
 

CraigC

Jedi Trainee
Country flag
Offline
Matt, looks like someone tried to epoxy the fast idle cam mounting boss onto that carb. Perhaps it was originally a Jag version AUC 6040 where that boss was originally not present

With the idle/fast idle lever having the correct number, your solution is fairly simple. Just acquire another AUC 6040 main body and swap all your existing parts over.

Make sure that the boss for the fast idle cam is .575" long. I suspect that they all started at that length and were modified by SU for the various applications--AH 100M, MGA TwinCam, TR3 & 4, Jaguar, etc. You will probably need to thread that boss. Take it slow with a normal tapered tap, being sure not to go too deep, you don't want the tip of tap to bottom out and pop the boss off. I would test fit the pivot bolt as you go. If the tapered tap does not provide suitable depth of threads, you may need to finish with a bottoming tap.

As far as locating a suitable main body, I may be able to help with that, but I won't know for a week or two.

Regarding the etched number in last pic, it is located much lower than on the Healey or Triumph bodies I have and they were only 4 digits long. Those numbers indicate the original application of the carb.
 
OP
M

matt78

Senior Member
Offline
Yes, replacing the body would be straightforward, but I intend to try to repair it first.
Steve, that's what I thought of, and I'm wainting for the welding material I previously ordered. Hope this will be ok, and that I won't damage the body, as I'm not a good welder...

Matt
 
OP
M

matt78

Senior Member
Offline
Steve,

I am happy to provide you some entertainment.
This afternoon, I received the welding aluminium sticks, and the week-end is coming : what a thrill :eagerness:

I'll keep you posted, of course.

Matt
 

spinaway

Freshman Member
Country flag
Offline
Hi Matt
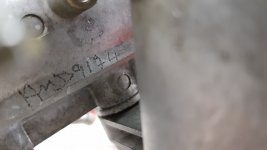
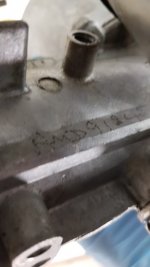
Referring to your Pic-3 you posted on 14th May showing the side of the carb body, It shows a hand etched number of AUD91xx on the bottom of the body. I put in the "xx" as it should have a 4 digits after the AUD.
I have a suspicion the full number on your carb is AUD9124. . This AUD9124 specification carb was built for Rover 75, Rover 90, Rover 105 of the 1955 to 1959 period. They used only 1 carb per engine. Possibly your other carb also has the AUD9124 spec hand etched on the carb body side.
What makes me suspect this ?? Well my car had 2 AUD9124 carbs fitted in its very early days for racing etc. It would have been a poor mans way of generating a 100M spec engine. The AUD9124 spec called for the boss on the right hand side of the carb body to be machined off so of course that's not very helpful for us Healey guys for fitting the choke cam on the front carb. My original owner had tapped the carb body side for a fine thread bolt and had fitted a cam holding pivot ok. Out of interest he had also hand machined the inside of the original H4 alloy manifold to transition the 1.75 inch carb to the head OK .... plus an adaptor plate made up to adapt 4-stud H6 carb to 2-stud H-4 manifold. I did at one stage fit an original 100M manifold, but it made no noticeable difference so have put it back to the way the guy raced it.
Can you confirm what the actual hand etched numbers are on both carbs please ?
Additionally on the top face of the carb mounting flange you may find a two character stamping. Probably would be a alpha character and then a number. If anything there please advise.
Regards
 
OP
M

matt78

Senior Member
Offline
Hello.

I took apart the two carbs this afternoon.

The rear one is 9124 :
front carb_2 (640x360).jpg

Not 100 % sure for the front one (must be a 2, not a 7 ?) :
rear carb_2 (640x360).jpg

I couldn't read any # on the top of the flanges, but maybe I didn't understand where to look at ?

Now up to the task of dismantling and - hope so - repairing : this is the end of the beginnng !

Another question : what is the acceptable level of radial play for a throttle shaft inside the body bores ? It seems to be quite small, but I want to be sure that I really NEED to replace them, as I'm not sure to be able to rebore the bodies...

Matt
 

spinaway

Freshman Member
Country flag
Offline
Hi Matt
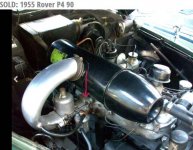
Rover90-1955_H6-Carb.jpg

OK looks like both of your H6 carb bodies are AUD9124 as suspected. Given that the original pre-machining number on the body casting is AUC6040-5, this is probably an early 1960s version of the H6 body mainly produced for the spare parts system. The "5" at the end indicates a very late casting version. My AUD9124 carb bodies are similar.
I have attached a pic of this H6 carb in its original use in a Rover 90 out of interest. You will note that the float bowl is on the right side and is also flat. Its highly likely that the owner of your car transferred over the float bowls (and maybe the choke levers) from his original H4 carbs to his new H6 carbs. They are the same float bowl on both.
You may also note that there is an extra device/pipe heading from the top of the float bowl to under the carb body. This device picked up a vacuum feed under the carb (next to the vacuum pickoff point feeding the distributor), the purpose of which was to weaken the mixture at certain times. The H6 carb does not provide accurate mixture control across the full range when used on many 6-cylinder engines using just one carb per engine. So SU added this device to get around the problem. Your weakening device looks to have been removed, which is good, but you will still have the extra drilling under the carb body which should be blanked off.

Re the possible stamping on the mounting flange of the H6 carb body. See my red arrow on the Rover carb picture. If its present it will be on the upward facing face of the mount flange, If you see anything let us know plz.
Regards
 

steveg

Yoda
Gold
Country flag
Offline
Spinaway,
This is very interesting. Thank you for the info.

Out of curiosity, I unsuccessfully looked in the Burlen SU "Spare Parts and Specification Catalog" for these AUD numbers.

Is there another source?

BTW - I was part of the Southern California contingent that attended the 2015 Nelson meet and toured the country afterwards. Really enjoyed hanging with the Kiwis and Aussies!
 
OP
M

matt78

Senior Member
Offline
Thank you for all this information.

I confirm that :
- there's no # stamped on the flanges,
- the two drillings under the front carb are blanked off, but under the rear carb, only one is, the other drilling receiving the vacuum line feeding the ignition,
- just for fun, even the float levels are badly adjusted - not to speak about the twisted forks... and the piston springs are different between the rear carb (red, like 100M) and the front one (no colour, and almost 3 cm shorter)...

Now, I better understand why each time I had a look to the Moss catalog, I never fully recognized the parts fitted on my car :rolleye:

Do you have any comment / data regarding the throttle shafts maximum play, please ?

Matt
 
Last edited:

Dandare

Jedi Hopeful
Country flag
Offline
H6.jpg


I think this is the animal. It's possible these were fitted to a Land Rover also in which case spare s/h bits might be around. I don't know that for sure though.

Danny
 

steveg

Yoda
Gold
Country flag
Offline
Matt,
The thing is whether air leaks in or not. Not what the clearance is.

With the motor running, shoot some water or WD40 or window cleaner at the joint where the shaft enters the carb body. If the car idles faster or slower, you've got a leak.

Would be surprised if they didn't leak.

Don't know if this is feasible from France, but you might want to consider sending your carb bodies to Tom Bryant in the US for re-bushing with Delrin nylon. This will make them run better if you're having idling problems.

He has a lot of info on his website:
https://thosbryant.wordpress.com/2014/03/30/su-carburetor-rebuild-h-6/
 

spinaway

Freshman Member
Country flag
Offline
MATT
Sounds like your small drillings under the carb body are correctly set up. One hole on one carb used to feed the distributor vacuum advance, and the other 3 holes blanked off.
Probably would pay you to order two new springs, so you know you have two known similar rate springs. Order as per 100M spec springs.
Steve above comments on the throttle spindle clearance. Good to be fussy with this one.

STEVE-G
I dont have any SU books or catalogues etc. that shows these carb body numbers, or total carb specifications.
I have had my car for 45 years or so and when I got it one of the guys that used to race it told me its carbs were taken off a wrecked Jaguar. So I was intrigued as to to what exact car the carbs came off. I used to hassle XK120 guys to find out what their carbs were, but no joy. Then in recent times I ran into a Jag guy who knew his SU stuff and he said NO, that's not a Jag carb. So he proceeded to tell me the AUD9124 was a Rover carb body spec, which set me down the right path. Then I hassled some Rover guys and got the lowdown on what exact cars they were on etc. One funny thing is that all the Rover guys say that the "weakening device" was added to the H6 carb to aid extra economy on this Rover car. But in fact it was added by SU to cater for a deficiency in the H6 running as single carb on a 6 cylinder (or more) engine. Have to give credit to Rover for good marketing I guess.
One thing to note: The AUD9124 number is the number of the assembled carb body only, as I understand it. In other words, machined carb body plus throttle spindle etc. The specification for this total carburettor for Rover-90 is AUC719.
Just as for Healey 100M: Total carb specification is AUC739, and the individual carb bodies only are numbered AUC6047 and AUC6053.

Glad to hear you made a tour of the South Island NZ Steve. Some quite good Healey roads around this area, particularly now with no tourists able to come in haha. I was not at that Nelson rally unfortunately. I think my brother may have gone to that rally. He has a BT7 Tri-Carb. I must ask him.

Regards
 
OP
M

matt78

Senior Member
Offline
Thank you both for your comments and advices !
Unfortunately, I noticed the small play of the rear carb throttle shaft only AFTER having taken everything apart. My mistake :blue:
So it's too late for a brake cleaner spray test, as I don't want to put back all the stuff on the engine now...

As a preventive maintenance action, I will try to replace the shafts.
I already ordered the two red springs, of course.
I'll keep you posted.

Matt
 
Similar threads
Thread starter Title Forum Replies Date
I Wanted BN1 with H6 carbs : bodies of TR3 Austin Healey Classifieds 1
G 1955 Austin-Healey BN1 H6 Carbs Austin Healey 1
Gray_Cat 55 100 BN1 Carbs Austin Healey 2
S Wanted Windscreen Wiper Arm for BN1 wanted Austin Healey Classifieds 2
J For Sale BN1 project car (price reduction) Austin Healey Classifieds 0
W BN1 Steering Box Removal Austin Healey 11
W BN1 Steering Box Austin Healey 3
S BN1 Wheel-Tyre Combination Austin Healey 10
AUSMHLY Laygear End Float BN1-BJ8 Austin Healey 2
W Healey BN1 Ignition Light Austin Healey 8
T Wanted: Early BN1 Sidescreens Austin Healey 2
Guido36 BN1 with Triumph TR 4 engine Austin Healey 1
B Austin-Healey 100 BN1 Electrical Diagram Austin Healey 0
W BN1 Gearbox First Motion Shaft Austin Healey 0
I Austin-Healey BN1 Parts List Austin Healey 4
BoyRacer BN4 Front Wings on a BN1 Austin Healey 9
BoyRacer Engine Swap: 3000 Engine Into a BN1 Austin Healey 25
BoyRacer Replace BN1 steering box with later version? Austin Healey 0
red57 Interesting BN1 for sale in Bellingham, WA Austin Healey 4
D BN1 Parts to Trade Austin Healey Classifieds 0
S WANTED: Healey BN1 "Smiths" Fuel Gauge (Dead or Alive) Austin Healey Classifieds 3
A BN1 Mechanical Brake Switch Austin Healey 23
P Wanted BN1 can shaft Austin Healey Classifieds 0
C BN1 Clutch Pedal Rattle Austin Healey 2
CharlesBN1 Uprated or 'umbrella' valve stem oil seals for BN1 Austin Healey 2
Guido36 BN1/BN2 Sidescreens Austin Healey 0
M BN1 Loss of Power Austin Healey 21
L Seat position for a BN1 Austin Healey 0
CharlesBN1 Wanted WTB Shelley Jack [6 INCH DL] for Early BN1 Austin Healey Classifieds 0
I Ball Bearing cup for old style BN1 steering box Austin Healey 0
M Heat-related carb issue on BN1 Austin Healey 7
RCarr 1954 BN1 Wiper Wheelbox and Rack Austin Healey 3
CharlesBN1 Wanted wanted to buy - sidescreen trim/strips for early BN1 Austin Healey Classifieds 5
CharlesBN1 BN1 Soft Top installation - need advice! Austin Healey 3
Michael Oritt Optimal lighting for a BN1 Austin Healey 5
D Wanted BN1 LH Seat Cushion [Bottom] Austin Healey Classifieds 0
J 100 bn1/bn2 id Austin Healey 26
HealeyRick Wilwood Discs on a BN1 Austin Healey 1
CharlesBN1 need some advice fitting the bonnet on a 54 BN1 Austin Healey 4
Z For Sale 1954 Austin Healey 100-4 BN1 Beautiful Restoration Austin Healey Classifieds 0
Z For Sale 1955 Autsin Healey 100-4 BN1 and 1956 100-4 Race car Austin Healey Classifieds 0
D Wanted BN1 or BN2 Donor/Parts Car Austin Healey Classifieds 1
GeorgeC Rear spring disassembly - BN1 Austin Healey 1
Jake BN1 Front Shroud Badge - What is original? Austin Healey 4
Jake For Sale FS: BN1/BN2 Kilmartin Chassis Repair Parts, New Austin Healey Classifieds 2
55modified Need photoshop help for side vent options on my BN1 Austin Healey 6
55modified Nardi hub for a BN1? Austin Healey 10
L BN1 Transmission rebuild Austin Healey 1
simon1966 Replacing the witches nose in-situ. BN1 Austin Healey 14
P BN1 Rear Chassis-to-Shroud Extensions Austin Healey 1

Similar threads

Top