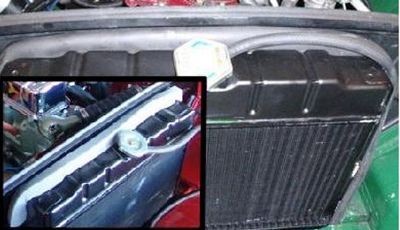
 The pictures to the left are representative of the current methods used to help keep air moving through the Radiator instead of past it. It works and has since the idea was introduced by the factory. Some have opted to use pipe insulation and when installed neatly does look better than the typical foam that is sold as an original replacement part. Adhesives are commonly used to hold the material in place, but stories continue about how the foam is sucked into the fan and shredded. Undoubtedly there are thousands of folks who have never had a problem, but still it looks like a window seal and out of place in an otherwise pristine Engine Bay. This is just my opinion of course and my solution, while it works for me, may not be right for you. The following is how I did it and you are welcome to give it a try if you like. The pictures to the left are representative of the current methods used to help keep air moving through the Radiator instead of past it. It works and has since the idea was introduced by the factory. Some have opted to use pipe insulation and when installed neatly does look better than the typical foam that is sold as an original replacement part. Adhesives are commonly used to hold the material in place, but stories continue about how the foam is sucked into the fan and shredded. Undoubtedly there are thousands of folks who have never had a problem, but still it looks like a window seal and out of place in an otherwise pristine Engine Bay. This is just my opinion of course and my solution, while it works for me, may not be right for you. The following is how I did it and you are welcome to give it a try if you like.
 I suppose, that first, I should show you the alternative (photos on the left). I suppose, that first, I should show you the alternative (photos on the left).
(There are larger pictures at the end of this article.)
This is a very simple project that does not require any special tools. It's a fun project and so, let's begin.
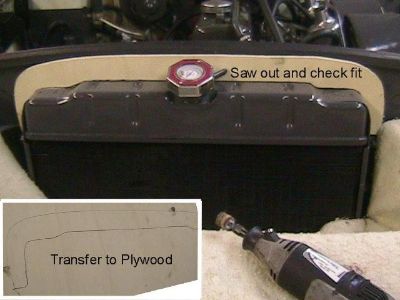 Use a piece of Cardboard placed against the front of the Radiator as a template by drawing a line with the Radiator as a guide. Cut out the Cardboard and use it as a template and transfer it to a piece of ¼" Plywood. Cut out the Plywood and test fit it as shown in the picture above. Trim by cutting or sanding until you're satisfied with the fit. Use a piece of Cardboard placed against the front of the Radiator as a template by drawing a line with the Radiator as a guide. Cut out the Cardboard and use it as a template and transfer it to a piece of ¼" Plywood. Cut out the Plywood and test fit it as shown in the picture above. Trim by cutting or sanding until you're satisfied with the fit.
 The Aluminum Sheet being used can be purchased from McMaster-Carr on line and is part #8973K61. It is Improved-Strength Basic Aluminum (Alloy 3003) and comes in a sheet .016 thick X 24" X 36" at a cost of $13.09. This is way more material than this project will take. You may be able to get a smaller piece, but it will need to be at least 24". I believe you will like working with this material. You won't need a saw to cut it and you can do the forming necessary for this project by hand. The Aluminum Sheet being used can be purchased from McMaster-Carr on line and is part #8973K61. It is Improved-Strength Basic Aluminum (Alloy 3003) and comes in a sheet .016 thick X 24" X 36" at a cost of $13.09. This is way more material than this project will take. You may be able to get a smaller piece, but it will need to be at least 24". I believe you will like working with this material. You won't need a saw to cut it and you can do the forming necessary for this project by hand.
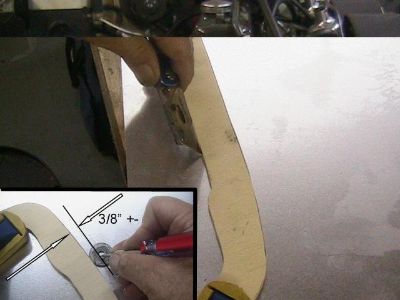
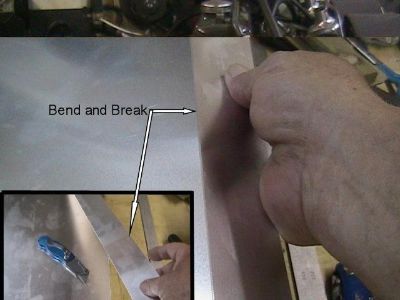
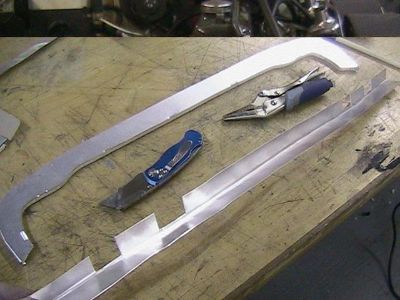
Lay your Plywood piece on the Aluminum, clamp it so that you can draw a line along the inside area of the Plywood piece as shown in the picture above. Instead of using a marker, use a Box Knife. You're not trying to cut it out, just making a good line. For the outside, carefully reset your clamps so you can get to the outside line. Use a scribe (pick, sharpened screw driver) and mark 3/8" outside the Plywood piece. You can use a washer or any thing as a spacer to mark your line. After it is marked, use the Box Knife and retrace the line. Rather than cutting out the marked piece, we will break it out. See the picture below. All the Aluminum will be done like this.
 Once the Aluminum piece has been broken out lay it on the Plywood piece so that the inside edges are flush, with the Aluminum hanging over the outside edge. Use a staple gun and staple the Aluminum to the Plywood not more than 3/8" from the edge. ¼" staples work fine.
 It should look something like this. It should look something like this.
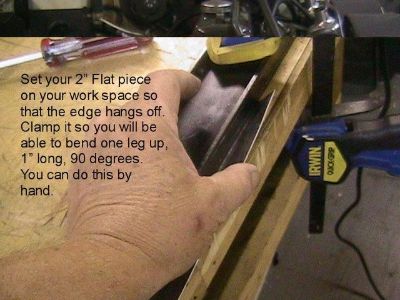
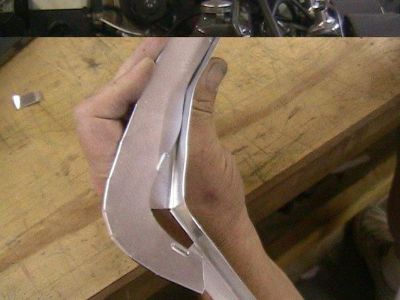
Next we will want to turn the overhanging Aluminum up 90 degrees and then bring it down flush to the opposite side of the Plywood which will mean that you have an Aluminum piece with a Plywood backing.
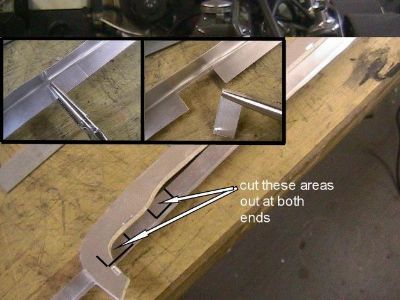
First we will have to notch around the corner sections. This is all break out, not cut out.
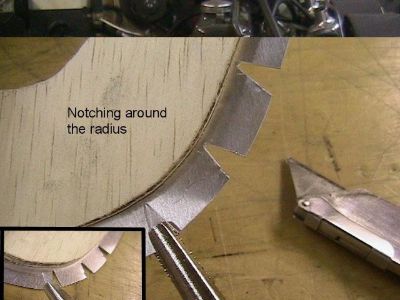 Once the piece is notched, turn the tabs up 90 degrees by hand.
Just push them up. The long straight section can be done the same way
except you don't have to notch it. It won't hurt anything if you do
though. Once the piece is notched, turn the tabs up 90 degrees by hand.
Just push them up. The long straight section can be done the same way
except you don't have to notch it. It won't hurt anything if you do
though.
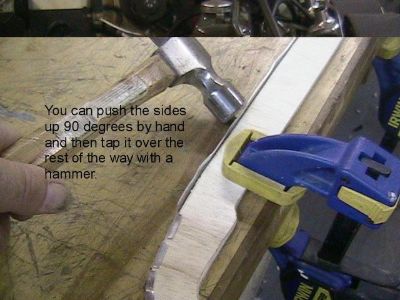 Use a hammer or mallet to finish wrapping the material around the Plywood. Use a hammer or mallet to finish wrapping the material around the Plywood.
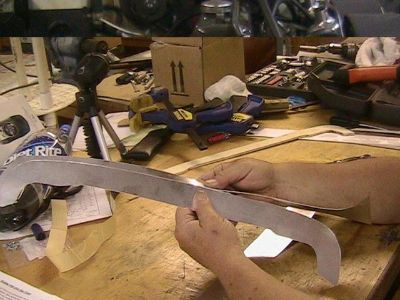
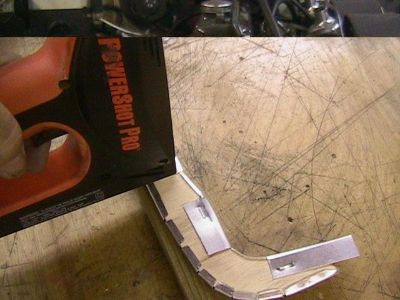
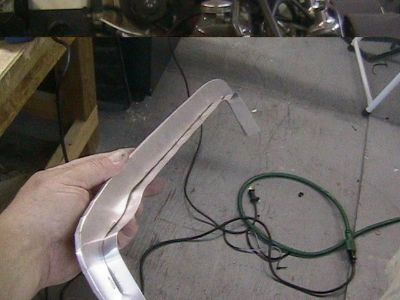
 To keep things simple the piece in the picture above will be referred to as "Fred". The part to the left will be referred to as "Wilma"
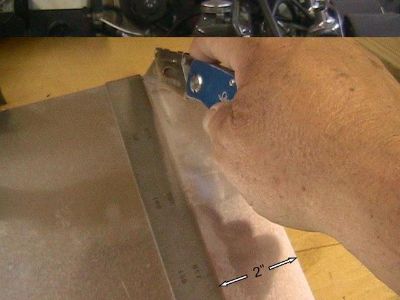
 Break out another piece of Aluminum 2" X 24" (Wilma) Break out another piece of Aluminum 2" X 24" (Wilma)
 This will be the piece that will be formed to fit the contour of the top of the radiator. It will first be bent 90 degrees and then made to follow the contour of the top of the Radiator and match up to Fred. This will be the piece that will be formed to fit the contour of the top of the radiator. It will first be bent 90 degrees and then made to follow the contour of the top of the Radiator and match up to Fred.
 In the picture on the left, notice that Wilma is lying under Fred. The leg of Wilma that is flat against the table will be attached to the back side of Fred once it is formed to match the contours of the piece. In the picture on the left, notice that Wilma is lying under Fred. The leg of Wilma that is flat against the table will be attached to the back side of Fred once it is formed to match the contours of the piece.
Let Wilma extend beyond Fred on each end equal amounts as shown in the picture above. Use a pencil and draw a line just before and after each curve or radius. You will have to guess for the line at the end. Use your Box Knife and retrace the lines and break out the pieces. If you didn't take out enough to clear the radius just take out a little more.
 Fred and Wilma should now look something like the picture to the left. Fred and Wilma should now look something like the picture to the left.
 Press Wilma into Fred so that the broken out areas are at the curves of Fred. Get all the curves to fit nicely then turn both pieces over and lay them on a piece of wood. I used a 1x2 but just something so that Wilma's vertical leg doesn't drag. Pull Wilma in tight to Fred and staple as shown in the picture below. Press Wilma into Fred so that the broken out areas are at the curves of Fred. Get all the curves to fit nicely then turn both pieces over and lay them on a piece of wood. I used a 1x2 but just something so that Wilma's vertical leg doesn't drag. Pull Wilma in tight to Fred and staple as shown in the picture below.
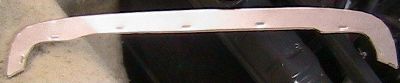
 Fred and Wilma should now look something like this photo. Fred and Wilma should now look something like this photo.
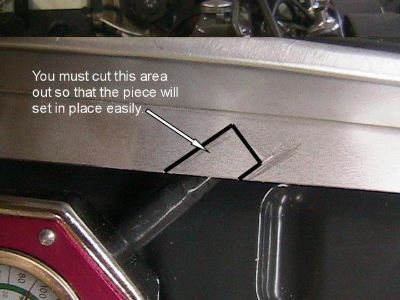 Take your new Radiator Seal and place it as if you were going to install it and mark Wilma's leg where the over flow nipple is at. Use a pencil. Take your new Radiator Seal and place it as if you were going to install it and mark Wilma's leg where the over flow nipple is at. Use a pencil.
Then retrace the lines with a Box Knife and break out the piece. Now you can set your piece in place and mark the ends to be trimmed.
 You will have to decide how you want to route your over flow hose. You can drill a hole in Fred and run it that way, or you can stay in front and go to the Radiator support and drill a hole, or you can go through the big hole that already exists. You will have to make that decision. You will have to decide how you want to route your over flow hose. You can drill a hole in Fred and run it that way, or you can stay in front and go to the Radiator support and drill a hole, or you can go through the big hole that already exists. You will have to make that decision.
If you want to make Fred and Wilma look like one piece run a small bead of paintable caulk at the seam before you paint it.
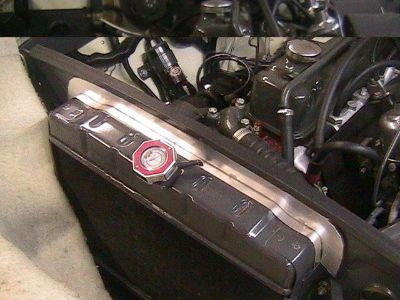
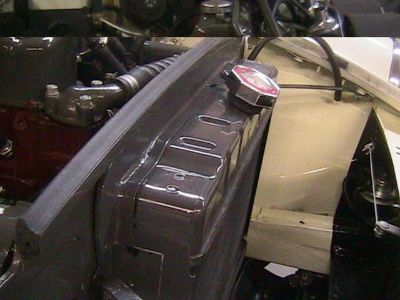
This is how it should look at this point.
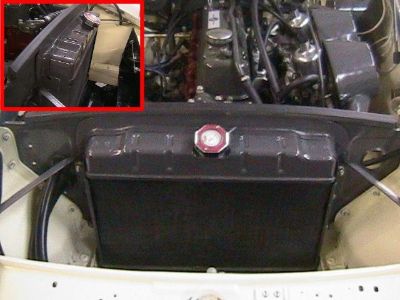
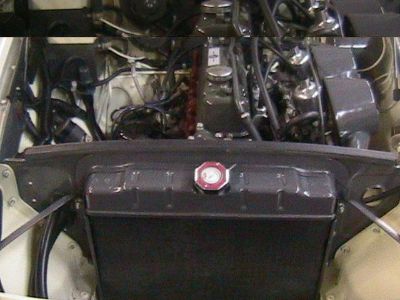 I had fun doing this project and if you decide to try it I hope all turns out well and that you also have fun with it. The pictures below show the final installation. I had fun doing this project and if you decide to try it I hope all turns out well and that you also have fun with it. The pictures below show the final installation.
 Mick McGuire Mick McGuire
|