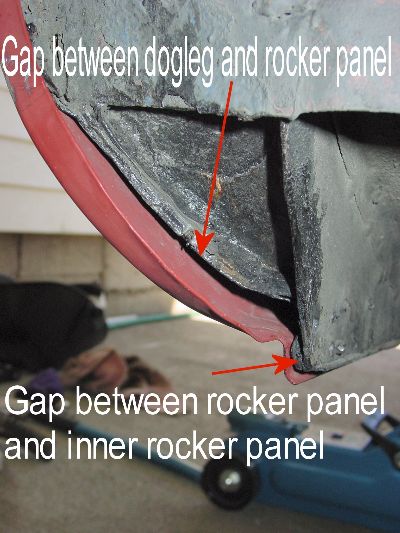
 When installing rear Dog Leg panels, realize that they do not always fit up to the other panels as perfectly as you might like. Sometimes you will end up with gaps as shown and they will need to be filled to keep out road wash and debris. When installing rear Dog Leg panels, realize that they do not always fit up to the other panels as perfectly as you might like. Sometimes you will end up with gaps as shown and they will need to be filled to keep out road wash and debris.
The gap between the dog leg (outer skin) and the inner rocker panel is where most all of the dog leg rot begins, not usually inside the rocker itself. Therefore it is most important to a) keep the crap OUT, and b) to shoot some sort of corrosion preventative (Waxoyl, Penetrol, etc) between these panels. The accumulated dust and debris acts like a sponge and when water gets in, the dirt just holds it there so that it can attack the spot longer. Also note that you should seal ALL the edges of the replacement panel as water and silt can enter along any edge, run down to this gap, and start corrosion.
OE Weatherstipping shapes Early Cars
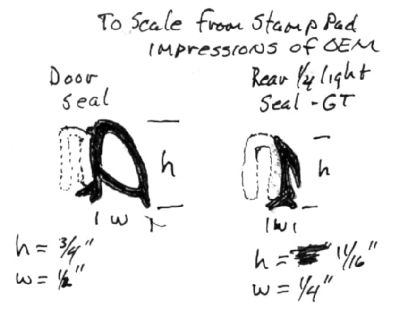 These are impressions made from OE weatherstripping from my 1968 MGBGT. On the left is the main door weatherstrip and on the right is the cross section of the rear quarterlight weatherseal. To make these impressions, a sample was cut across the seal, and then the seal pressed into an ink pad and then onto paper. I have highlighted the rubber areas to make them more visible. I do have actual samples available. As you can see, most all current replacement seals are a bit off from these, but close enough in terms of function. These are impressions made from OE weatherstripping from my 1968 MGBGT. On the left is the main door weatherstrip and on the right is the cross section of the rear quarterlight weatherseal. To make these impressions, a sample was cut across the seal, and then the seal pressed into an ink pad and then onto paper. I have highlighted the rubber areas to make them more visible. I do have actual samples available. As you can see, most all current replacement seals are a bit off from these, but close enough in terms of function.
**************************************************************
Installation Photos of a typical Pertronix Ignitor Electronic ignition module into a Lucas 25D4 Dizzy
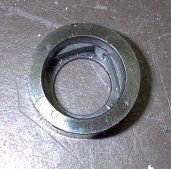 The Magnetic collar. there are four small magnets in it, equally spaced, which use the Hall Effect to trigger the Ignitor at the right moment. It spins in close proximity to the actual Ignitor pickup/control unit seen below. The Magnetic collar. there are four small magnets in it, equally spaced, which use the Hall Effect to trigger the Ignitor at the right moment. It spins in close proximity to the actual Ignitor pickup/control unit seen below.
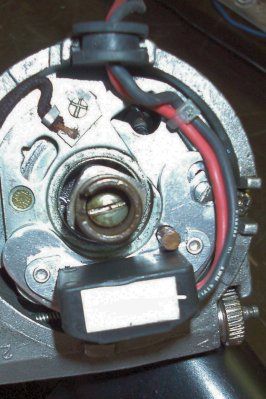 Here you can see a typical installation of the Pertronix Ignitor Pickup/Control unit into a Lucas 25D4 distributor. It mounts right to the existing rotating breaker points mounting plate and is located in place by the pivot pin the breaker points normally mount to. One other screw and a locating "teat" on the bottom position the Ignitor into place and correct relationship to the rotating shaft and magnetic collar seen above. The wiring from the Pertronix unit is routed so that it does not interfere with the free rotation of the upper breaker plate when vacuum advance attempts to move it. The wiring is anchored to the rotating plate to keep it out of the rotor's way, and with a small amount of slack between the anchor and the rubber feed through grommet so that it doesn't bind. Here you can see a typical installation of the Pertronix Ignitor Pickup/Control unit into a Lucas 25D4 distributor. It mounts right to the existing rotating breaker points mounting plate and is located in place by the pivot pin the breaker points normally mount to. One other screw and a locating "teat" on the bottom position the Ignitor into place and correct relationship to the rotating shaft and magnetic collar seen above. The wiring from the Pertronix unit is routed so that it does not interfere with the free rotation of the upper breaker plate when vacuum advance attempts to move it. The wiring is anchored to the rotating plate to keep it out of the rotor's way, and with a small amount of slack between the anchor and the rubber feed through grommet so that it doesn't bind.
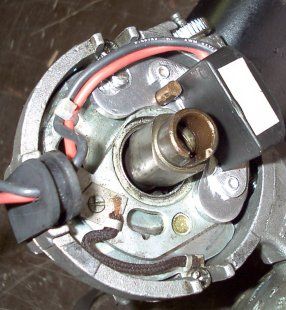 Another shot of the finished control unit installation. Make absolutely sure that the little black fabric covered wire between the rotating plate and the breaker plate mounting screw (in the slot on the side of the body casting) is screwed down AND that there is continuity between the plate and the body casting. This is the ground connection between the plate and the rest of the B's electrical system. Another shot of the finished control unit installation. Make absolutely sure that the little black fabric covered wire between the rotating plate and the breaker plate mounting screw (in the slot on the side of the body casting) is screwed down AND that there is continuity between the plate and the body casting. This is the ground connection between the plate and the rest of the B's electrical system.
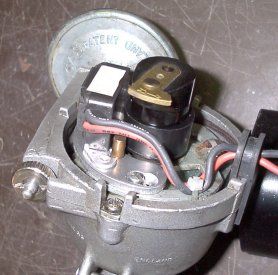 A final shot showing the unit fully installed with the collar and the rotor in place. Make sure the collar is down fully, you may need to fiddle a bit with it to get it to go over the cam on the shaft. The rotor will then hold the collar in place. If the collar is not down completely, you may run into difficulty getting the rotor on or getting the cap to fit down properly. If either of the latter happen, go back to making sure the collar and the rotor pushed down fully. They should look pretty much like you see in this photo. A final shot showing the unit fully installed with the collar and the rotor in place. Make sure the collar is down fully, you may need to fiddle a bit with it to get it to go over the cam on the shaft. The rotor will then hold the collar in place. If the collar is not down completely, you may run into difficulty getting the rotor on or getting the cap to fit down properly. If either of the latter happen, go back to making sure the collar and the rotor pushed down fully. They should look pretty much like you see in this photo.

Monroe SensaTrac # 5893 alternate Rear Tube shock for conversions ~ Extension limits
Monroe will send a catalog if you have a business address, this his how I got mine and was able to peruse their info to find a compatible shock. Compressed length is 9.5" and Extended length is 14.5". Total travel is 5". If you decide to find a shock yourself, measure max drop and rise of rear lower shock mount relative to the fixed upper mounting.
|