By Bob Muenchausen

Before spending time trying to fix an aftermarket
valve, consider replacing your leaker with a genuine Smith's
replacement valve. Gordon at the B-Hive in NC reportedly carries
these, and you can find his information at this site: http://bhive.tierranet.com/111heatingsystem.htm
However, if you have an aftermarket valve that is not leaking but simply needs some help getting you some HEAT.....Read On!
********************************************************************

The most fundamental problem with our OE heater valves is finding truly
good valves and consistently. Those who have gotten well-made OEM valves (such as those mentioned above) know, and
regularly report, that they have NO problems. But they are definitely in
the minority of those who post on most of the BBSs. This is sad
situation, in my opinion, and one that could be resolved if there was a
will to do so.
The aftermarket valves we
have received from most of our suppliers over the last 16 years in the
U.S. have prompted this "solution" of using stacked washers to regain
something like the "proper" functioning of these sometimes shoddily
made valves. A truly good OEM (Smith's) valve should not need this change,
but unfortunately, this fix of mine does give those of us who have received poor
valves an opportunity to actually get heat into our cars.
I have frequently and continually read negative reports on MG bulletin
boards and in emails to myself, however, about "new" replacement valves
which leak after a short while, or, more commonly, simply don't work as
they should at providing heat. Most owners simply need to get more heat and be able to shut the heat off come summer.
The modifications I discuss deal only
with how to get heat without eliminating valve closure, not with fixing leaking valves. Valves which
leak after only a short time should be returned to the supplier ~ Keep
your receipts!
Too many people have used the OEM
heater valve successfully, being able to move the cable far enough with
the dash control to move the operating lever on the valve the full range necessary to completely open and close it, getting plenty of
heat and being able to shut it off completely. To me, that says they
can operate correctly with the controls originally provided by MG.
If you have issues with your valve either not closing completely or not opening up completely, I would suggest that it would pay you to check out the operating cable you have for proper length. I realize that routing the cable and removing/replacing it is a pain, but what you may find is that after 30+ yrs of service, your cable may have been shortened or the route it has taken may have changed the relationship of the inner cable wire to the outer sheath. When shortening has been done, it is usually because the original inner cable end has either broken off or been so badly boogered up that someone simply cut off the offending end and cut back the cable's sheath to reveal a new length of inner cable.
Although the distance that the inner cable is moved by the dash control remains the same, the attachment of the sheath can change and that can change the relation of the inner cable to its attachment point and that, in turn, can change how your valve opens or closes.

My suggested modifications (below) are based on experience with many owners
over the last 10 yrs. who have gotten replacement valves, the majority of which
simply did not function as intended. We can blame suppliers, we can
blame indifferent manufacture by makers in far off lands. However, the
one point common to these folks' experience was that the valves they
trusted to give them OE performance, simply did not, not even with properly setup cable controls. When we
investigated this situation, others also found that their valves
operated little differently than the one whose changes I outline
below. Some better, some worse, but very few as intended. During
those years, I have received far more email grateful for a better
result than not, and I leave it up to you to decide if such a
modification is something you want to attempt.

The limiting factor of ALL valve designs is how large are the openings (inside diameter) in and out of the valve vs. the inside diameter of the outlet from the head and the inlet pipe to the heater core. For the flow to be truly unrestricted at full flow, the entire path needs to be essentially the same opening size all the way thru the system.
The internal valve shut mechanism must rise off of its seat enough in the full open position to ensure that as much coolant flows as passes the inlet pipe to the heater core, or it will end up a restriction also.
The biggest problem with flow for many aftermarket heater valves is that they don't all rise off their shut position as much as they should. In short, they rise up too late in relation to the swing of the control arm and when full open is reached, they are not really fully open. I have found that about as good as you can do is to ensure that at full shut, the valve just closes.
From that starting point, most will then open as much as is necessary to match flow with the heater core inlet.
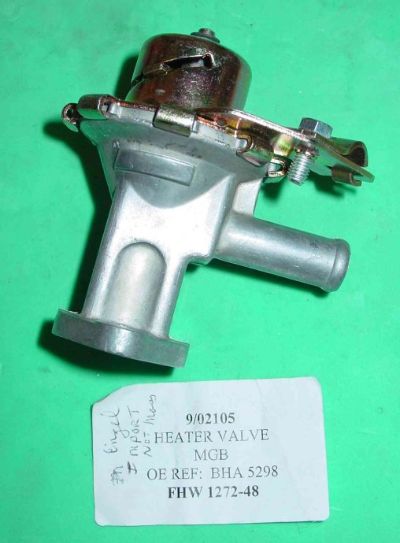 A brand new valve, purchased from Engel Imports. This is one of the better valves I have run across and perhaps demonstrates a willingness of some suppliers to find the better quality parts. Some of the units offered in the past were truly poorly done, loose fitting parts, crude castings of inferior materials destined to rot away in a short time. If you go to my alternative heater valve page, and look at the photo showing three bases, you will see an example of the diversity of valves offered and their equally diverse quality. A brand new valve, purchased from Engel Imports. This is one of the better valves I have run across and perhaps demonstrates a willingness of some suppliers to find the better quality parts. Some of the units offered in the past were truly poorly done, loose fitting parts, crude castings of inferior materials destined to rot away in a short time. If you go to my alternative heater valve page, and look at the photo showing three bases, you will see an example of the diversity of valves offered and their equally diverse quality.
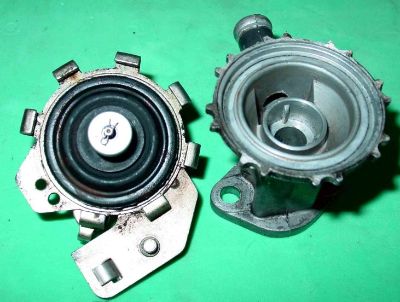
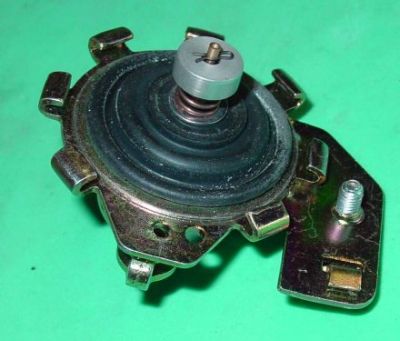 Once the locating rivet has been drilled out, and the valve head turned off the base casting, this is the view of the innards you will see. The rubber diaphram/seal, the spring loaded valve shut, and the retaining "hairpin" clip. Once the locating rivet has been drilled out, and the valve head turned off the base casting, this is the view of the innards you will see. The rubber diaphram/seal, the spring loaded valve shut, and the retaining "hairpin" clip.
Some units I have worked on use a more substantial "E-clip" instead. Replacing the clip with a stainless steel E-clip would probably insure the longest life for the valve, regardless of whether you choose to add the washers or not.
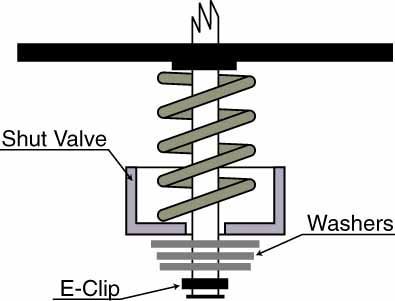 When stacking the spacer washers as mentioned below, this is how the above assembly will look in cross section. When stacking the spacer washers as mentioned below, this is how the above assembly will look in cross section.
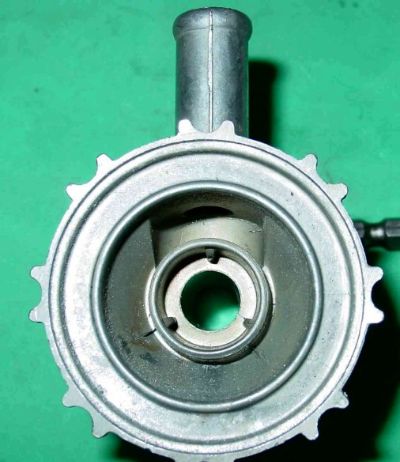 And this is a brand new, uncorroded base casting which bolts directly to the head. In this view, you can plainly see both the springloaded "restrictor's" seat in the center with its three guide ramps, and concentric to it, the next ring which forms the diaphram's sealing surface. The diaphram seals at this ring when the dash control is a bit past midway. The restrictor "seals" by a combination of spring pressure and closure against its bottom. And this is a brand new, uncorroded base casting which bolts directly to the head. In this view, you can plainly see both the springloaded "restrictor's" seat in the center with its three guide ramps, and concentric to it, the next ring which forms the diaphram's sealing surface. The diaphram seals at this ring when the dash control is a bit past midway. The restrictor "seals" by a combination of spring pressure and closure against its bottom.
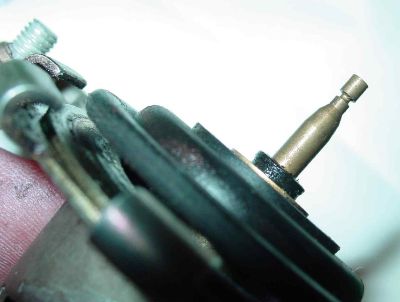 This is the shaft which the restrictor rides on. You can see the relief turned into the end for the clip. This is the shaft which the restrictor rides on. You can see the relief turned into the end for the clip.
Modifying for a better responding valve!
I purchased a new reproduction OE style valve for my MGB a some years ago, and in looking at it carefully before installation and measuring some openings, both for the hose and head connections, and internally, at the valve, I quickly came to the conclusion that the inner restrictor valve simply did not travel far enough off its seat to let in a sufficient amount of water even when the larger, rubber diaphram valve had moved its full travel. With dial caliper in hand, I determined that, as this unit came from the factory, the restrictor valve was only moving about 30% of its necessary travel to allow a full 100% flow from the head to the heater hose output. If I wanted as much heat as this particular valve was able to allow, then it appeared to me that some sort of correction of the restrictor valve was going to be necessary to rectify its insufficent travel.
This problem with this particular aftermarket* valve
was why I chose to reposition the restrictor valve in relation to its
shaft by shimming it with some small stainless washers behind the
e-clip (these small washers can be found at better hobby shops and
industrial hardware suppliers) .
So I decided to open up the assembly, carefully drilling out the pop-rivet that holds the upper mechanism from turning in relation to the lower body casting. I then chucked the base in a vise and tapped the "ears" around the circumfrence of the top with a punch and hammer until the assembly came loose. DO NOT BEND THE EARS TO LOOSEN, THIS WILL DESTROY THE SEAL WHEN YOU REASSEMBLE THE UNIT! When refitting the top to the base, make sure that the surfaces are all DRY. The bayonet-like locking action of the top to the base is supposed to clamp down the rubber diaphram and lubing the outer edge could cause the rubber to slip out and the valve to leak.
As we turn the temperature control knob on the dash, a cable driven lever rides up or down a ramp or slot in the "cap" and causes a center rod which has a rubber diaphram and a spring loaded cup attached to its interior end, to move away from or against the two respective openings.
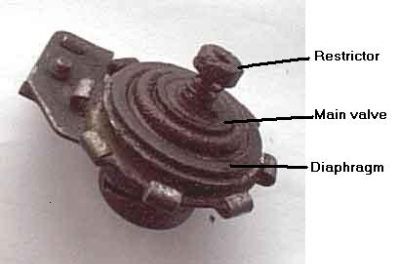
"This is a two-stage valve. When the large rubber diaphram valve is at rest (more or less the midpoint of its travel, the lever the cable attaches to is in the middle of its travel also. In this position a restrictor (valve shut or valve cup) sits on a secondary seat allowing only a relatively small amount of water through the center of the restrictor. Moving the valve to its Off position puts the main (large rubber diaphram) valve onto the larger seat above the restrictor valve, closing off even this restricted flow, whereas moving this valve to its Hot position lifts both the rubber diaphram wide open and the restrictor off its seat allowing a much larger flow."
"This seems to give a much finer control of water flow (hence heat) between Off and Warm than the relatively coarse control between Warm and Hot. One difference between some MGs and others is that some always seem to be either hot ot cold, owners unable to get anything in between, whereas those lucky enough to have both stages operating correctly are easy to set to warm or cool as well as fully off and hot." (Paul Hunt)
{Please see Paul Hunt's further comments on these Heater Valves at http://www.mgb-stuff.org.uk/wn_heaterframe.htm}
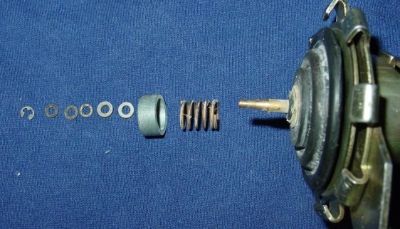
Shimming the restrictor valve with washers repositioned it relative to the shaft it rides on, allowing it to open with a more functional relationship to the actual movement of the shaft. You do not need many washers to make a real improvement, so go lightly with them! The key to the number you will need is their thickness. The ones shown above are only a few thousandths thick.
Also, keep in mind that with a dysfunctional valve, the relationship of the movement of your adjustment cable from the dash to its fixing point with the cable stop on the valve can and often does influence WHEN the restrictor AND diaphram valves will open and by how much. Even those cables and gear drives which worked perfectly with a good OE valve can have insufficient movement with a poorly executed replacement. In that case, about the most you can do is decide if heat or complete shut off is the more important aspect you want from your new valve and then to position your cable for full open or full shut at the valve's operating lever.
Results of simply shimming back the Restrictor valve:
Before beginning, I took some readings of the water temperature when fully warmed up, and of the air temp of both the outside air and the air delivered by the heater to the cockpit.
My initial results were as follows:
Water Temp Outside Air Temp Heater Air Temp
181 F 74 F 95 F
After installing the modified valve, I got the following readings:
Water Temp Outside Air Temp Heater Air Temp
181 F 74 F 152 F
As you can see, there was a rather dramatic difference between the stock and the modified valves, verifying my original thesis that this valve might be the source of a restriction and a major contributing factor to the heater's poor performance.
After concluding the test for heater performance, I then shut the valve to observe if the modifications might have affected the Shut Off capabilities of the valve, however, they did not. The diaphram valve continued to perform full shut off.
I know that some folks may not be willing to go this far in dealing with this situation, but this has worked out very well a great many people. And, of course, I have described how to do it yourselves as explained above.
*****************************************************************************************
Some Photos of the basic Heater Valve Components
 Note here that the spring loaded restrictor valve rides on the shaft bonded to the rubber diaphram, which serves as the main control/shutoff valve. If your diaphram assembly looks like this, you may have difficulty reusing the E-clip or "hairpin" clip on the shaft. Note here that the spring loaded restrictor valve rides on the shaft bonded to the rubber diaphram, which serves as the main control/shutoff valve. If your diaphram assembly looks like this, you may have difficulty reusing the E-clip or "hairpin" clip on the shaft.
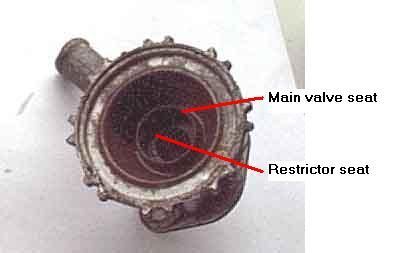 A little better view of the Main valve seat and restrictor seat. A little better view of the Main valve seat and restrictor seat.
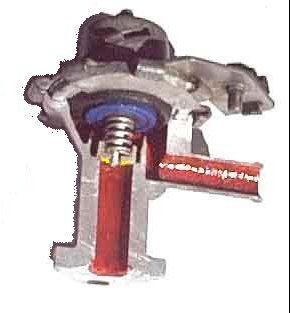 A cutaway of a typical Heater valve from Paul Hunt. Note the Yellow restrictor against its seat, and the Blue Main valve, part of the diaphram, which is off of its seat in this photo. A cutaway of a typical Heater valve from Paul Hunt. Note the Yellow restrictor against its seat, and the Blue Main valve, part of the diaphram, which is off of its seat in this photo.

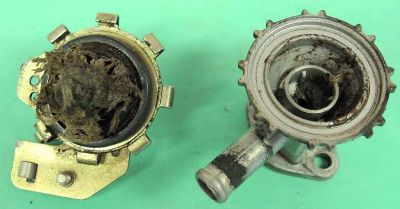 A valve submitted by Don Holle. When I opened it, this is what I found. Almost looks like old lawn clippings but it is actually the remnants of one of those "miracle" Stop Leak concoctions sold over the counter. Sure, it might seal a leaking head but think what else it seals!!!! In this case, it pretty effectively plugged the valve and Don got no heat! A valve submitted by Don Holle. When I opened it, this is what I found. Almost looks like old lawn clippings but it is actually the remnants of one of those "miracle" Stop Leak concoctions sold over the counter. Sure, it might seal a leaking head but think what else it seals!!!! In this case, it pretty effectively plugged the valve and Don got no heat!
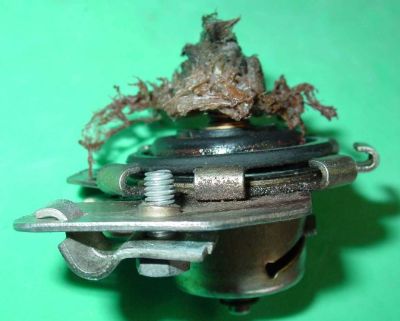 Just another view of the muck in his valve. Could yours look like this??? You might never know unless you opened it up. Doing so could save you the cost of a new valve. Take a look at Don's valve below once I cleaned it up a bit. Just another view of the muck in his valve. Could yours look like this??? You might never know unless you opened it up. Doing so could save you the cost of a new valve. Take a look at Don's valve below once I cleaned it up a bit.
 Don's valve cleaned up without much fuss allowing me to add some washers (not seen here) and then to simply seal it back up and reinstall the locating rivet. It makes at least a good spare since it showed very little wear or aging from chemicals or other exposure. Don's valve cleaned up without much fuss allowing me to add some washers (not seen here) and then to simply seal it back up and reinstall the locating rivet. It makes at least a good spare since it showed very little wear or aging from chemicals or other exposure.
A case demonstrating that you do NOT always need a NEW valve. You may just need to clean out your existing unit.

One issue which sometimes comes up when trying to make
the connections for the valve control is what is the correct control
cable run for easiest use and minimum kinks and hassles???
The dash
mechanism you see directly above should be mounted so that the cable
clamp is on the RH side (as shown the unit is upside down from what it
should be). The cable should then run from it in a long sweeping arc
behind the dash to an exit hole on the top of the firewall just under
the heater box/blower motor (on its RH side). There should be a rubber
grommet at this exit hole and the cable should then be pretty close to
the OE heater valve on the engine.
Routing the cable this way is the
least binding and most direct and should give you enough cable to
hookup to your valve with minimum problems. However, even when the dash
control unit is mounted correctly, be aware that the cable can often be
the wrong length due to mishandling over the years. Some previous
owners and mechanics have been known to have broken off the valve end
of the inner cable and cut back the spiral wrapped sheath to allow
hooking it up to the valve again.
When cars get to be this old, there
are many things that have happened to them we assume are OK, but
actually are not.
|