For many MGB and MGA owners, one of the nagging issues that
keeps them from enjoying their cars to the fullest is that the cooling system
seems to be inadequate, especially in hot climates. It is true that these cars were designed in an area where
temperatures above 90 degrees F. were seldom encountered, and many folks have
attributed their cooling issues to the cars' designers not having taken the
higher temps in markets like the USA or Australia into account. This is simply not true. These cars were tested under hot climate
conditions before they ever entered these markets and found to have adequate
cooling systems.
The real problem evolved over the life of the BMC/BLMC B-series engine which both of these cars
shared. A key factor that has been lost
sight of over the years was that the
design of this engine as originally conceived was that it was intended to use a
rather different thermostat than we have been used to.
This thermostat was a bellows design (see 1st photo below) which had a
movable sleeve around its bellows which moved up as the thermostat's main valve
opened in response to rising engine heat.
This movable sleeve, when the engine was cold, sat at a position that
allowed a coolant by-pass passage in the head (see 2nd photo below) to remain open, allowing warming coolant to
recirculate back into the head and engine while the main thermostat valve
blocked coolant from going into the radiator.
This setup was used to help to speed up warming the coolant to the
engine's operating temperature. As the
coolant temperature rose closer to this ideal operating temperature, the bellows type thermostat door opened,
allowing coolant to begin circulating through the radiator, while at the same
time moving the sleeve up into place to block the bypass passage, shutting off
its recirculation of the coolant before it entered the radiator.
These bellows type thermostats from Smith's ceased
production before the end of production of the MGA and the more typical wax pellet
type thermostat we have been familiar with for the last 40 years, was
substituted. They were replaced as modern engineering increased the cooling system's pressurization. The higher system pressure played havoc with the functioning of the bellows type design as it relied on expanding gases to make it work, and pressurization counteracted that to the system's detriment.
For basic temperature
control, the wax pellet type thermostat functioned OK, but they were missing that key sleeve, and from
that point forward, coolant would be able to re-circulate into the head and
block via the bypass at will and to some extent always defeating the flow of
coolant through the radiator. Although
not necessarily overly significant with a perfectly operating clean/brand new
cooling system, its effect would become a more meaningful contribution to
overheating in systems that progressively became more contaminated with scale,
rust, and sludge which reduced heat transfer from the head and block and into
the coolant. In fact, any factor which
reduced the cooling system's efficiency would make this shortcoming a bigger
factor in defeating the cooling system's original design and reducing the
margin of safety built into the system.
The original Smiths'
bellows type thermostats are almost impossible to find these days, and I am not
sure I would trust a 40 year old NOS unit for too long anyway, not only because of age, but because of the pressurization issue mentioned above..
In an attempt
regain the advantage of shutting off the by-pass circuit when the engine is
warmed up, a very perceptive Australian, Neal Cotty, took a chance to use the
factory optional blanking sleeve (originally intended for full flow
racing cooling only, with NO thermostat ~ see 3rd photo below)
together with a pellet type thermostat.
In short, his experiment worked very well, but his only reservation was
that he was fearful that in colder climes than his native Australia, it might
force the engine to warm up too slowly or, possibly, not at all.
This is where I stepped into this experiment by being
willing to turn my 68 BGT into a test bed to test his concerns. It definitely gets colder here in the Pacific Northwest in
winter than Australia, and like Neal, I too was a bit apprehensive. However, if empirical results are valuable,
my experience with this T-stat/blanking sleeve combination did not create as
much of (if any) problem with engine warm up during cold weather as
anticipated. Yes, my engine does take a
bit longer to warm up, but the difference is about ½ to 1 mile more of travel
to reach normal when the temps are below about 30 degrees. That is significantly less than the
difference I experienced before I started using a cover over the oil radiator
in winter! And I have been using this
combination since about 1999 and have had no reason to ever look back. It works very well for me as well, and
probably, closer to the engine designer's intent, than what we have been
generally doing for so many years.
The success I had with this combination inspired me to look
into the possibility that the choices among modern thermostats might also contribute
to allowing better, and better controlled, cooling. I had been made aware of what was called the "balanced"
thermostat designed by Robertshaw Controls (now marketed by Prestone ~ see
4th and 5th photos below) by my hot rod buddies and so I got one and used it instead of the common
pellet type. Although I will not say
that its effectiveness is entirely obvious when you drop one in, it does become
a bit more plain when driving at sustained highway speeds (70+ mph) as the temp
does seem a bit more stable and when under the strain of mountain climbing, it
takes longer for the inevitable rise to occur.
The balanced design is such that it is not influenced by coolant pressure
increases or decreases as engine rpms rise and fall, and that means that it is
better able to more accurately control temperature than pellet type T-stats.
An excellent discussion of how a thermostat actually works can be found at Rob Edwards site: http://www.mgcarz.com/thermostats.html

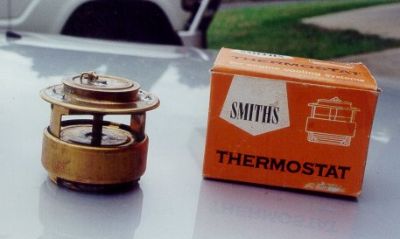 This is a photo of the OE type Smith's Bellows Thermostat. Note the moving sleeve along the outside of the bellows. This ring was intended to cut off the bypass port in the head once the engine warmed to normal. Photo: Neal Cotty This is a photo of the OE type Smith's Bellows Thermostat. Note the moving sleeve along the outside of the bellows. This ring was intended to cut off the bypass port in the head once the engine warmed to normal. Photo: Neal Cotty
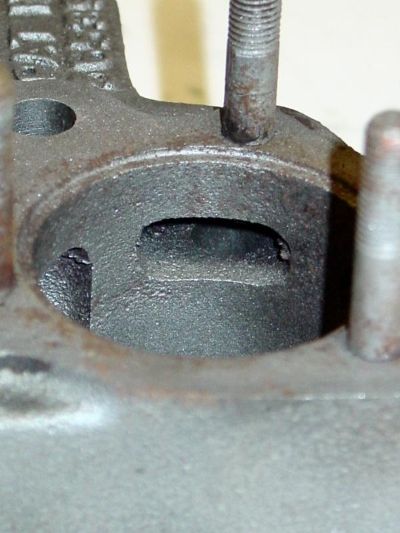 A photo of the bypass port in the head. As you can see, it lies just below the nesting place for the thermostat, and you can see that when the OE Smith's T-stat's sleeve rose up, it would shut off this passage. Note also the drilled passage inside leading down into the head and block. A photo of the bypass port in the head. As you can see, it lies just below the nesting place for the thermostat, and you can see that when the OE Smith's T-stat's sleeve rose up, it would shut off this passage. Note also the drilled passage inside leading down into the head and block.
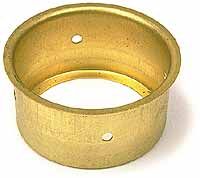 This a photo of the commonly available blanking sleeve once intended only for racing. It was not originally designed to be used with a T-stat, but it does work well with one to shut off that bypass port and help restore the original coolant flow when your engine is fully warmed up. This a photo of the commonly available blanking sleeve once intended only for racing. It was not originally designed to be used with a T-stat, but it does work well with one to shut off that bypass port and help restore the original coolant flow when your engine is fully warmed up.
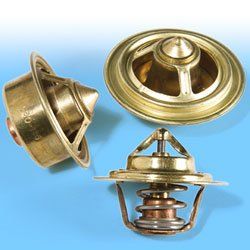 Just a photo showing two views of the Robertshaw designed Balanced type T-stat (upper) and a side view of the commonly used wax pellet type T-stat (below). Both will work with the blanking sleeve, I just happen to like the action of the Balanced type. Just a photo showing two views of the Robertshaw designed Balanced type T-stat (upper) and a side view of the commonly used wax pellet type T-stat (below). Both will work with the blanking sleeve, I just happen to like the action of the Balanced type.
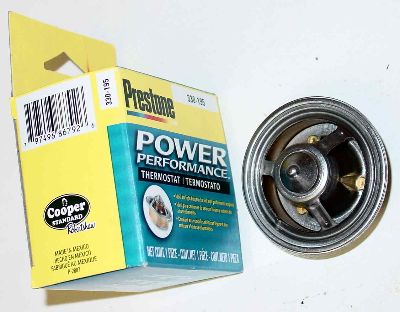 Robertshaw no longer markets the balanced T-stat, but it has been picked up for marketing by Prestone. In this case, the Model # is 330-195, indicating that it opens at 195F. A 160F T-stat would carry the # 330-160 part number, and a 185F unit, #330-185. If you have difficulty finding these, simply copy this photo to your computer and print off a copy and take it to your parts house. They will then know that they DO exist, and with the UPC code, they will know more about how to find you one. Robertshaw no longer markets the balanced T-stat, but it has been picked up for marketing by Prestone. In this case, the Model # is 330-195, indicating that it opens at 195F. A 160F T-stat would carry the # 330-160 part number, and a 185F unit, #330-185. If you have difficulty finding these, simply copy this photo to your computer and print off a copy and take it to your parts house. They will then know that they DO exist, and with the UPC code, they will know more about how to find you one.

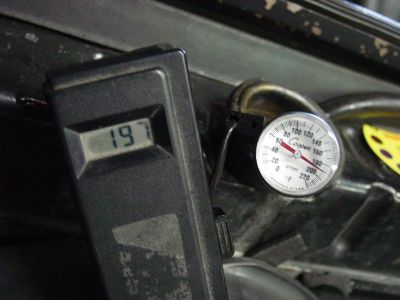 This photo shows coolant temp taken while the engine was running after a short run. The electric fan was running, and coolant flowing into the top tank of the radiator. The two temp gauges, one a typical mechanical pocket gauge and the larger black box, a precision calibrated electronic gauge had their probes extended into the coolant through the radiator filler neck and as close to the radiator inlet as possible. As you can see, they give reasonably comparable readings of about 197F. This photo shows coolant temp taken while the engine was running after a short run. The electric fan was running, and coolant flowing into the top tank of the radiator. The two temp gauges, one a typical mechanical pocket gauge and the larger black box, a precision calibrated electronic gauge had their probes extended into the coolant through the radiator filler neck and as close to the radiator inlet as possible. As you can see, they give reasonably comparable readings of about 197F.
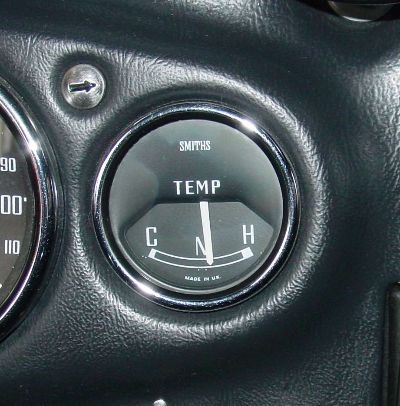 A photo taken within 10 secs of the photo above of the dash gauge. A photo taken within 10 secs of the photo above of the dash gauge.
I post this as a relative indication of what the "Normal" range probably is in most MGBs. Anyone can duplicate this process to resolve for themselves how well "calibrated" their particular MGB's temp gauge might be. At least you would then know what "Normal" means in actual degrees for your car.
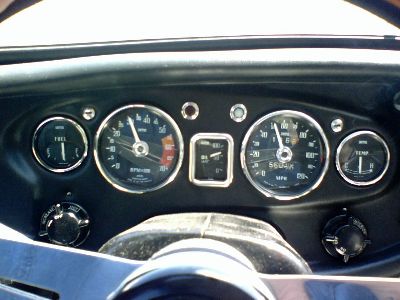 Another photo taken while on the road in actual driving conditions, FYI Another photo taken while on the road in actual driving conditions, FYI

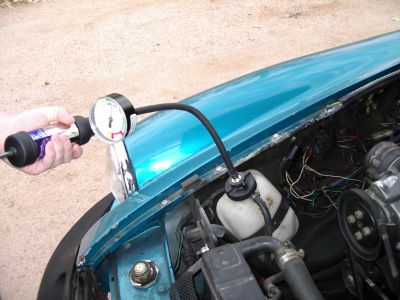
There are occasions where it is desirable to pressure test your system. The device shown in the photo can often be rented/borrowed from an auto parts house and is simple to use. It will help you find leaks when none seem apparent under ordinary circumstances. MGB radiator caps have come in several different pressures over the years. Your best move is to read up in your shop manual for the correct pressure for your year and engine, and then, when testing keep that in mind at as you raise the pressure in the system. If leaks start after you reach that point, you could either have a bad (too high) pressure cap. If, however, your leaks start below the cap's pressure, it means that you need to do some remedial work to all those areas where leaks start even sometimes before the system is pressurized. Pressurizing a leaking system is often the best means of locating where they are.

Many folks will want to add an electric fan(s) to their MGB cooling system. One thing necessary will be the installation of some sort of triggering switch that brings the fan on line at the right temperature.
In my case, I used an existing switch originally intended for a Toyota, Wells TU-68. This is a threaded body switch, which requires that a hole be cut into the top tank and threaded "bung" be soldered/brazed into the hole to receive the switch. The photo below simply shows how I positioned the switch on my 68 GT (on the rear of the tank on the RH side), but exact positioning is not critical with most MGBs as there is a baffle in the top tank to help spread the incoming coolant from the engine more or less evenly into the top of the core, rather than letting it concentrate towards the inlet side of the radiator.
There are other choices, to be sure, but I chose this setup simply because it would provide what I felt was the best sealing and easy replacement if the switch someday goes bad.


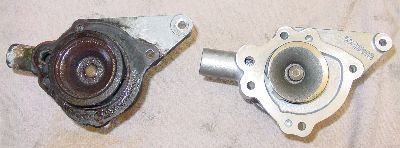 If you look carefully at this photo you will note that the AP made pump on the left has a somewhat larger diameter impeller than the Burgess made pump next to it. Both pumps are for the same application, but the AP pump will fit the hole in the block more completely and has more swept area to move coolant. They ar both well made pumps and both have worked well for me, but I thought you might want to note the differences from one to another. It could make a difference, if only to you. If you look carefully at this photo you will note that the AP made pump on the left has a somewhat larger diameter impeller than the Burgess made pump next to it. Both pumps are for the same application, but the AP pump will fit the hole in the block more completely and has more swept area to move coolant. They ar both well made pumps and both have worked well for me, but I thought you might want to note the differences from one to another. It could make a difference, if only to you.

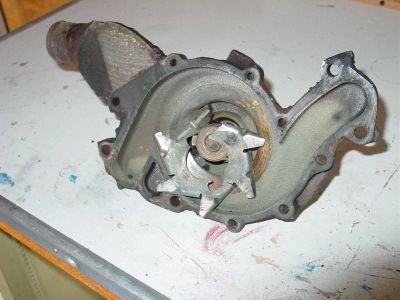 On occasion, cheap MGB water pumps will come with sheet metal impellers. I don't like them because I believe that they can lead to cavitation more easily. On occasion, cheap MGB water pumps will come with sheet metal impellers. I don't like them because I believe that they can lead to cavitation more easily.
However, I show you this photo of a water pump out of my son's old Cadillac. This is what we found when we took it off. Not a very pretty sight. FWIW
|