Hey Guest!


SNClocks
Senior Member
Offline
Our ’69 XKE has gone 201,000 miles, 140,000 of which we added. When we bought her, the engine had been gone through by a shop in Tulsa, whose work proved they were pretty much incompetent. When the pressure plate came apart, I decided to find out how the rods and main bearings looked. All was great, except for the rear rod bearing. Pity the shop was not smart enough to clean out the oil journals in the crank.
NTL, I built the engine. Didn’t have a full set of the shims for the valves, so ground down ones I had from another engine I parted out, but did the best I could with where I was in life (26 years old). Then I drove the crap out of her. Most years I did a fall tour of Colorado mountain passes to see color changes. Some of those passes were dirt roads, and some pretty rocky.
Not uncommon for me to have to pull the section of the exhaust system under the differential and either hammer it back down after it got pushed up into the car or just replace it.
The car got driven.
With 160K miles on my rebuild I am not surprised that the front (and likely rear) main seals are leaking. Not Niagara Falls, but still, makes a mess of the front of the engine and both sides after a decent trip (like the recent one from Portland to Victoria on Vancouver Island, BC). We still get her out for long drives! Oh, like the one we took a few years ago in the late fall, from Portland to Colorado Springs to visit a customer. 3,500 miles in 10 days, including snow/ice covered passes.
We love to get our cars out for long drives. Nothing more satisfying for a mechanic than having a car they personally maintain perform flawlessly.
OK – long lead in to get down to the subject at hand – leaking crankshaft front and rear main seals.
They leak. Didn’t when I put them in, but that was 46 years, and a lot of miles ago.
I could pull the engine and replace them. But, where I am in life, I would probably just have it rebuilt professionally, with upgrades to boost power. And, with the engine out, danged, she could sure use a paint job. And then I would have a car I wouldn’t drive because it was too nice. Tough to want to take a show car on week-long vacations in the rain (it is the Pacific North West).
So: What to do???
Being an engineer, I am aware that fluids flow from high pressure to lower pressure. Whilst I’ve had a number of discussions with folks who don’t get that, the reality is that pressure (including head) drives fluid flow. And engine crankcases tend to have a bit of pressure due to blowby.
Honestly, I was surprised at how little crankcase pressure there was on our XKE at idle: With the crankcase connected to the air-cleaner on the engine side of the filter, I measured 0.15 psi at idle. The pressure would be greater at higher revs and under acceleration.
With a leaky seal, there was no compulsion for the oil to stay in the engine. And it doesn’t.
I’ve previously retrofitted an adjustable PCV valve to both our Daytona Coupe (427 Roush) and our Bug Eye Sprite (1275 upgraded to 1380 cc). Both had some leaks, both have a lot fewer leaks now.
I’d been meaning to try it on the XKE, but hadn’t figured out where to provide a fresh-air inlet to the crankcase – which is important if one is trying to actually do what a PCV (Positive Crankcase Ventilation Valve) is designed to do – which is sweep fresh air through the engine.
On the Daytona and the Bug Eye I set up a filtered air source, then installed a small orifice in the line to the crankcase to control the amount of fresh air I let in. My goal was to create about one psi vacuum in the crankcase to keep oil in the engine. The other part of the equation is the adjustable PCV valve from M/E Wagner. This is a rather nicely made piece of kit that allows you to adjust the amount of gas pulled from the crankcase at idle, and separately adjust the transition point from high inlet-manifold vacuum to lower vacuum (as in during acceleration) when you get more blow-by and need more gas extracted.
Let’s see – leaking oil past the main seals, so, if I draw a slight vacuum – should have air leaking into the crankcase. Hmmm. There’s also the dip-stick seal (or lack thereof) to provide some air flow. Wonder if that would be enough air leakage for the PCV?
Online references suggest that an added benefit of a slight vacuum in the crankcase is improved ring seating in the pistons, thereby reducing oil consumption and blow-by.
I plumbed up a M/E Wagner adjustable PCV with rubber hoses, drilled a damaged oil-fill cap to provide a pressure check point and tried it out. IT WORKED. At the idle setting recommended by M/E Wagner for an engine with 4.2 liters capacity and a strong inlet manifold idle vacuum I got right around 0.3 psi vacuum (0.6 inches of mercury). MAGIC!
Revving the engine to 2,000 rpm saw the vacuum decrease by about 0.1 psi - which is not bad at all, given the PCV had not switched to it high-volume mode.
No question, a fresh air sweep would reduce engine oil degradation, but it would also increase the flow of the gas from the crankcase into the inlet manifold. And add more oxygen/nitrogen (air) to the inlet manifold. Given I am using the inlet manifold tap that goes to the vacuum tank for the power brakes – introducing crankcase gases plus a little more air at the back end of the inlet manifold will likely mostly impact the rear-most cylinder.
What are crankcase gasses? The web suggests they are 80% carbureted fuel/air mixture and 20% exhaust gasses. Oh, and water vapor. The good news: On a decently maintained engine, the volume of blow-by is pretty small. Based on a 4/1963 article (CRANKCASE EMISSION CONTROL DEVICES for Typical Gasoline Engines Informative Report No. 1) “Expressed as a fraction of the supplied fuel, the hydrocarbon loss is currently estimated to average between 2 to 3% for a large sample of automobiles.”
Not bad, actually – given about 16% of the fuel goes to each cylinder of the 6-cylinder 4.2-liter Jag XK engine, displacing a bit of it will likely not cause a major issue. Plus, the crankcase gasses already have the right fuel/oxygen ratio and have a bit of water vapor to boot! FYI – water vapor boosts the apparent octane rating of the fuel by slowing down the speed of flame propagation in the cylinder. A good thing actually.
Bottom line – the system worked great: 0.3 psi vacuum in the crankcase and still had a good idle.
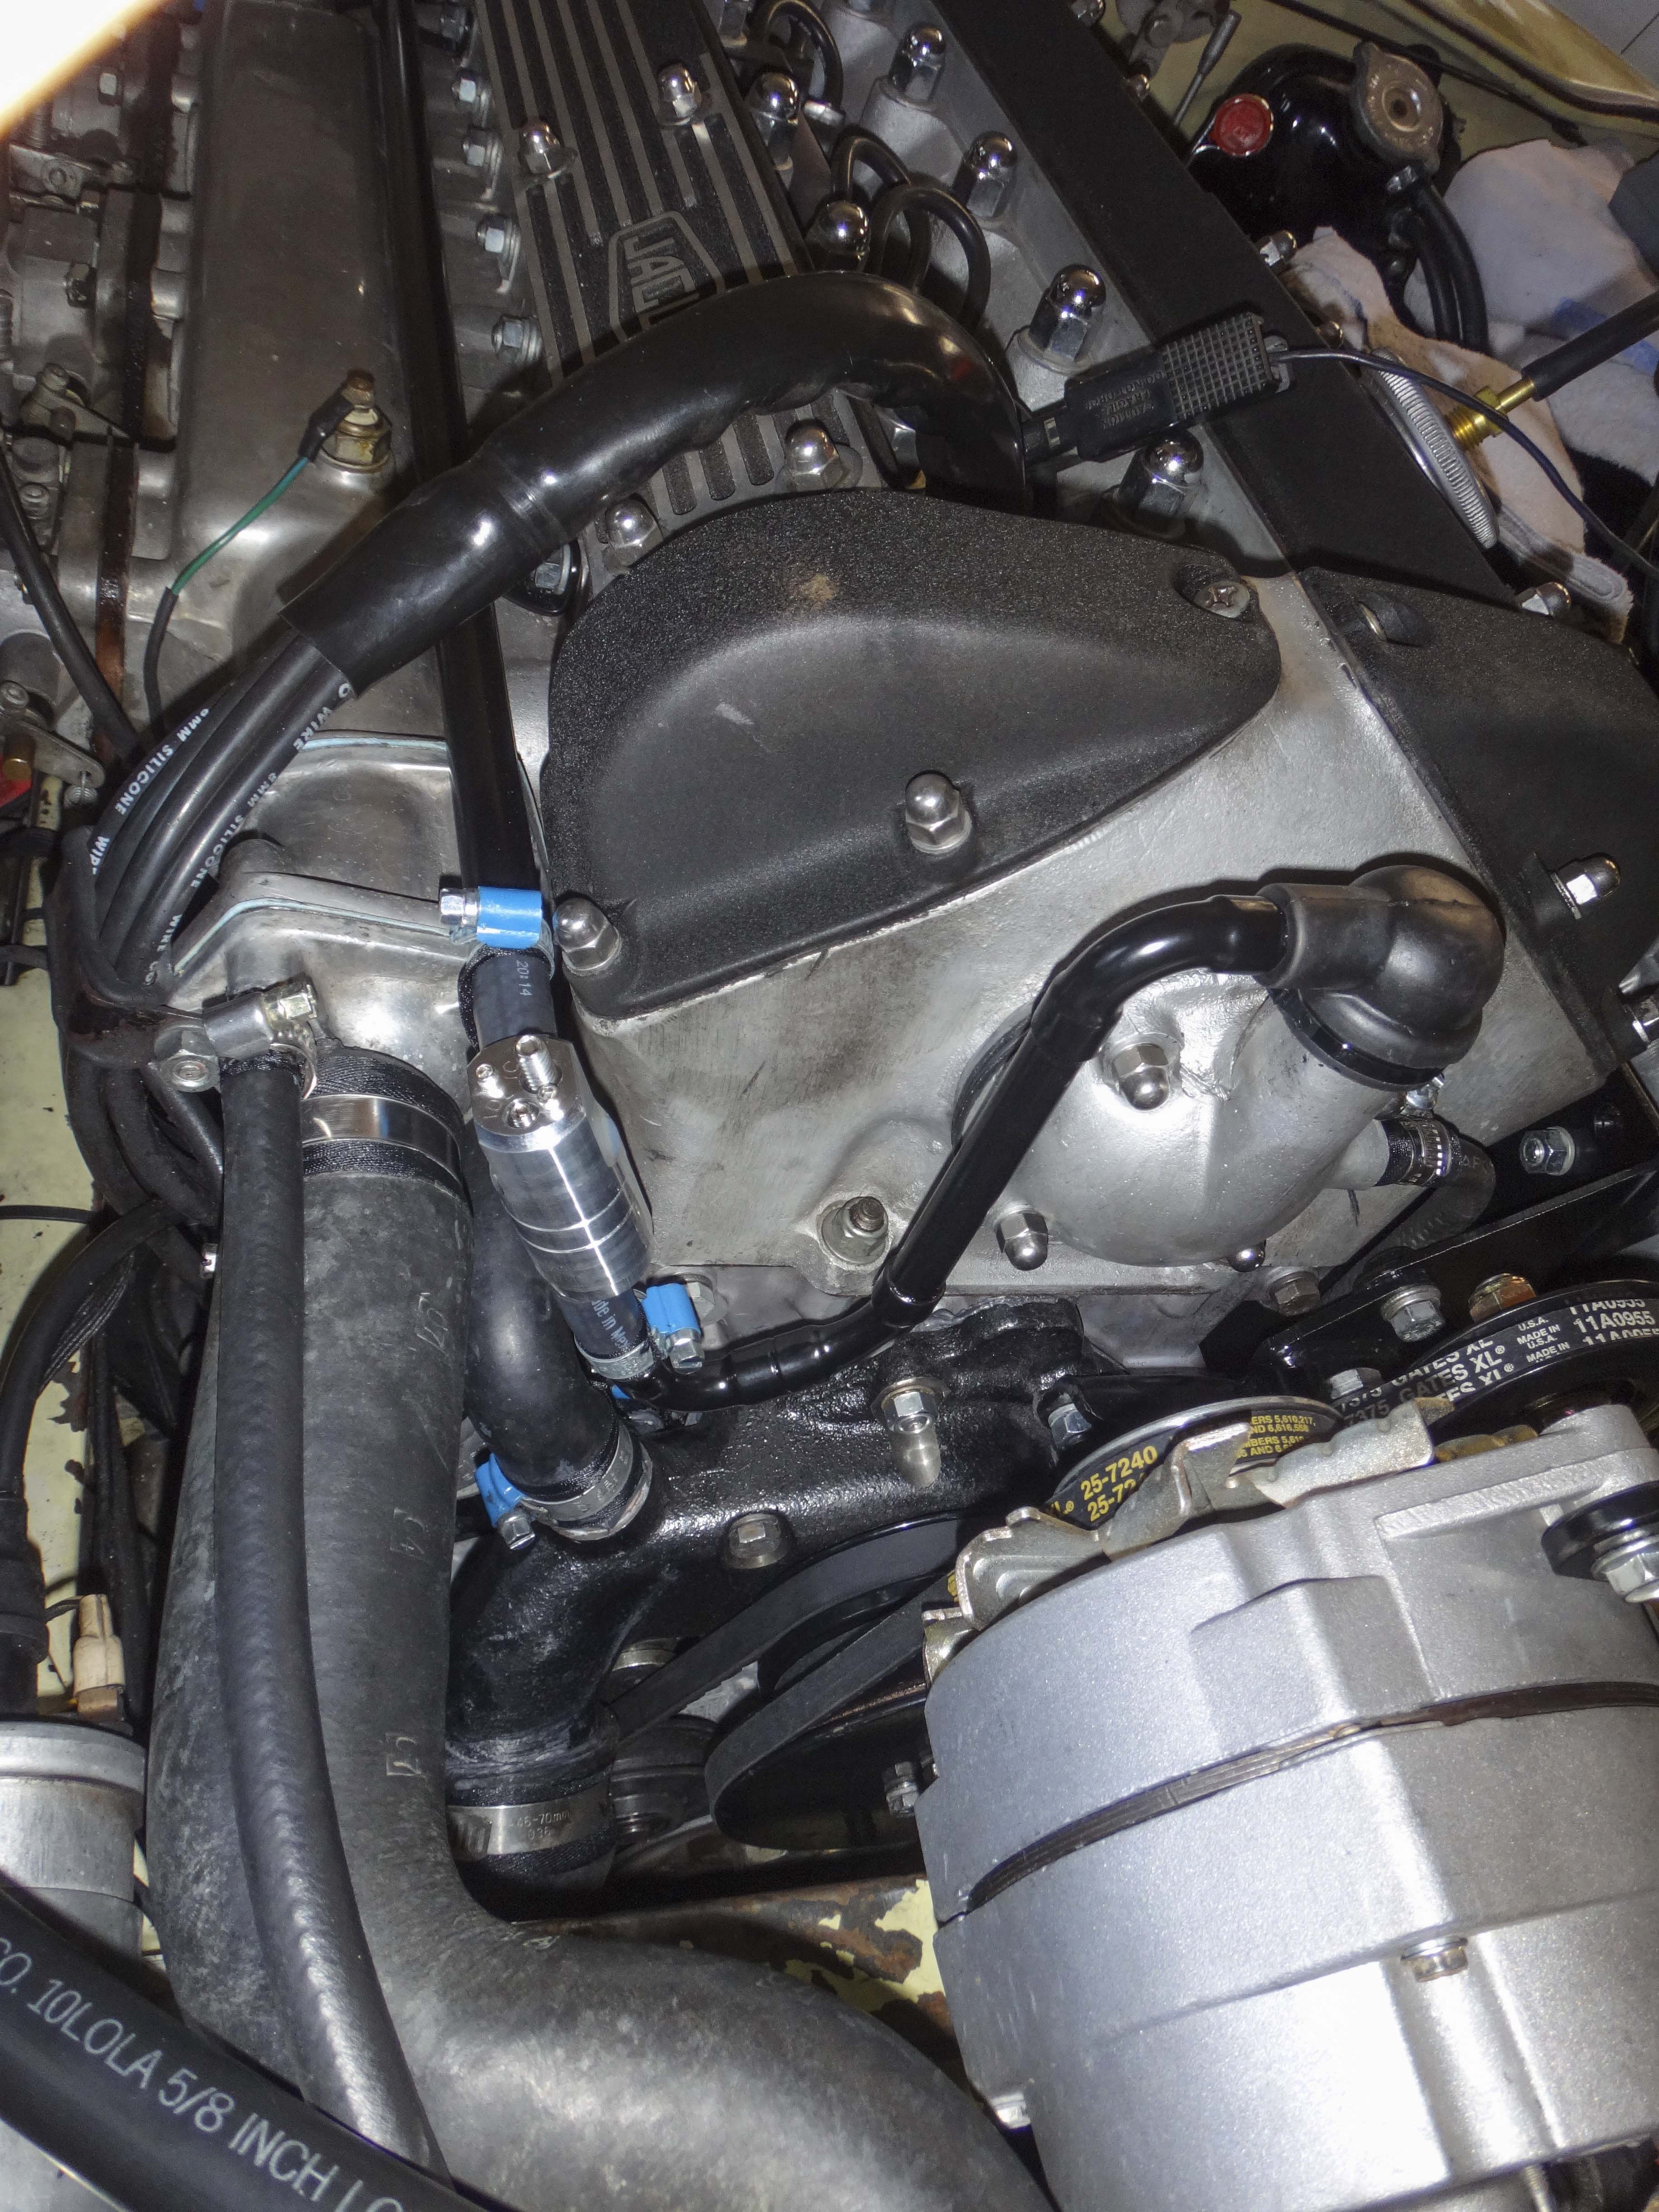
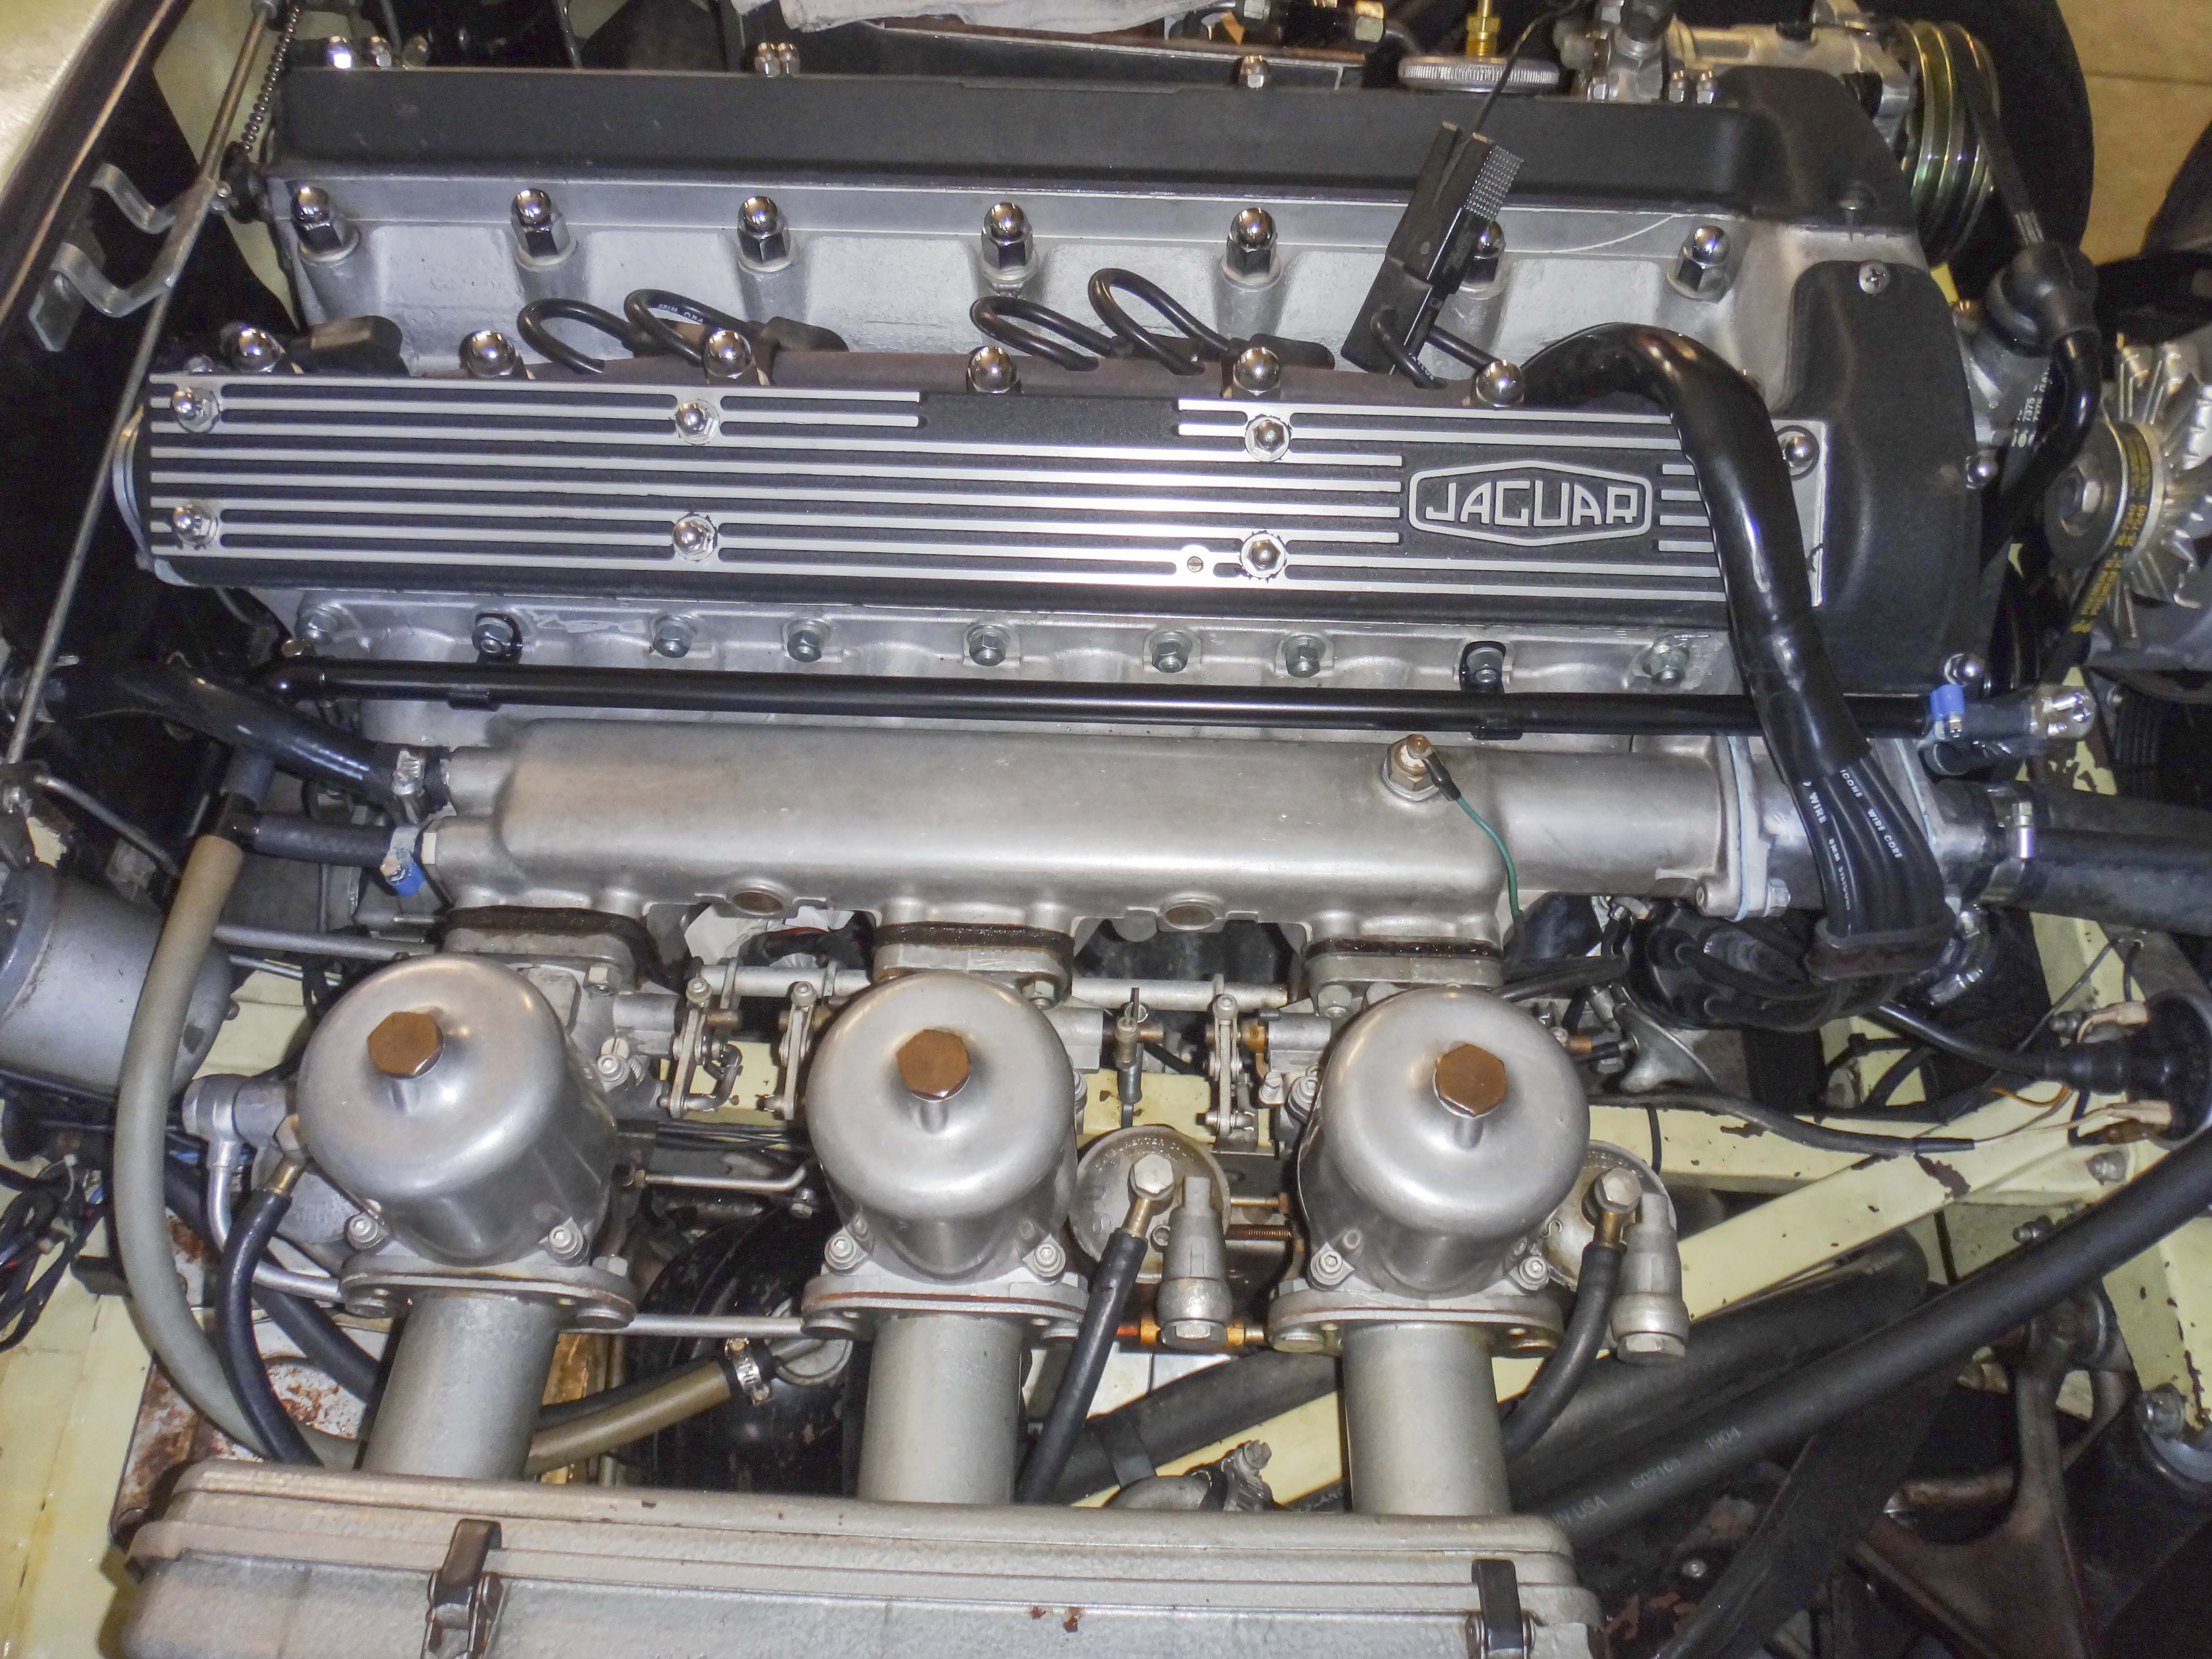
Now to make the PCV install permanent. I could set everything up with rubber hoses, but I prefer to make things look OEM – or maybe I just like to do things the hard way. NTL, my goal was to make the mods look like they truly belong. To that end I plumbed from the crankcase vent at the front of the engine, using an original rubber cap to connect to the ½ inch OD copper tubing. I routed the tubing to the bottom of the PCV, then connected the manifold side of the PCV to 5/8-inch OD copper tubing. I crafted a couple of lugs to secure the 5/8 pipe via inlet-manifold mounting studs.
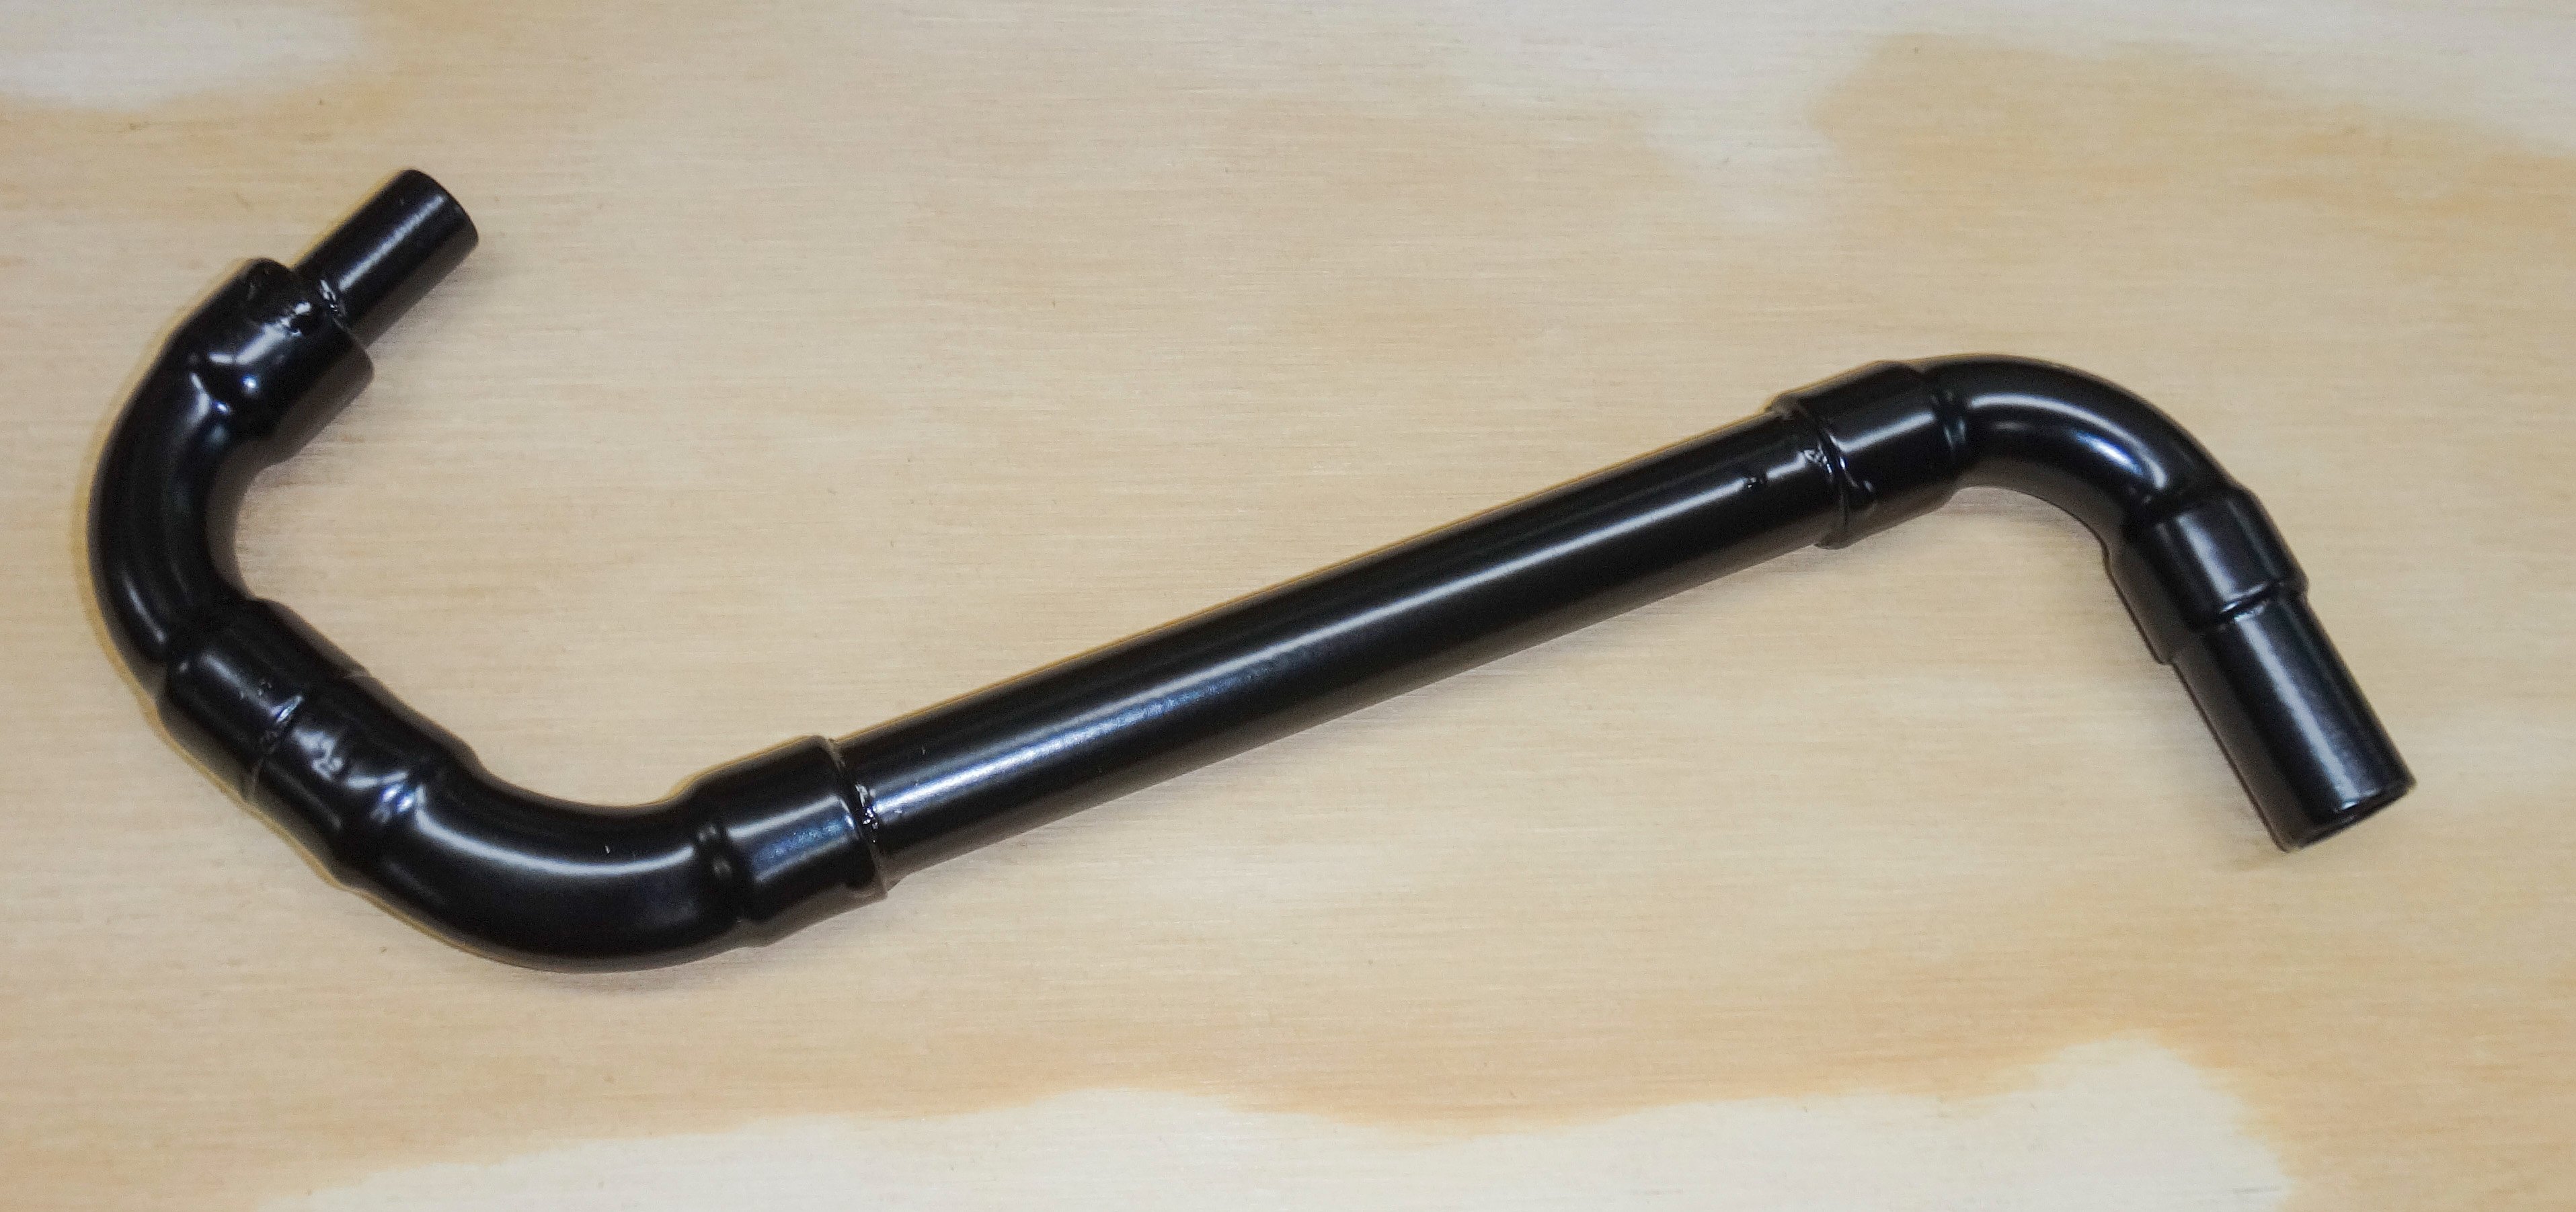

I went larger diameter on the outlet of the PCV since that section will be under decent vacuum (17 inches Hg at idle) whilst the inlet side will be at a higher pressure (0.3 psi vacuum, or about 0.6 inches Hg). As the vacuum increases a given mass of gas increases its volume proportionately – hence the larger diameter on the inlet-manifold side of the PCV.
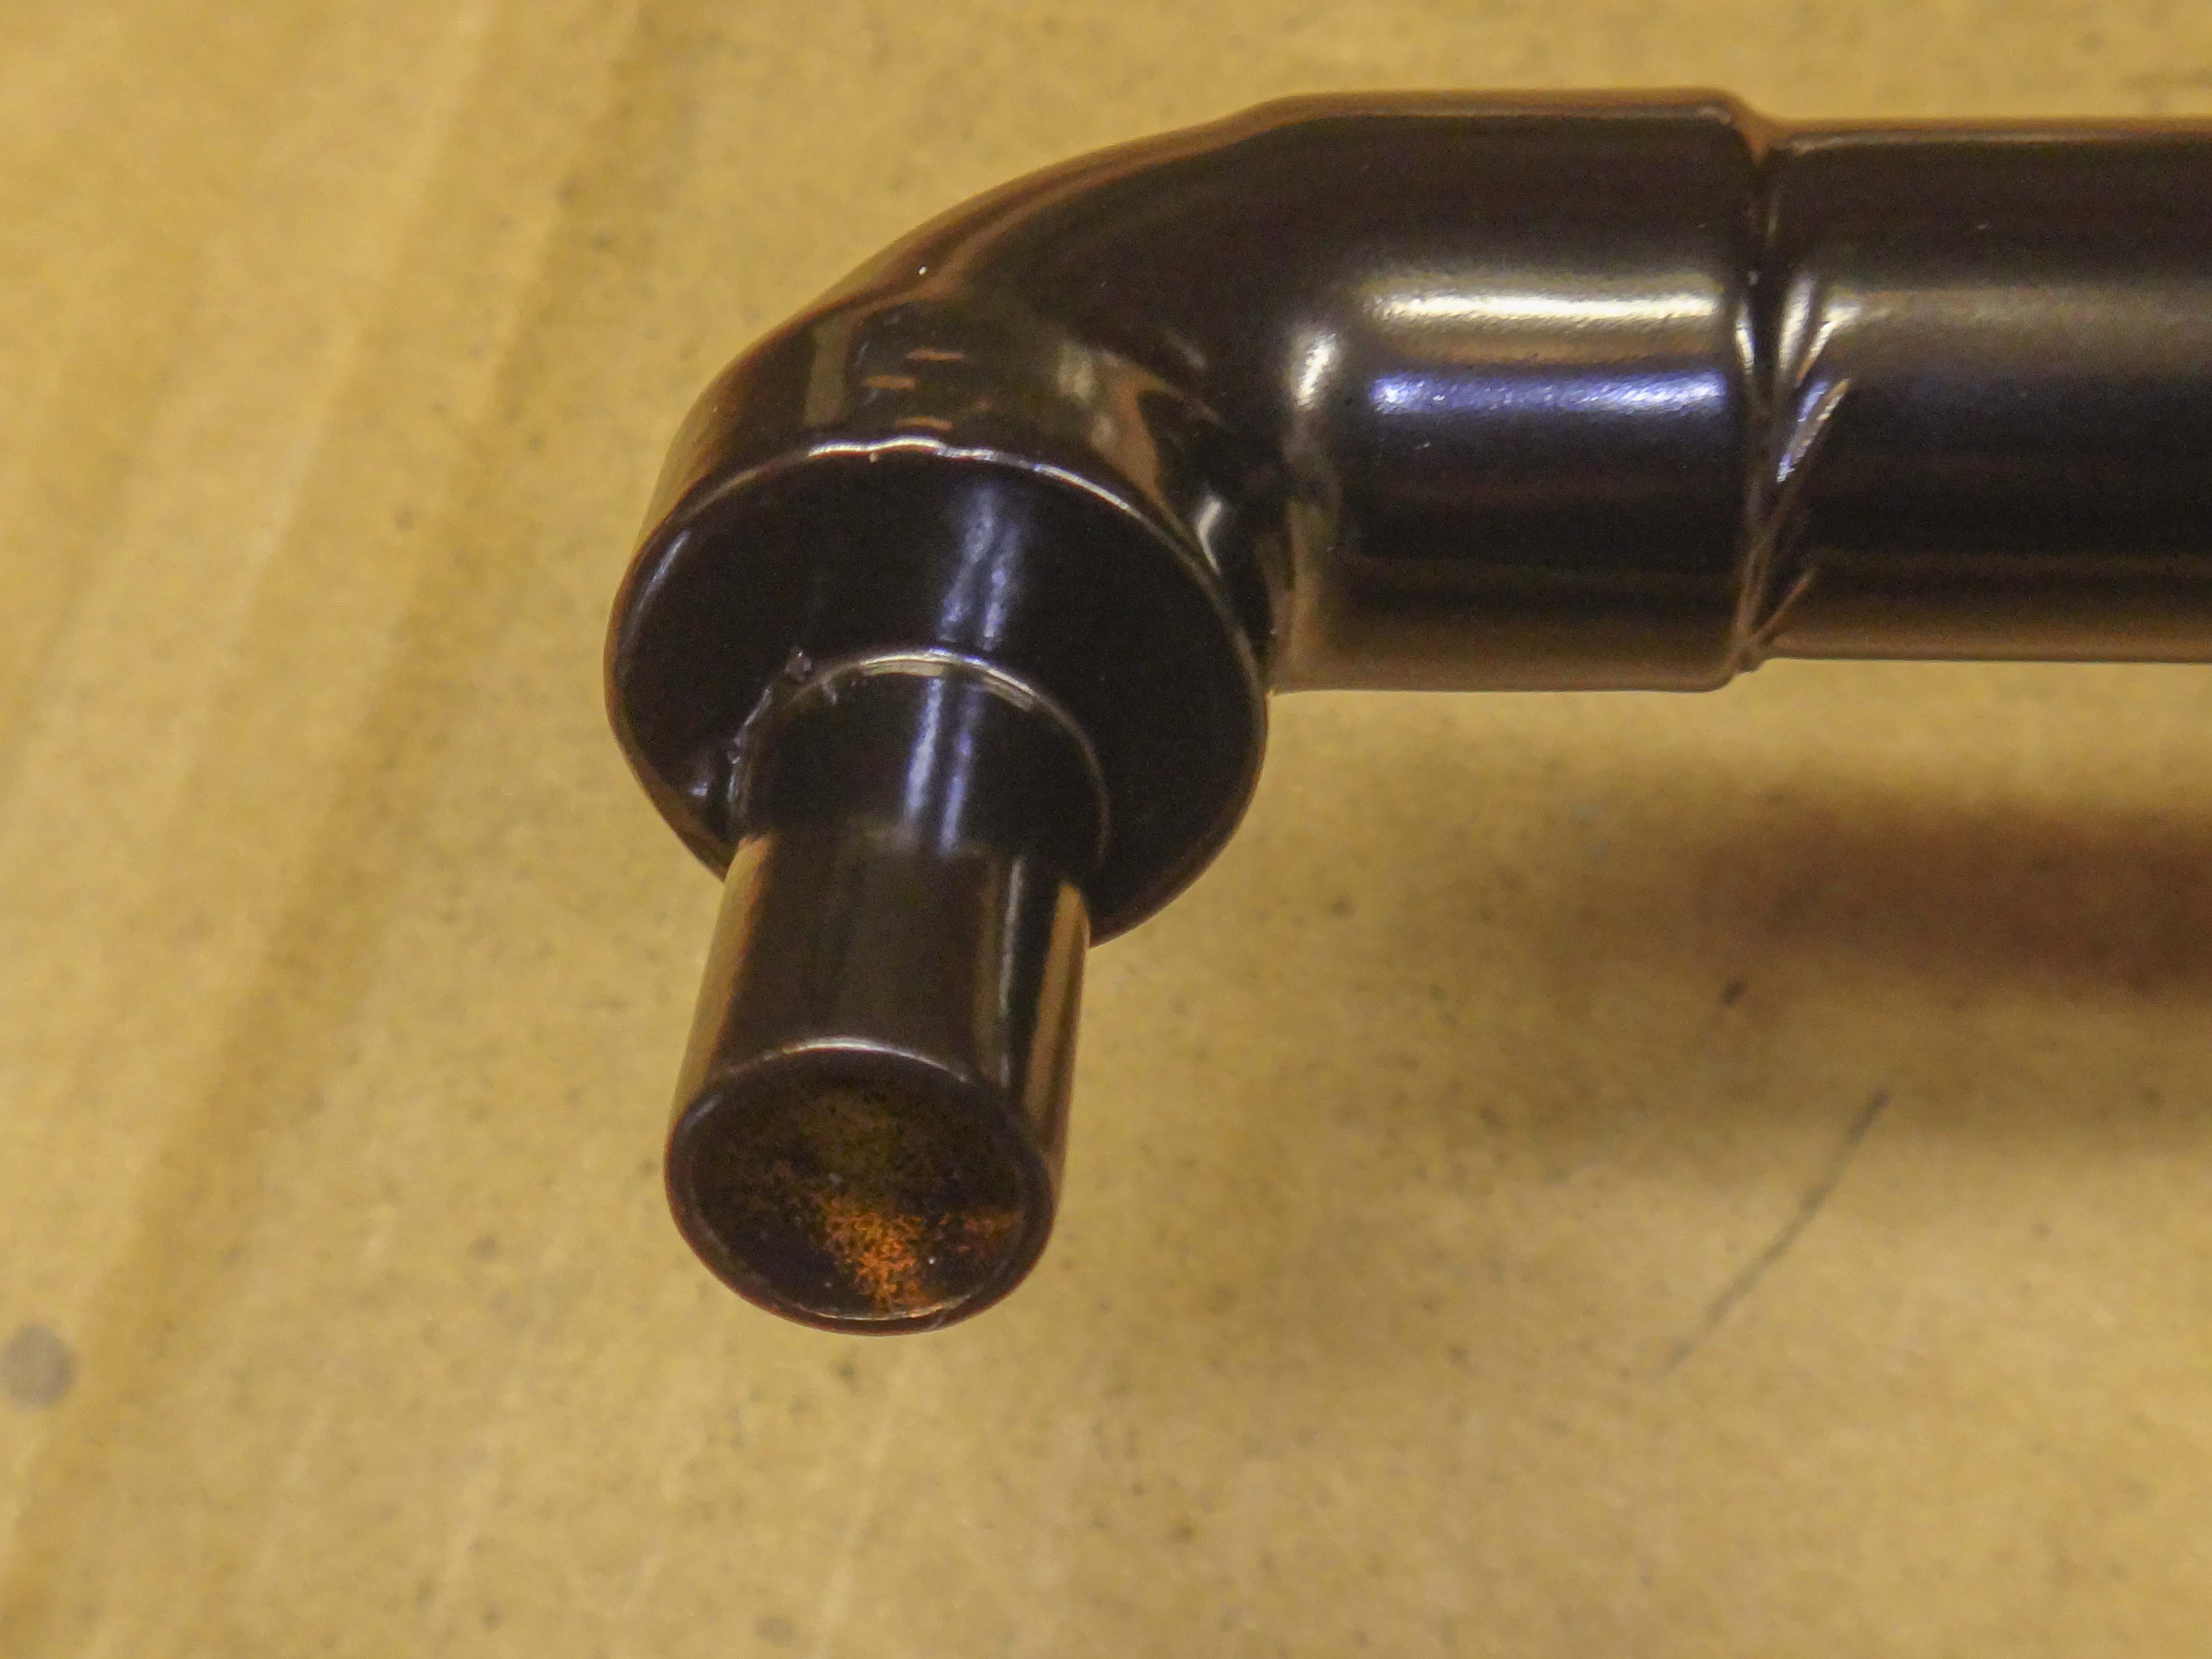
If you look at the picture of the rearmost end of the 5/8 pipe, the end of the pipe that connects to the inlet manifold has the outlet size diminished to match the diameter of the hose that connects to the vacuum tank (3/8-inch OD). I offset the diminished outlet to the bottom of the 5/8-inch pipe to minimize fluid accumulation in the pipe.
I hope this makes some kind of sense to you, and that a few folks might be able to reduce their oil leaks this way.
NTL, I built the engine. Didn’t have a full set of the shims for the valves, so ground down ones I had from another engine I parted out, but did the best I could with where I was in life (26 years old). Then I drove the crap out of her. Most years I did a fall tour of Colorado mountain passes to see color changes. Some of those passes were dirt roads, and some pretty rocky.
Not uncommon for me to have to pull the section of the exhaust system under the differential and either hammer it back down after it got pushed up into the car or just replace it.
The car got driven.
With 160K miles on my rebuild I am not surprised that the front (and likely rear) main seals are leaking. Not Niagara Falls, but still, makes a mess of the front of the engine and both sides after a decent trip (like the recent one from Portland to Victoria on Vancouver Island, BC). We still get her out for long drives! Oh, like the one we took a few years ago in the late fall, from Portland to Colorado Springs to visit a customer. 3,500 miles in 10 days, including snow/ice covered passes.
We love to get our cars out for long drives. Nothing more satisfying for a mechanic than having a car they personally maintain perform flawlessly.
OK – long lead in to get down to the subject at hand – leaking crankshaft front and rear main seals.
They leak. Didn’t when I put them in, but that was 46 years, and a lot of miles ago.
I could pull the engine and replace them. But, where I am in life, I would probably just have it rebuilt professionally, with upgrades to boost power. And, with the engine out, danged, she could sure use a paint job. And then I would have a car I wouldn’t drive because it was too nice. Tough to want to take a show car on week-long vacations in the rain (it is the Pacific North West).
So: What to do???
Being an engineer, I am aware that fluids flow from high pressure to lower pressure. Whilst I’ve had a number of discussions with folks who don’t get that, the reality is that pressure (including head) drives fluid flow. And engine crankcases tend to have a bit of pressure due to blowby.
Honestly, I was surprised at how little crankcase pressure there was on our XKE at idle: With the crankcase connected to the air-cleaner on the engine side of the filter, I measured 0.15 psi at idle. The pressure would be greater at higher revs and under acceleration.
With a leaky seal, there was no compulsion for the oil to stay in the engine. And it doesn’t.
I’ve previously retrofitted an adjustable PCV valve to both our Daytona Coupe (427 Roush) and our Bug Eye Sprite (1275 upgraded to 1380 cc). Both had some leaks, both have a lot fewer leaks now.
I’d been meaning to try it on the XKE, but hadn’t figured out where to provide a fresh-air inlet to the crankcase – which is important if one is trying to actually do what a PCV (Positive Crankcase Ventilation Valve) is designed to do – which is sweep fresh air through the engine.
On the Daytona and the Bug Eye I set up a filtered air source, then installed a small orifice in the line to the crankcase to control the amount of fresh air I let in. My goal was to create about one psi vacuum in the crankcase to keep oil in the engine. The other part of the equation is the adjustable PCV valve from M/E Wagner. This is a rather nicely made piece of kit that allows you to adjust the amount of gas pulled from the crankcase at idle, and separately adjust the transition point from high inlet-manifold vacuum to lower vacuum (as in during acceleration) when you get more blow-by and need more gas extracted.
Let’s see – leaking oil past the main seals, so, if I draw a slight vacuum – should have air leaking into the crankcase. Hmmm. There’s also the dip-stick seal (or lack thereof) to provide some air flow. Wonder if that would be enough air leakage for the PCV?
Online references suggest that an added benefit of a slight vacuum in the crankcase is improved ring seating in the pistons, thereby reducing oil consumption and blow-by.
I plumbed up a M/E Wagner adjustable PCV with rubber hoses, drilled a damaged oil-fill cap to provide a pressure check point and tried it out. IT WORKED. At the idle setting recommended by M/E Wagner for an engine with 4.2 liters capacity and a strong inlet manifold idle vacuum I got right around 0.3 psi vacuum (0.6 inches of mercury). MAGIC!
Revving the engine to 2,000 rpm saw the vacuum decrease by about 0.1 psi - which is not bad at all, given the PCV had not switched to it high-volume mode.
No question, a fresh air sweep would reduce engine oil degradation, but it would also increase the flow of the gas from the crankcase into the inlet manifold. And add more oxygen/nitrogen (air) to the inlet manifold. Given I am using the inlet manifold tap that goes to the vacuum tank for the power brakes – introducing crankcase gases plus a little more air at the back end of the inlet manifold will likely mostly impact the rear-most cylinder.
What are crankcase gasses? The web suggests they are 80% carbureted fuel/air mixture and 20% exhaust gasses. Oh, and water vapor. The good news: On a decently maintained engine, the volume of blow-by is pretty small. Based on a 4/1963 article (CRANKCASE EMISSION CONTROL DEVICES for Typical Gasoline Engines Informative Report No. 1) “Expressed as a fraction of the supplied fuel, the hydrocarbon loss is currently estimated to average between 2 to 3% for a large sample of automobiles.”
Not bad, actually – given about 16% of the fuel goes to each cylinder of the 6-cylinder 4.2-liter Jag XK engine, displacing a bit of it will likely not cause a major issue. Plus, the crankcase gasses already have the right fuel/oxygen ratio and have a bit of water vapor to boot! FYI – water vapor boosts the apparent octane rating of the fuel by slowing down the speed of flame propagation in the cylinder. A good thing actually.
Bottom line – the system worked great: 0.3 psi vacuum in the crankcase and still had a good idle.
Now to make the PCV install permanent. I could set everything up with rubber hoses, but I prefer to make things look OEM – or maybe I just like to do things the hard way. NTL, my goal was to make the mods look like they truly belong. To that end I plumbed from the crankcase vent at the front of the engine, using an original rubber cap to connect to the ½ inch OD copper tubing. I routed the tubing to the bottom of the PCV, then connected the manifold side of the PCV to 5/8-inch OD copper tubing. I crafted a couple of lugs to secure the 5/8 pipe via inlet-manifold mounting studs.
I went larger diameter on the outlet of the PCV since that section will be under decent vacuum (17 inches Hg at idle) whilst the inlet side will be at a higher pressure (0.3 psi vacuum, or about 0.6 inches Hg). As the vacuum increases a given mass of gas increases its volume proportionately – hence the larger diameter on the inlet-manifold side of the PCV.
If you look at the picture of the rearmost end of the 5/8 pipe, the end of the pipe that connects to the inlet manifold has the outlet size diminished to match the diameter of the hose that connects to the vacuum tank (3/8-inch OD). I offset the diminished outlet to the bottom of the 5/8-inch pipe to minimize fluid accumulation in the pipe.
I hope this makes some kind of sense to you, and that a few folks might be able to reduce their oil leaks this way.