 but were afraid to ask:
 I saw a post on here or the other forum where someone ran into issues with the castle nut stripping out on the trunnion when putting the new washers that need to be "pressed" on so they are notched with the teeth. Well, I guess I spoke too soon and it seems my driver's side trunnion got stripped in the process. I know some guys have used the old trunnions to get the grooves into the washer and then put the washer on the new trunnion. Well...I guess I can do that now. I just hope I can get the new washer off as I'm sure the new washers are on there TIGHT. Guess I'll order a new TRF trunnion and 2 washers. This fix will have to wait till later. I've already taken some stuff out I put in due to clearance issues and what not. I want to put stuff in and it stay there, like engine stuff. Interior items. Etc. Get to repaint my fuel tank too! :grief: Sorry for the vent post.

-
 Hey Guest!
British Car Forum has been supporting enthusiasts for over 25 years by providing a great place to share our love for British cars. You can support our efforts by upgrading your membership for less than the dues of most car clubs. There are some perks with a member upgrade!**Upgrade Now**
(PS: Upgraded members don't see this banner, nor will you see the Google ads that appear on the site.)

Tips
- We have a special forum called "Member Articles" where you can submit actual articles for consideration for publication. Learn More
- Don't have an Avatar? If not, your avatar will default to the 1st character in your username. Go into "Account Details" to change your Avatar.
- Some basic forum navigation info: click
 Hey - did you know if you click on the title of a thread it will take you to the first unread post since you last visited that thread?
- Hey Guest - Is your British Car Club in our Clubs database? If not, send me a PM - Basil

- Looking for a local club? Click the "Clubs" tab above and browse hundreds of clubs world-wide.
- Add Android or iPhone APP: click
- Did you know - any picture or video you add in your posts in any marque-specific forum will also get added to the Media Gallery automatically.
- A few more tips about posting and replying: click
- Hey there Guest - be sure to keep your profile page up to date with interesting info about yourself: learn more
- More tips and tricks on Posting and Replying: click
 STOP!! Never post your email address in open forums. Bots can "harvest" your email! If you must share your email use a Private Message or use the
  smilie in place of the real @
- Want to mention another member in a post & get their attention? WATCH THIS

- So, you created a "Group" here at BCF and would like to invite other members to join? Watch this!
- Hey Guest - A post a day keeps Basil from visiting you in the small hours and putting a bat up your nightdress!
- Hey Guest - do you know of an upcoming British car event?
 Pretty Please - add it to our Events forum(s) and add to the calendar! >> Here's How <<
- Hey Guest - you be stylin' Change the look and feel of the forum to fit your taste. Check it out
- If you run across an inappropriate post, for example a post that breaks our rules or looks like it might be spam, you can report the post to the moderators: Learn More
- If you would like to try some different "looks" or styles for the site, scroll to the very bottom, on the left and click the Style Selector.
You are using an out of date browser. It may not display this or other websites correctly.
You should upgrade or use an alternative browser.
You should upgrade or use an alternative browser.
TR4/4A Well...another stripped trunnion
- Thread starter ghawk16
- Start date
TR3driver
Great Pumpkin - R.I.P
Offline
Probably tap right off. Check your FLAPS, they should have castle nuts.
There are several workarounds; generally I just reuse the old washers as they never seem to be worn enough to worry about. But you can use a file or small die grinder (aka Dremel) to cut the required chamfer; then use a regular grade 5 nut (instead of the weak castle nut) or even a press to force the washer on the first time.
There are several workarounds; generally I just reuse the old washers as they never seem to be worn enough to worry about. But you can use a file or small die grinder (aka Dremel) to cut the required chamfer; then use a regular grade 5 nut (instead of the weak castle nut) or even a press to force the washer on the first time.
Probably tap right off. Check your FLAPS, they should have castle nuts.
There are several workarounds; generally I just reuse the old washers as they never seem to be worn enough to worry about. But you can use a file or small die grinder (aka Dremel) to cut the required chamfer; then use a regular grade 5 nut (instead of the weak castle nut) or even a press to force the washer on the first time.
Yeah, I'm planning to use a good nut to press them on next time and then after everything is set I'll thread the castle nut on and do the whole back off 1/2-2 flats. $90 mess up. Ugh. It's more having to tear everything back off. Not to mention the new trunnions felt good on the arms. Lets hope this new one feels tight on the threads.
carpecursusII
Jedi Trainee
Offline
I had this problem recently with my 3. I think the new washers they provide are not soft enough to absorb the splines. The splines are also bigger on the new trunnions. I drilled out the washers a bit after I started to realize I was stripping the threads. My trunnions came from TRF.
CJD
Yoda
Offline
Yep. Two things have happened to the Repro trunions lately. First, the pin is not as loose as the OEM pins were. In fact, I cannot remove the pins or even get them to budge, to the point of bending the frame on my 10 ton press. Secondly, the threads on the pins are NOT strong enough to set the nuts into the splines as the manual says to do it. I came up with a work around about half down the page here:
https://www.britishcarforum.com/bcf/showthread.php?108693-Recipe-for-a-TR2
Here is the meat of it re-posted:
Here is the outer pivot ready to complete...NOT so simple!
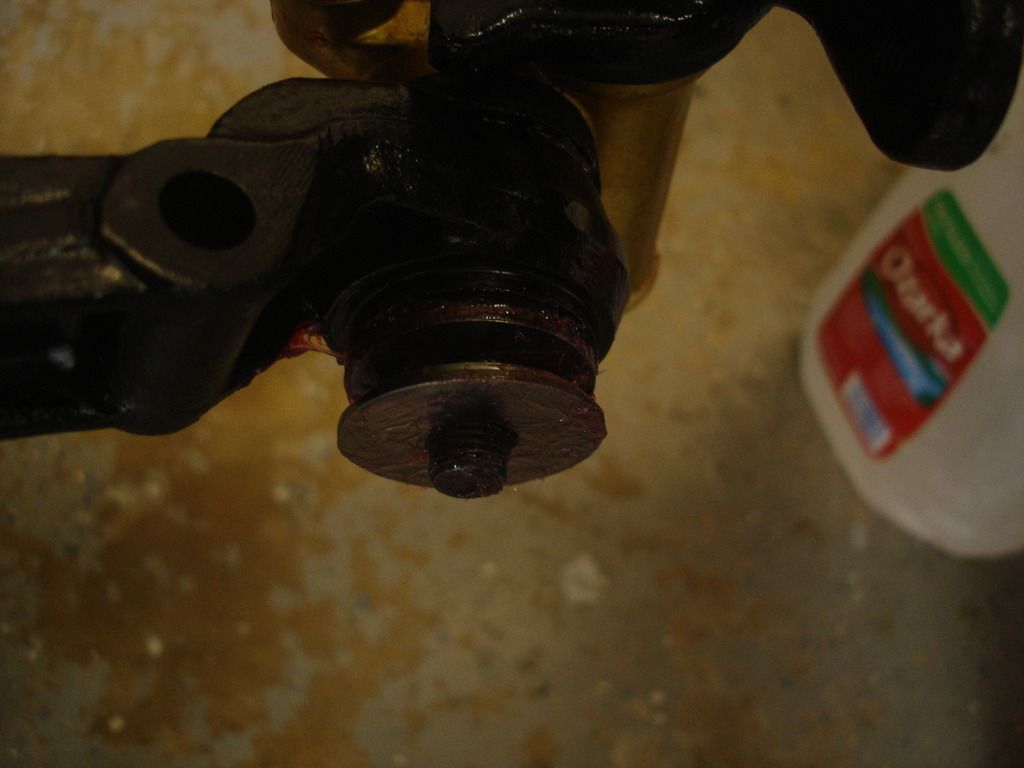
Here is the rub. The washer you see in the pick is too small for the trunnion post it goes on. You have to tighten it onto the post so tightly that some splines on the post cut into it. The only thing is that if you try to use the retaining nut to do this, as the instruction say to, I assure that you will strip the nut. Ask me how I know!?! So, we need to alter the instructions a bit. Here is what I recommend.
First, the original trunnion posts apparently had a loose interference fit inside the trunnion. The manual instructions assume that tapping the post will move it fore and aft relatively easily. I have YET to be able to move the post in a trunnion. I have bent my 10 ton press trying to move a trunnion post. Trust me, unless you are working on an original trunnion with no mileage, the post in all later trunnions are not going to budge!! We are going to use this fact to our advantage.
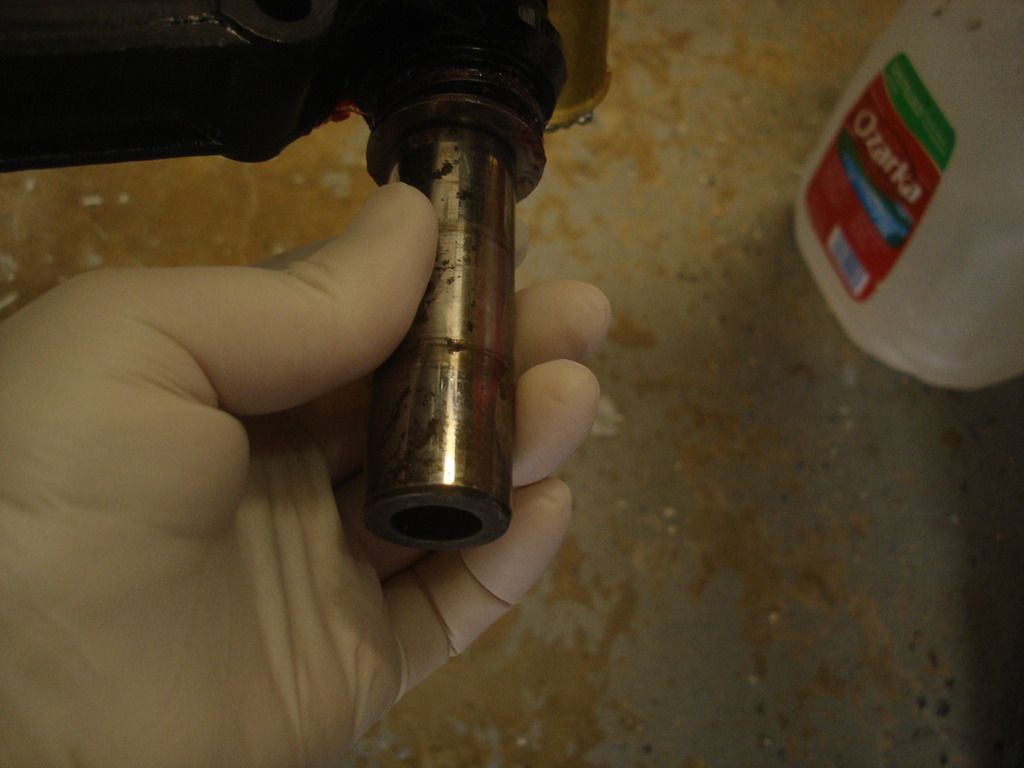
So, rather than stripping the nut trying to fit the washer on the trunnion post, Hammer it on like so! I am using an old piston pin to go over the end of the post. Once the splines have cut through the washer, then you can switch and put the retaining nut on.
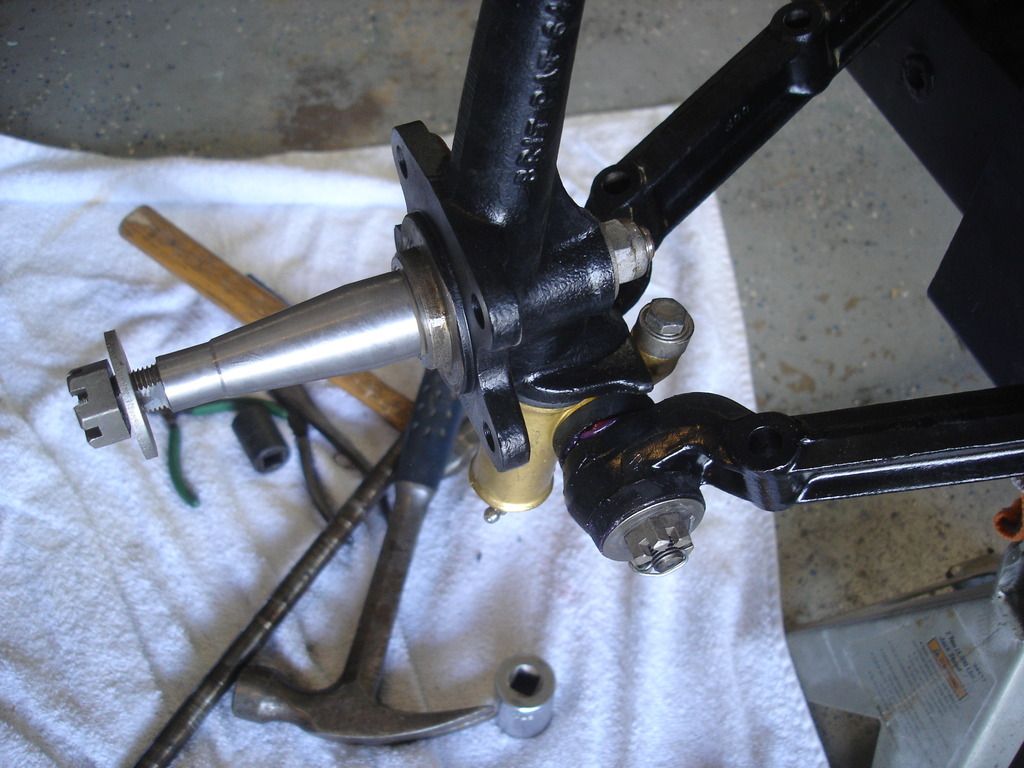
Like so. Next, we have to get the clearance on each end of the trunnion post to about .004-.008". Because we have decided that the trunnion post will not move, do this one end at a time. Tighten the pivot nut until the suspension will no longer move...it is just locked solid. Then Back off the nut 1-1/2 to 2 flats (not turns!). Then put the cotter key in the nut. At this point the nut is loose, and the suspension is still locked up, since the washer is holding it tightly together. So...use a drift and smack the arm away from the trunnion. When you do, the arm will push the washer against the nut firmly, and you'll have the perfect play in the pivot, so the suspension will move again.
Repeat the process for the other end of the trunnion post and you're done with that trunnion.
https://www.britishcarforum.com/bcf/showthread.php?108693-Recipe-for-a-TR2
Here is the meat of it re-posted:

Here is the outer pivot ready to complete...NOT so simple!
Here is the rub. The washer you see in the pick is too small for the trunnion post it goes on. You have to tighten it onto the post so tightly that some splines on the post cut into it. The only thing is that if you try to use the retaining nut to do this, as the instruction say to, I assure that you will strip the nut. Ask me how I know!?! So, we need to alter the instructions a bit. Here is what I recommend.
First, the original trunnion posts apparently had a loose interference fit inside the trunnion. The manual instructions assume that tapping the post will move it fore and aft relatively easily. I have YET to be able to move the post in a trunnion. I have bent my 10 ton press trying to move a trunnion post. Trust me, unless you are working on an original trunnion with no mileage, the post in all later trunnions are not going to budge!! We are going to use this fact to our advantage.

So, rather than stripping the nut trying to fit the washer on the trunnion post, Hammer it on like so! I am using an old piston pin to go over the end of the post. Once the splines have cut through the washer, then you can switch and put the retaining nut on.

Like so. Next, we have to get the clearance on each end of the trunnion post to about .004-.008". Because we have decided that the trunnion post will not move, do this one end at a time. Tighten the pivot nut until the suspension will no longer move...it is just locked solid. Then Back off the nut 1-1/2 to 2 flats (not turns!). Then put the cotter key in the nut. At this point the nut is loose, and the suspension is still locked up, since the washer is holding it tightly together. So...use a drift and smack the arm away from the trunnion. When you do, the arm will push the washer against the nut firmly, and you'll have the perfect play in the pivot, so the suspension will move again.
Repeat the process for the other end of the trunnion post and you're done with that trunnion.
OK...this is all VERY good information. Thank you! I'm going to attempt to cut off the nut even tho I have ordered another trunnion already. Maybe the nut that is stripped. My passenger's side was OK. But to be honest...John's post above is clearly right, those washers will NOT budge. I was curious what they meant in the manual about hitting the arm and now I get it. Hit it to move the washer out against the nut. Duh. But my question is...to get that to .004 to .008", where the heck do you measure this? I just cranked the nut down till tight and backed it off like the manual says. Is that gap between nut and first washer? Also, if you are going to buy the Moss shims (NOT washers)...don't bother. ID is too large and they just flop around against the rubber seals.
Sheesh...working on my offroad Toyota 4Runner is so much easier than working on this car. And that's a 2006!
Again, thank you so much everyone. This has been a big learning curve. But I hope I can pass on everything I've learned on here doing this restoration to people in the future. Sometimes a search just doesn't work. You know you've seen it somewhere but it's usually buried in a post. Now to start looking for someone somewhat local to me to bribe with $$$, beer, food to come help me fire it up for the first time. That's when I will REALLY want someone with a wealth of knowledge. Seems most are in the Sacramento area.
CJD
Yoda
Offline
Yes, as you said, the clearance is adjusted by backing off the nut from full tight. The 1-1/2 to 2 flats will put you within the .004 to .008 range. But remember that once you back off the nut, the splined washer still jams the arm against the trunnion...so the clearance is between the splined washer and the nut. Smacking the arm away from the trunnion has the affect of moving the washer over to the nut, so the clearance goes to the Trunnion side of the washer, and the washer to nut clearance goes to zero.
Reading the manual can be confusing, as it is a bit of a backassward way of getting to the correct clearance. The important thing is that the trunnion should pivot rather freely after you are done. If it still binds, then you need to smack the arm to move the washer over to the nut and open up the clearance.
Reading the manual can be confusing, as it is a bit of a backassward way of getting to the correct clearance. The important thing is that the trunnion should pivot rather freely after you are done. If it still binds, then you need to smack the arm to move the washer over to the nut and open up the clearance.