
 Hey Guest!

 Hey - did you know if you click on the title of a thread it will take you to the first unread post since you last visited that thread?
 but were afraid to ask:
  STOP!! Never post your email address in open forums. Bots can "harvest" your email! If you must share your email use a Private Message or use the
  smilie in place of the real @
 Pretty Please - add it to our Events forum(s) and add to the calendar! >>
angelfj1
Yoda
Offline
Anyone who has disassembled the cowl vent lid and mechanism on a sidescreen TR knows the frustration involved in this job. Its kind of tedious and reassembly is not intuitive. OTOH, once this job is finished, there is extreme relief that its behind you. At least that's what I thought!  When restoring the vent lid and mechanism, we decided to replace the actual "pull rod", knob, escutcheon, etc. The repro isn't very expensive and we figured we'd save some time/money. Ha! In the first photo below you see the assembly with the knob attached.
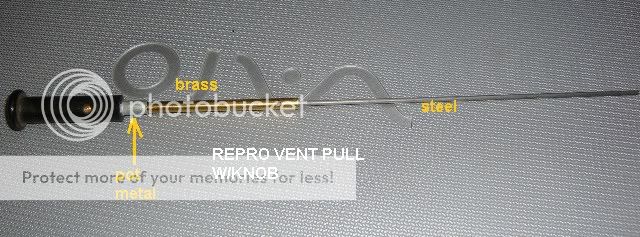
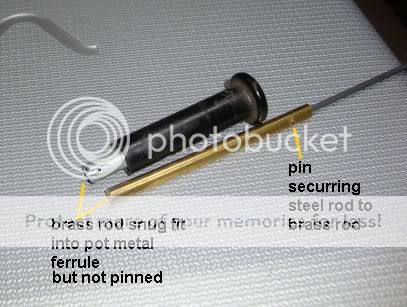
For some reason this assembly is made up from three different metal parts, plus a phenolic knob. The steel wire is snug fit into the brass rod(and pinned), and the brass rod is press fit into the pot metal ferrule but not pinned. We did not recognize this lack of a pin until everything had been reassembled.
The second photo shows the brass rod pulled out of the pot metal ferrule.
I wasn't there to see it happen but I can only imagine the look on Brian's face when testing the vent. Pull once - looks good. Push back in. Pull twice - very nice. Push back in. Pull three!!! Oh - you dirty, no good, blah, blah, blah. That's right! The brass rod/pot metal ferrule came apart, and Brian is standing there with the knob in his hand. He realizes that the vent and mechanism job has to be repeated.
I took the repro unit home to show my wife. My 3 year old grand son was able to pull it apart. There's no way a press fit would have lasted. Then, I had a revelation! Perhaps in their infinite wisdom, the engineers at Canley counted on electrolytic corrosion between the dissimilar metals, brass and zinc(pot metal). Surely there was a reason for selection of three different metals!
So, a word to the wise is sufficient - check your repro vent pull!
When restoring the vent lid and mechanism, we decided to replace the actual "pull rod", knob, escutcheon, etc. The repro isn't very expensive and we figured we'd save some time/money. Ha! In the first photo below you see the assembly with the knob attached.
For some reason this assembly is made up from three different metal parts, plus a phenolic knob. The steel wire is snug fit into the brass rod(and pinned), and the brass rod is press fit into the pot metal ferrule but not pinned. We did not recognize this lack of a pin until everything had been reassembled.
The second photo shows the brass rod pulled out of the pot metal ferrule.
I wasn't there to see it happen but I can only imagine the look on Brian's face when testing the vent. Pull once - looks good. Push back in. Pull twice - very nice. Push back in. Pull three!!! Oh - you dirty, no good, blah, blah, blah. That's right! The brass rod/pot metal ferrule came apart, and Brian is standing there with the knob in his hand. He realizes that the vent and mechanism job has to be repeated.
I took the repro unit home to show my wife. My 3 year old grand son was able to pull it apart. There's no way a press fit would have lasted. Then, I had a revelation! Perhaps in their infinite wisdom, the engineers at Canley counted on electrolytic corrosion between the dissimilar metals, brass and zinc(pot metal). Surely there was a reason for selection of three different metals!
So, a word to the wise is sufficient - check your repro vent pull!

