• Hey Guest!
    British Car Forum has been supporting enthusiasts for over 25 years by providing a great place to share our love for British cars. You can support our efforts by upgrading your membership for less than the dues of most car clubs. There are some perks with a member upgrade!

    **Upgrade Now**
    (PS: Upgraded members don't see this banner, nor will you see the Google ads that appear on the site.)
Tips
Tips

TR6 Veneering a TR6 dash

hondo402000

Darth Vader
Offline
I purchased a used dash and going to reveneer it, so my question is who has reveneered their dash? what glue did you use, Contact cement, carpenters glue? how did you trim the veneer? I have done lots of woodworking projects in the past but never involving veneers and any comments I could mull over before the dash gets here and I start on it
 
P1040068.jpg

I bought a veneer at Lowes that you iron on with your wifes iron ( while she is shopping) Bandit, or Band it brand. I used red oak ( about $20) and then cut out the openings rough with a knife and trimmed them with sanding drum attachments with a dremel tool. I wanted to get close to my wood steering wheel in color hence my color selection.
 
I,like Roofman, also trimmed with a dremel tool. I also used a file and sand paper. I got Koa at a local supplier of vaneers I deal with.I used water base contact. 3M,don't use Weldwood it is garbage. I am waiting for the finish material I am going to use to arrive in the mail. Then I will post pics. The hardest part was trimming the inset for the gauges.
 
I suppose the existing finish is so bad that you
must cover it up, huh?

I left some blemishes in my orginal wood dash.
Posted pics from photobucket on a thread
on 4-24-07. Search for key words: TR6 dash and
you can see how it came out.

Let me know if you have any questions what worked
for me, but didn't reveneer.
 
...first post...be kind!

Hi...fast and easy dash reveneer: buy a paperbacked veneer, trim to rough size, glue with a quality yellow carpenter's glue (not too much, nor too little). Water based contact would work as well but is less forgiving. Place veneer on prepped dash blank and place a sheet of 1/2" thick glass (or 1/4") on both pieces to act as a press. I added a few small anvils for extra weight. When dry trim with a laminate trimmer or utility knife.

dash2.jpg


My finish was a bit of an experiment and I would do it different next time: one coat of boiled linseed oil, a coat of FEV, (alcohol, shellac and orasol dye) and a water based top coat called Varithane. Next time I would skip the varithane and topcoat with a spar varnish or clear coat.

Be sure to properly prep your old dash...remove all old finish, glue any loose laminations,and fill any voids with a suitable filler (wood or bondo).

Hope this helps a little...it's a fun project and worth taking your time.

Rob in Niagara Falls (prop builder/furniture maker)
 
For what it's worth, here's what worked well for me.

Last year I purchased some American walnut burl veneer from Certainly Wood. I stopped at their facility on the way to Canada for a fishing trip and, quite frankly, was surprised I had a choice of American, French, English and Russian walnut.

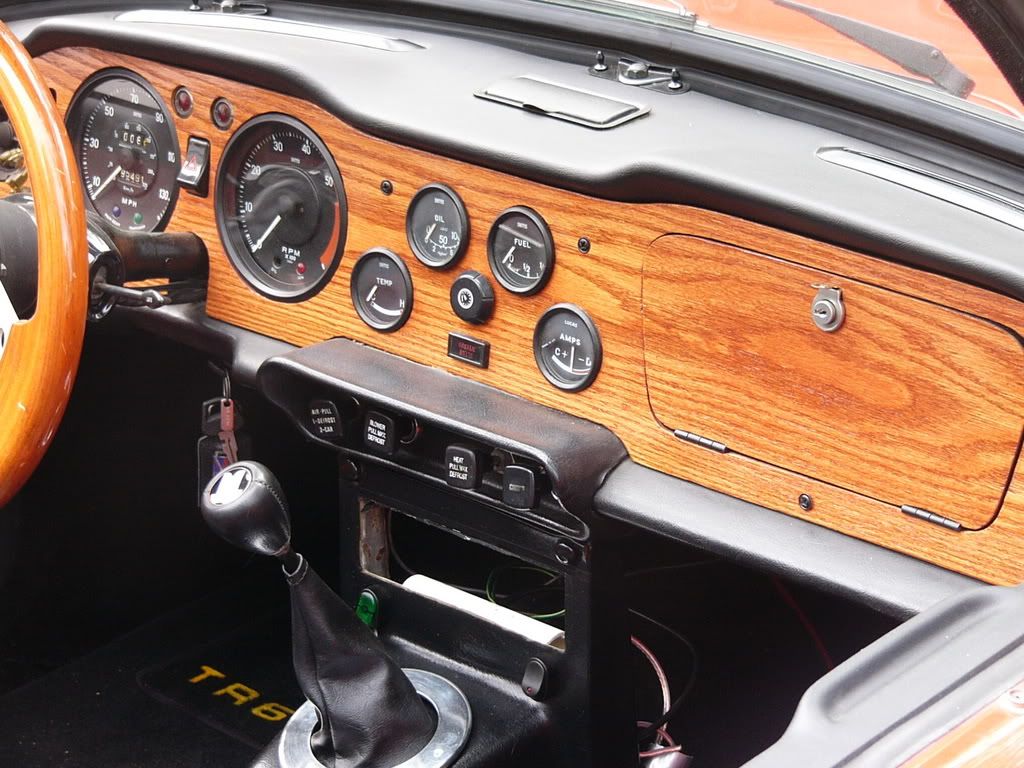
I'll try to be as brief as possible with what I did. I probably went through more steps than necessary to laminate the dash. I first scraped off all the old veneer, sanded, filled some of the holes, and then resanded. To do the lamination, I used simple yellow glue and made a vacuum bag out of sheet vinyl. After using a roller to roll very even layers on the veneer and the dash face. After covering with wax paper and sandwiching between two slabs of particle board, the stack was placed in the bag, the bag sealed, and I pulled a vaccum with a vaccum pump I have. After a couple of hours, I pulled it out of the bag and used a dremel with a bit to route within a 1/4"-3/8" of the edges of the dash and the edges of the gauge openings. After chucking a fine sanding drum in the dremel, I sanded the rest of the way to the opening. Cutting the cubby cover free was a little more of a challenge since I did this with a new, sharp exacto knife and then sanded to the edge with the dremel.

Finish was multiple coats of brush on satin spar varnish- sanding in between coats down to the wood. This left small shiney spots where there were still depressions. I kept building up the coats in this manner until there were no more shiney areas after sanding. I lost track of the number of coats somewhere around 15. I then sprayed 5 coats of spar varnish on the front and back, lightly sanding in between coats.


Ron

71TR6
 
Gotta just love this forum....great info galore!!

Ron, you know the rules, no explanations without pics to show your fine work.

Nice first post for Rob! Welcome to the forum.
 
I ordered the veneer, curly walnut, and some glue, once I get started I will post pics of the dash refinish, at this point I am planning on clear coating with an automotive 2 part clear coat, I sprayed the same clear on my teak deck table and it has lasted for 3 years on the back deck in direct sun and no cracking or peeling yet
 
Sorry guys, forgot to upload an image. Flog me with a burnt TR wiring harness.

Here it is...
Img_0999.jpg


Ron
 
Tom and Paul...thanks for the kind welcome!

I've been cruising this site for a few days and it seems like the place to be...hope I can add something occasionally.

Rob
 
Rob,

Nice to have you here. We all try to help each other, but also keep a sense of humor about the topics and ourselves, so yes, I agree. It is a rather nice and civil place to be if you love British cars as we all do.

Well, maybe not quite all of us. Dale may be getting a bit testy with his love affair at this time......
 
Well I purchased a used dash, got it yesterday and was planning on using the core to reveener, but after looking at the core the plywood is delaminating in places and just doesnt appear to be in that good a shape, since the wood is 36 years old and glue too, I decided to use it as a template. So off to Lowes, purchase a sheet of 1/2 birch cabnet grade plywood. Lay out the dash and begin to cut. so all holes are cut but the recesses for the gauges are next so off to the woodworking store today to get an 1/8 inch router rabbiting bit. As usual I will probably have just as much or more in the dash than just purchasing one. The glove box cut out and door might be the hard part, I just have to go slow
 
Back
Top