-
 Hi Guest!
You can help ensure that British Car Forum (BCF) continues to provide a great place to engage in the British car hobby! If you find BCF a beneficial community, please consider supporting our efforts with a subscription.
There are some perks with a member upgrade!**Upgrade Now**
(PS: Subscribers don't see this gawd-aweful banner

Tips
- We have a special forum called "Member Articles" where you can submit actual articles for consideration for publication. Learn More
- Don't have an Avatar? If not, your avatar will default to the 1st character in your username. Go into "Account Details" to change your Avatar.
- Some basic forum navigation info: click
 Hey - did you know if you click on the title of a thread it will take you to the first unread post since you last visited that thread?
- Hey Guest - Is your British Car Club in our Clubs database? If not, send me a PM - Basil

- Looking for a local club? Click the "Clubs" tab above and browse hundreds of clubs world-wide.
- Add Android or iPhone APP: click
- Did you know - any picture or video you add in your posts in any marque-specific forum will also get added to the Media Gallery automatically.
- A few more tips about posting and replying: click
- Hey there Guest - be sure to keep your profile page up to date with interesting info about yourself: learn more
- More tips and tricks on Posting and Replying: click
 but were afraid to ask:
  STOP!! Never post your email address in open forums. Bots can "harvest" your email! If you must share your email use a Private Message or use the
  smilie in place of the real @
- Want to mention another member in a post & get their attention? WATCH THIS

- So, you created a "Group" here at BCF and would like to invite other members to join? Watch this!
- Hey Guest - A post a day keeps Basil from visiting you in the small hours and putting a bat up your nightdress!
- Hey Guest - do you know of an upcoming British car event?
 Pretty Please - add it to our Events forum(s) and add to the calendar! >> Here's How <<
- Hey Guest - you be stylin' Change the look and feel of the forum to fit your taste. Check it out
- If you run across an inappropriate post, for example a post that breaks our rules or looks like it might be spam, you can report the post to the moderators: Learn More
- If you would like to try some different "looks" or styles for the site, scroll to the very bottom, on the left and click the Style Selector.
You are using an out of date browser. It may not display this or other websites correctly.
You should upgrade or use an alternative browser.
You should upgrade or use an alternative browser.
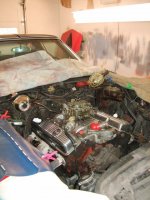
Valve Cover Gasket
- Thread starter vette
- Start date

dougie
Luke Skywalker
Offline
What is the best valve cover gasket for the 6 cylinder Healey? And where can I get one?
Thanks for the help. Dave C.
I used this one for a few years with success on my racer. https://mossmotors.com/austin-heale...-valve-cover-gaskets-by-gasket-innovations-12 After I rebuilt the motor last year I put a new one on and had some leaking, so I went back to the old school cork unit. I do use gasket sealer https://www.walmart.com/ip/Permatex...F26pToYEPlfXdP4waaXOyhuImlU4fgdQaAmhAEALw_wcB
to mount both the silicone and cork gasket to the cover and only use a little oil on the head side to create a solid seal.
Offline
I put the silicone gasket from Moss this last time. It seems to be working fine. Need to follow the directions, though.
OP
Offline
Thanks Dougie. I also have the blue silicone gasket on my '70 Vette valve covers and yes they leak a little. Not really happy with them. I have been running the cork gasket on the Healey for about 10 years. I also use the black RTV with the cork. The Healey valve cover gasket has weeped a little near the front right corner. I am going to adjust valves soon and was hoping to find a superior gasket this time around. Maybe I already have the superior gasket in the cork.
Thanks for the input. Dave C.
Thanks for the input. Dave C.

Offline
I've twice tried the silicone gaskets with my Ray Juncal valve cover - without success. Maybe they work better on the stock valve covers due to the lip around the periphery.
What's worked for me is to glue the cork gasket to the valve cover with weatherstrip adhesive, then weight it overnight on a plate glass tabletop so the bottom is flat. Install with a light coat of hylomar between the gasket and head surface.
What's worked for me is to glue the cork gasket to the valve cover with weatherstrip adhesive, then weight it overnight on a plate glass tabletop so the bottom is flat. Install with a light coat of hylomar between the gasket and head surface.
RAC68
Darth Vader
Offline
Hi All,
Dave, I made the same request a number of years back and was referenced to Gasket Innovations. Back then, I had been using cork gaskets and had never gotten the knack down for getting an oil-tight seal. After receiving and installing the silicone gaskets, without applying anything additional, I found all leaks eliminated (for the first time). I must admit, however, since my (initial) success I have been quite hesitant of removing the cover to adjust my valves (with tapping getting louder) as I don't know how they will fare when reapplied.
Has the Gasket Innovations gasket re-sealed well after some years of being in-place and is there a procedure?
Ray(64BJ8P1)
Offline
There are two gasket styles, one for stock covers, one for aftermarket (alloy) covers. Use the correct one. Seal to the cover with red RTV, and set the cover, gasket down, on a FLAT surface until the RTV cures. Then install.Thanks John. I'm curious, what directions need to be followed with the silicone gasket?
Offline
Ray:
You said "I have been quite hesitant of removing the cover to adjust my valves (with tapping getting louder) as I don't know how they will fare when reapplied."
Solution 1--Remove valve cover, adjust valves and if necessary get a new gasket.
Solution 2--Remove hearing aids and continue to ignore the issue.
fwtexasbj8
Senior Member
Offline
I have had the Moss silicone gasket, installed like John Turney says, for several years. I have had the cover off several times and never any sealing problems.
Keoke
Great Pumpkin
Offline
I have had the Moss silicone gasket, installed like John Turney says, for several years. I have had the cover off several times and never any sealing problems.
Me TOO no problem.
Thanks Dougie. I also have the blue silicone gasket on my '70 Vette valve covers and yes they leak a little. Not really happy with them.
Dave C.
Name a small block Chevy valve cover/gasket that don't leak...

RAC68
Darth Vader
Offline
Hi All,
Removed my valve cover and adjusted the valves. Prior to setting the valves, I remembered something Randy Forbes posted a while back on setting valves. Randy indicated that he set the valves cold for consistency and, since the intake valves gain some cooling when Open, due of the passage of the air/fuel, he set the intakes to 0.012". However, since the exhaust gain any cooling Closed, when in contact with the valve seats, he set the exhausts to 0.015" to allow a small amount of extra time.
His logic seemed proper to me and have set my intakes at the high side of 0.012" cold and my exhausts to 0.015" cold. Also interesting, 0.015" cold translates to 0.012" hot. Has anyone tried this exhaust valve setting?
Although I have reinstalled my valve cover with the Gasket Innovations seal still in place, I have not yet started the engine but expect to have no issues when I do.
Ray(64BJ8P1)
Last edited:
pkmh
Jedi Warrior
Offline
Ray,
Very interesting concept. The idea of having two different valve settings sounds interesting, though at the risk of sounding like an idiot on the issue, I am going to try answering (or bring up) with two more questions that come to my mind.
A. What happens to the "balance" of the two opposites--intake and exhaust? Like breathing in and out.
B. What can be said for gyration issues on the cam? Minuscule, probably, especially at low rpms. Any concerns at higher rpm's??
Again, not sure if my questions even make any sense. Just throwing it out there. Very curious about this approach!
I, myself for now, am leaving my valve settings all the same (.012", cold), as the good book says.
Paul
pkmh
Jedi Warrior
Offline
I did some further investigation on this issue of creating two different valve settings.
After asking some folks I know who seem to have a better understanding of this sort of thing than I, they seem to suggest by creating a larger than specified valve setting (i.e.-exhaust), there will still be a tendency for more banging of the tappets and cam, leading to more wear over time. I understand there will be an advantage to creating a more firm seating of the exhaust valves, but that's all I can mustard at the moment.
I drive my Healey as an old fogy so for me, I am leaving my settings all the same which is 0.012" at cold setting, although it does specify in the Austin Healey Workshop Manual it can be set at .015" (cold) for "competition."
What more or truth can be said about the above?
Paul
OP
Offline
Paul, I think your right on the money. But also know that many hi po cams (especially in small block V8 engines) have different specifications for the intakes and the exhaust valves. This is used to not only develop hp but to develop torque and at what rpms it comes in at. In todays world many of the cams are hydraulic so there effectively is no gap to pound the valve gear. But solid lifter cams are still used. Many small block chevy solid lifter settings were right around .018. The racers would play with the gaps to change the valve timing to see if they could pull more power out of an engine. Racers primary interest is to see how fast they can make it not how long it will last. If its your street car, keep it stock.