 but were afraid to ask:
 With my bicycle project now complete (I restored a 1971 Schwinn Super Sport), it's time to get back over to Baby Blue to fix some of the cosmetic issues. The most pressing issue is the wheel well paint coming off. I'm going to strip the old stuff off and reshoot the wheel wells. Any recommendation what to use? I have two full spray cans of pickup truck bedliner paint from a previous aborted project (discovered the stuff didn't work well on wooden surfaces). Would that work?
-
 Hi Guest!
If you appreciate British Car Forum and our 25 years of supporting British car enthusiasts with technical and anicdotal information, collected from our thousands of great members, please support us with a low-cost subscription. You can become a supporting member for less than the dues of most car clubs.
There are some perks with a member upgrade!**Upgrade Now**
(PS: Subscribers don't see this gawd-aweful banner

Tips
- We have a special forum called "Member Articles" where you can submit actual articles for consideration for publication. Learn More
- Don't have an Avatar? If not, your avatar will default to the 1st character in your username. Go into "Account Details" to change your Avatar.
- Some basic forum navigation info: click
 Hey - did you know if you click on the title of a thread it will take you to the first unread post since you last visited that thread?
- Hey Guest - Is your British Car Club in our Clubs database? If not, send me a PM - Basil

- Looking for a local club? Click the "Clubs" tab above and browse hundreds of clubs world-wide.
- Add Android or iPhone APP: click
- Did you know - any picture or video you add in your posts in any marque-specific forum will also get added to the Media Gallery automatically.
- A few more tips about posting and replying: click
- Hey there Guest - be sure to keep your profile page up to date with interesting info about yourself: learn more
- More tips and tricks on Posting and Replying: click
 STOP!! Never post your email address in open forums. Bots can "harvest" your email! If you must share your email use a Private Message or use the
  smilie in place of the real @
- Want to mention another member in a post & get their attention? WATCH THIS

- So, you created a "Group" here at BCF and would like to invite other members to join? Watch this!
- Hey Guest - A post a day keeps Basil from visiting you in the small hours and putting a bat up your nightdress!
- Hey Guest - do you know of an upcoming British car event?
 Pretty Please - add it to our Events forum(s) and add to the calendar! >> Here's How <<
- Hey Guest - you be stylin' Change the look and feel of the forum to fit your taste. Check it out
- If you run across an inappropriate post, for example a post that breaks our rules or looks like it might be spam, you can report the post to the moderators: Learn More
- If you would like to try some different "looks" or styles for the site, scroll to the very bottom, on the left and click the Style Selector.
You are using an out of date browser. It may not display this or other websites correctly.
You should upgrade or use an alternative browser.
You should upgrade or use an alternative browser.
Undercoat Paint
- Thread starter SaxMan
- Start date
Gerard
Luke Skywalker
Offline
I don't know what brand truck bed liner you have, but some don't work that well. If you want to shoot something from a can, 3M 8882 rubberized undercoating is probably your best bet. It's black, but paintable. If you want something extremely durable, the Raptor product is a catalyzed bed liner that is also tint-able to match your paint color. That latter will require a shutz gun and an air compressor, but the guns are cheap. I can post finished results pix of either if that interests you.

Jim_Gruber
Yoda
Offline
Gerard, I was going that direction with Bugsy II but now that I picked up Bugsy IV, an non rusty CA BE your thoughts on applying undercoatibg to keep it nice vs long term resale value way down the road. He will be stored in the garage and he will not see road salt. Thoughts on the best way to go when I pull him off the road for painting. First to get him running.
Gerard
Luke Skywalker
Offline
Hi Jim,
It depends on how much work you want to do and how much you want to spend. To use the Raptor, I would strongly recommend the car be inverted and stripped of everything. There will be much more overspray issues, so you'll not only need to mask off areas of the car you don't want covered, but also barriers around the car to keep the stuff off the floor and surrounding area. The Raptor product will be nearly impossible to remove once it's set. While the 3M product will require some masking and protection of the surrounding area, it won't need to be as extensive, and cleanup is easy if it gets somewhere you don't want it. Also, the 3M product can be more easily managed with the car upright, as long as you can get it on jack stands high enough to have room to spray. The Rapter is much more durable, but the 3M is easier to touch up in the future.
In either case, you'll want to get things as clean and rust free as possible. It's easy to hide things if you don't, but that's just not my personal style of doing things. In the case of the Bugeye, all work was done over bare metal and a good coat of rust inhibiting primer. Any panel straightening or shrinkage, and welding of any holes was done first. The same was true of the Morris I'm currently restoring. Also, in the case of the Bugeye, areas I didn't want undercoated were painted first, then masked off. Because I tinted the Raptor with the same paint, paint touchup is easy and undetectable. In the case of the 3M product you can paint before or after; I usually do it after if using black, since it really doesn't require masking.
I've attached photos of my Bugeye, done with the Raptor, and also of a Morris Minor I just finished undercoating with the 3M product.
Gerard, I was going that direction with Bugsy II but now that I picked up Bugsy IV, an non rusty CA BE your thoughts on applying undercoatibg to keep it nice vs long term resale value way down the road. He will be stored in the garage and he will not see road salt. Thoughts on the best way to go when I pull him off the road for painting. First to get him running.
Jim_Gruber
Yoda
Offline
Thanks Gerard. Did you leave the BE undercarriage Blue ? In Bugsy IV's case no rust to fix, no panels to straighten. I will strip down to paint but first will get all running first and think about paint this fall. In the meantime I need to go drive.

Offline
Thanks for posting the pics -- 3m stuff looks good. I may do a test shot of the material I have and see what I think before I spray the whole fender well.
I would say go for it, you aren't driving in winter and not planning (I think) a concours car.
I would say go for it, you aren't driving in winter and not planning (I think) a concours car.
No. Baby Blue is definitely not a concours car. I gave some thought to doing a full restoration eventually, but I really don't think it would be worth it. What makes this car fun is that you don't have to worry about the occasional chip or ding. Why would I take away the car's biggest asset by turning it into something that I'd have to worry about every time I took it out? Would I like to restore another LBC to a concours standard one day? Absolutely.
Gerard
Luke Skywalker
Offline
Yes, what you see is Iris Blue (actual correct paint code, not a matching scan) and is the finished product.
Really, no dents from jacks in the frame rails and/or crossmember? No distortion in footwells below foot positions or dents from running over things a little taller than the rocker panels? I don't think I've ever seen any Spite that didn't have at least jacking damage and/or some extra holes drilled in the floors.
Really, no dents from jacks in the frame rails and/or crossmember? No distortion in footwells below foot positions or dents from running over things a little taller than the rocker panels? I don't think I've ever seen any Spite that didn't have at least jacking damage and/or some extra holes drilled in the floors.
Thanks Gerard. Did you leave the BE undercarriage Blue ? In Bugsy IV's case no rust to fix, no panels to straighten. I will strip down to paint but first will get all running first and think about paint this fall. In the meantime I need to go drive.
Steve P.
Jedi Hopeful
Offline
I'm a big fan of undercoating and have used it on many cars. I'm sure there are many alternatives
but the common Rustolium brand you'll find at WalMart for $3/can works fine. One thing to be aware
of...it takes a VERY long time to fully cure. I've used undercoating in the cockpit too. It does and excellent
job of sticking to and sealing the metal as well as be far more water resistant than paint which can get scratched.
But don't put it on something you'll want to re-do later. Removing this stuff is difficult.
Steve
Rut
Obi Wan
Offline
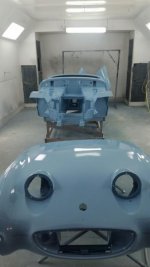
This is what I did on my Bugeye. After it was media blasted it was primed with epoxy primer followed by an Iris Blue tinted primer followed by Iris Blue tinted bed liner which I think was Raptor. Everything was urethane based and the car was painted with 3 coats of urethane top coat, color sanded between coats and buffed. The finish is very close to the original finish and I'm very pleased. I also had the tinted bed liner sprayed in the boot and on the floors and trans tunnel...very durable stuff!
Rut
Rut
Attachments

BlueMax
Jedi Warrior
Offline
No masking with undercoating for me, it adds weight to your car. Also if you do develop rust again, the undercoating can hinder the visual observation that corrosion has started, (blistering to paint)! Second, if repairs are needed it makes it more difficult in preparation having to remove undercoating.

I started stripping out the old undercoating tonight on the left front fender weel. Some of it came off alarmingly easily. Some of it was more difficult. There was corrosion behind the spots that came off easily, although no rust through. Also found a big wad of bondo on the lower rear part of the arch. It was in there pretty solidly. I really was not much in the mood for opening a pandora's box, so I smoothed that area over by sanding it. Cleaned up the area and called it a night. Tomorrow, I'll mask off the areas to prevent overspray and then the following evening, I'll shoot it.
Masked off and shot the fender well this evening. The pickup truck bedliner paint worked surprisingly well. Is it perfect? No. But it did turn out better than I thought. The main objective is not to have this car be a show winner as much as it is continuing to preserve the car as a driver for Daddy/Daughter adventures. By arresting the corrosion at this point in time, I'm probably saving myself a bigger headache further down the road.
Worked on the right side fender well last night. Very different experience -- undercoat was much thinner on most of the well, but there was a huge glob of bondo again on the rear of the fender well. I chipped away some of it and really couldn't figure out why it was there as there was solid metal underneath. However, like with the left fender, I didn't want to open Pandora's box, so I simply resanded the areas to get them ready for paint. Maybe one day the car will be media blasted and we'll see what we're dealing with, but that day is a long way off.
On to the left rear fender. Life got interesting here. I knew this fender was likely replaced due to accident damage as the trunk floor is still warped on the left rear of the car. Along the seam of the fender well to the rest of the body I found caulk -- like what you would use on a bathtub. Naturally, I stripped it away. More bondo found in both the front and the rear of the well. Smoothed it out, but did not remove it entirely for reasons that I have repeatedly mentioned above.
Some pics of what I've been doing:
Left front fender -- this was my starting point.
 DSC_0048 by David Cohen, on Flickr
Left front stripped down -- you can see the Bondo glob towards the lower right of the fender.
 DSC_0051 by David Cohen, on Flickr
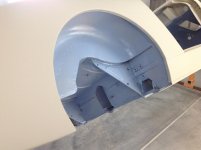
After paint. I have to go in and touch up some areas by hand. Yes, I had everything masked off and covered up before I shot the fender well.
 DSC_1004 by David Cohen, on Flickr
Left rear fender. This was after I pulled the "caulk" from the body.
 DSC_1101 by David Cohen, on Flickr
This is what the caulk looked like. It looks like the same stuff you'd use on your house. Has anyone else ever seen this before?
 DSC_1104 by David Cohen, on Flickr
No finished pics of the left rear that came out decently. One more fender to go, and then I'm off to do some rust repair on the trunklid and the inside of the rear fascia.
Left front fender -- this was my starting point.
DSC_0048 by David Cohen, on FlickrLeft front stripped down -- you can see the Bondo glob towards the lower right of the fender.
DSC_0051 by David Cohen, on FlickrAfter paint. I have to go in and touch up some areas by hand. Yes, I had everything masked off and covered up before I shot the fender well.
DSC_1004 by David Cohen, on FlickrLeft rear fender. This was after I pulled the "caulk" from the body.
DSC_1101 by David Cohen, on FlickrThis is what the caulk looked like. It looks like the same stuff you'd use on your house. Has anyone else ever seen this before?
DSC_1104 by David Cohen, on FlickrNo finished pics of the left rear that came out decently. One more fender to go, and then I'm off to do some rust repair on the trunklid and the inside of the rear fascia.
Got it -- except it was on the outside of the seam, on both sides of the panel. I don't think seam sealer could make a U-Turn like that? I'm thinking when the panel was replaced, the bodyman just pushed the excess up around the sides and then shot it with undercoat.
I do wish this car could talk. Still, little by little, it is giving up its secrets.
I do wish this car could talk. Still, little by little, it is giving up its secrets.