• Hi Guest!
    You can help ensure that British Car Forum (BCF) continues to provide a great place to engage in the British car hobby! If you find BCF a beneficial community, please consider supporting our efforts with a subscription.

    There are some perks with a member upgrade!
    **Upgrade Now**
    (PS: Subscribers don't see this gawd-aweful banner
Tips
Tips

TR6 TR6 wiring - Moss Motors

Bill Redd

Jedi Hopeful
Offline
Has anyone utilized the wiring harness from Moss Motors on their TR6?

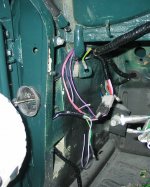
I'm laying this one out, getting ready to install it. However, from the few pictures I took as I disassembled, the wire colors do not appear to match up, or I'm looking at this harness wrong!/ubbthreads/images/graemlins/eek.gif

The entire car is apart, and I'm just beginning the reassembly. I wanted to lay out the harness, and run everything to the general final location. Then, as I get everything else in, I'll hook up the connections.

Anyone with experience, pictures, or better yet, both?
 
Well, after stopping to think about it, I think I've (partially) solved my problem!

I assumed that since the harness came with a grommet to go through the firewall, that the grommet would be about in the right spot.

But, hey, it had a lot of "clearance" around it, so after a little fidgeting around in there, I decided I had to "pull" more of the harness through to the engine compartment. Then, the "fitting" of the harness seemed much better!

Oh by the way, I could still use comments on how you set up the area where you connect the main and the rear portions of the harness... Do you put it through the door pillar, over the drain pipe, to keep it all out of the way?

First day of the rebuild, and I'm getting psyched!
 
Bill, it sounds as though you are past this stage, but whenever I do a harness swap, I lay the new next to the old and verify all the proper connections are there and the wire lengths are correct. It's much simpler to make any required adjustments or corrections before installation.
The last one I did was for my GT6, and the only thing I did to it was to crimp and solder new bullet terminals on everything, just for the added security. I got the brass terminals, and the special crimping tool, from British Wiring.
Jeff
 
Here's a picture that I just took of the way I've got it set up. I've put the rear harness thru the door post area, and the main harness is ready to connect.

Do i need to "hide" this in some fashion, to keep the wires from showing?
 

Attachments

  • 163350-wiringlfdoorarea.JPG
    163350-wiringlfdoorarea.JPG
    140 KB · Views: 200
Bill- As to your picture ,I see Moss doesn't even use bullit connectors. You might have checked out Dan Masters wiring panel.
 
Bill, I don't remember pulling the rear harness thru this area, but I guess you could. Just run it low and hold it down with some heavy tape, like 3M Black Duct Tape. I see some bullit connections in there myself. Also, being nosey, and looking down into your rockers, you might want to consider blowing some hot Waxoyl into these areas. Looks kinda rusty. Even use this product under your dash where some paint has been chipped away.

Hope you don't mind constructive criticism.

Bill
 
Thanks for the comments
I'm always open to some constructive criticism... I've never done this stuff before!
I think I'll pull the harness from inside the door post, as I'm concerned about what could happen if I push the wires too far back when I install the interior!
 
Bill,
A couple of more points on renovating your TR6. From what I see in the photo your paint man painted the outside of the car and that is all you got. Not that this is such a bad idea except there are more than a few areas in the interior that the carpet, panels and vinyl just don't cover and these will be exposed for you and all to see. That is the way the TR was built. It would be a better thing to have the interior sprayed the same color. If that is not available, then you will have to make do. Two different shades of green showing looks worse than a nice outside color and a neutral or semigloss black interior, if that is as far as you want to take it. This can be done with rattle cans, just use good preparation, clean working area and a good quality paint, such as Krylon. Another point is to make all your lower floor matts removeable, especially those in the front. The original matts were snapped in and were meant to be removed, like anytime the car gets wet. You can ruin some perfectly sound steel floorboards by leaving the matts in after rain or a wash job. Ask me how I know this. (Your car will leak somewhere on the firewall, if not now, soon.
I rigged my matts to all be removed without taking the seats out, but this is rarely where you will get rust, almost always under your feet. Again, putting something like Waxoyl in all the nooks and crannies is a good idea. Inside the doors, behind all panels, rockers, under dash, behind heater, etc. Repels moisture and prevents rust. Take your time and enjoy the project. I did mine as a body-on-frame resto like you, wish I had the room for a body-off but not meant to be. Above all, have fun. It will bring you lots of pleasure besides the heartache. Good luck.

Bill
 
Thanks for the comments Bill & Larry!
I think the picture does not do the paint job justice. Some of what looks bad in the door jamb itself is light reflecting off. I'm hoping that the stuff that has come off inside is covered by carpet or fuzzy stuff in the door frame. I am concerned with the way that paint came off the door post, but the "visible" stuff appears much stronger...
I hope...
 
[ QUOTE ]
I thought that this was a great link if you know to code of the paint used by your painter. They can put your code into spray cans.

https://www.paintscratch.com/

I ordered a copy of cans as "back up"

[/ QUOTE ]

Good, another source for coded paint in a rattle can. I got some stuff from Tower Paint for a tupperware project on my son's VW GTi. The red paint we got was a PERFECT match to the rest of the car. It isn't cheap, but if all you need is a couple of cans, it's worth it. /ubbthreads/images/graemlins/cheers.gif
 
Back
Top