• Hi Guest!
    You can help ensure that British Car Forum (BCF) continues to provide a great place to engage in the British car hobby! If you find BCF a beneficial community, please consider supporting our efforts with a subscription.

    There are some perks with a member upgrade!
    **Upgrade Now**
    (PS: Subscribers don't see this gawd-aweful banner
Tips
Tips

TR2/3/3A TR4 engine into TR3 crankcase vent tube?

Kleykamp

Jedi Trainee
Offline
I'm doing a engine block swap in a TR3 to a TR4 block ( CT 73130 E ), which I think puts it in the TR4A range. My question is: I want to switch the road tube vent off my TR3 engine to the TR4 engine. ISTR that the plug in the side of the block can be pryed out by driving a screw driver in it similar to a removing a freeze plug. Has anyone done this and how hard is it to get out? I don't really want to have to rig up the closed breather, requiring different air cleaners, valve cover, etc and prefer to keep the TR3 look. Both blocks are out of the car and in the floor. Thanks
 
I added a road draft tube to my TR4 engine to relieve some pressure. It wasn't too bad a job considering I did it with the engine in place. With an engine out it would have been about 30 seconds of work. Yes, it is just a stamped sheet metal plug.
 
I'm planning to take the plug out on my TR3 since it too has a TR4 engine block, but with the engine in the car. Is the screwdriver method the best way to get it out? I understand that it has to be done from under the car when it is up on jack stands, is that correct? Also, is there any special procedures to get the replacement pipe installed correctly? Thanks!
Regards,
Bob
 
I removed the plug from above. I dremeled the cap a bit to weaken the center, then was able to get a stuuby screwdriver through. Once it in there I was able to rotate the plug and pry/pull at the same time.

You want the pipe to be a pretty snug fit -- as I recall it has a slot in the side to allow some compression as you push it in. Some sealant on that connection is probably a good idea. I do not remember what I used, possibly form-a-gasket.
 
Here's how it's gone so far. The dremmel ideal is good, wish I had done that before I started. I attempted to drive a screw driver through...it dented the center of the cap, but did not break through,which took the pressure off the sides, then it drove the cap further into the block. Now I have to remove the oil pan to get rear access, where I will try to drive the side wall of the plug in, which hopefully will loosen it so I can just pull it out with pliers. A baffle behind it keeps it from being able to push it all the way through. The slide hammer(dent puller) didn't work for me. It just kept pulling the screw out. It seems pulling on the slighty concave plug only tightens it in the opening. Darrell's method obviously works. I was planning to remove the oil pan anyway, hopefully there is some access from the back side, or I may have to resort to the tapping and pulling method. The messes I get myself into.
 
Success! After taking the oil pan off and finding there was no access from the inside, I had to drop back and punt. I was able to drive a chizel into the edge of the plug and then pry up on the edge. The plug turned a few times in the hole and moved outward. I drilled and put a small screw in the plug and pulled it out with a pair of channel locks. Oil pan could have been wasted time, but now it's nice and clean inside and out and I got to look at the inners. Pat, If you are following this, it's not a recently rebuilt engine, but looked to be ok.
 
I appreciate that I can use this thread since I'm doing the same plug-to-pipe change. I have a question concerning where the bracket for the crankcase breather pipe attaches to the motor. On the Moss TR3 catalog for the external engine parts it shows a bracket #47 that goes to the breather pipe but it does not show where it attaches to the engine. Could someone tell me where to attach it, better yet post a picture showing the bracket installed? Thanks!
Regards,
Bob

It attaches to one of the oil pan bolts. There is an additional connector piece, either flat, or twisted 90 degrees, as there is apparently two different styles of draft tubes.
 
The oil pan has two bolts that are longer than the others. One is for the support that braces the slave cylinder bracket and the other is for the connector piece that Darrell mentions.

This pics shows a connector -- appears to be the 90° twist DW noted. I think mine is just a flat piece that bolts to a tab on the pipe (and to the oil pan). If you don't have/can't find a connector shouldn't take much to fashion one.

$T2eC16Z,!)UE9s3wDdqRBQwo(D6)p!~~60_57.JPG


Okay, this looks like one with the flat piece:

$T2eC16R,!)kE9s4Z+lW-BRTQ8vk-(Q~~60_57.JPG
 
Thanks for posting the pictures. The pipe I just got does not have the twisted bracket. Since the pipe attaches to one of the oil pan bolts, it appears that it is the bolt just behind the slave cylinder support bolt. I will have to get a new pan bolt for that location since on mine that the bolt does not stick out far enough. I guess because it currently has a plug, the PO did not put a longer bolt in that location. I'll make up a bracket for that support. Thanks for the information!!
Regards,
Bob
 
Joe,
I am following. Glad you are making progress. Pat
 
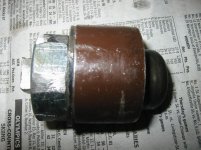
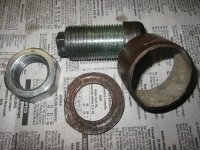
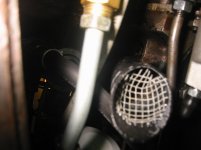
I was able to get the crankcase breather plug out of my TR3 engine. Here is my version of the puller suggested by Darrell Walker. The use of the 1 inch bolt is a VERY good idea. The 1 inch bolt worked very well. I decided to try screwing the 1 inch bolt into the plug so I would not have to use JB Weld. I cut off the head end of the bolt and cut it square on the end so a 9/16 wrench would fit it to provide leverage so I could screw the 1 inch bolt tightly into the plug. I then used a piece of pipe against the engine and a large washer against the pipe and then put a large 1 inch nut on the cut off end of the 1 inch bolt. The bolt held very well since I screwed it into the plug quite a ways. The only problem with my puller is that I should have used at least a 3 inch or 4 inch long bolt and a longer piece of pipe because the space where the plug is located is quite narrow and I had to grind off one edge of the large washer to allow clearance. If I'd have made the 1 inch bolt longer it would have been further out from the engine in an area that had more clearance for the large nut and washer. But in the end it worked well. One note is that I took the clutch slave cylinder off it's mounting bracket and tied the slave cylinder up out of the way. It would have been very difficult to work up in there without moving the clutch slave. I used Permatex Aviation sealer on the breather pipe so oil would not leak around it. I have attached pictures of the puller tool I made and also included a picture showing the piece of 1/8 inch hail screen (hardware cloth) that I put in the end of the
pipe to keep out the critters.
Regards, Bob


IMG_5188.jpg IMG_5189.jpgIMG_5185.jpg
 
Back
Top