Hey Guest!

 Hey - did you know if you click on the title of a thread it will take you to the first unread post since you last visited that thread?
 but were afraid to ask:
  STOP!! Never post your email address in open forums. Bots can "harvest" your email! If you must share your email use a Private Message or use the
  smilie in place of the real @
 Pretty Please - add it to our Events forum(s) and add to the calendar! >>
T
TRDejaVu
Guest
Guest
Offline
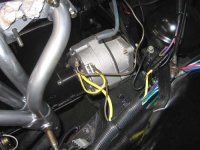
So my original project to go narrow belt, but retain the generator morphed into doing the alternator conversion as well. I sourced a 7127-3 unit from NAPA along with a conversion kit from Triumph Rescue.
The kit uses a 3/8 diameter bolt (same as the VTR write up), but when you remove the generator front mounting boss it leaves a 1/2 hole in the engine front plate. I know that it will pull up tight when bolted in, but with the load being applied to the pulley at the front it seems to me that the alternator will work inwards, go out of line and have extra load put on its bearings. I have MacGyvered the hole so that a 3/8 hole is present to keep the alignment, but the long bolt won't clear the body crossbrace. So my 2 questions are:
1. Has anyone got any long term usage time with this mod; if so any issues due to the bolt hole mis-match?
2. The VTR write up says to cut 1/2 inch off the alternator mounting boss. Has that been your experience as well?
Also, I sourced a 7385 belt, but I can't get it over the 3 pulleys so it's back to NAPA for a longer one on Sat.