• Hey Guest!
    British Car Forum has been supporting enthusiasts for over 25 years by providing a great place to share our love for British cars. You can support our efforts by upgrading your membership for less than the dues of most car clubs. There are some perks with a member upgrade!

    **Upgrade Now**
    (PS: Upgraded members don't see this banner, nor will you see the Google ads that appear on the site.)
Tips
Tips

TR2/3/3A TR3A windscreen top seal

NutmegCT

Great Pumpkin
Bronze
Offline
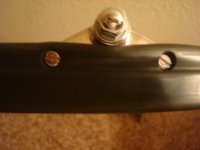
Today I received the new rubber seal from TRF (part #554339).

I don't understand:

(1) how to remove the strip left from the old seal (see picture - thin black strip of rubber),

(2) how to slip the new seal in the space where the old one was, and

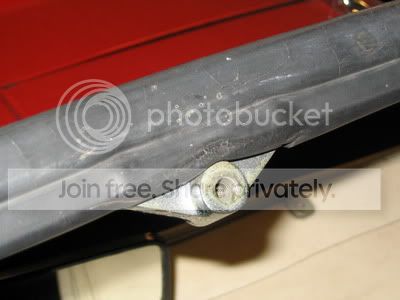
(3) how the new seal fits over the screws holding on the hard top bolt brackets. Does the seal just cover them up?

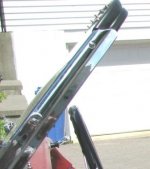
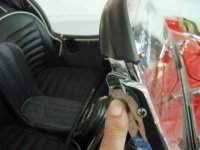
I'd sure appreciate someone pointing me toward an explanation of removal of the old piece from inside the windscreen frame, the installation of the new seal, and a picture of the seal installed, especially relating to the hard top bolt brackets.

The picture shows the remnant of the old strip; looks like someone sliced it off with a knife.

Thanks.
Tom
 
Tom

The windshield needs to come off the car and the side braces come off also. Then you should be able to slide the old seal out of the channel and then the new one in.

Don
 
Tom is right that the windshield has to come off the car,then the stanchions off the frame, and then the bottom of the frame has to come off. You have to start the seal at the bottom of the top part of the frame and slide it into place. If you can get it to slide all the way. Use lots of soapy water to help it slide. Give it a few days to relaxe before you trim it.

As for the hardtop you can remove the brakets as I did or not. Cars with the hardtop only had half of the seal that you got from TRF. The back edge of the seal on hardtop cars was trimmed off or they were made to only cover the front edge of the frame. I chose to leave the whole thing on and punch out where the screws would go for the brackets.

To get the old seal out you will have to dig it out with something.
 

Attachments

  • 28891.jpg
    28891.jpg
    90.5 KB · Views: 369
IMG_1512.jpg


Just for yuks, my pic is different than Mallard's. This seal dates back to at least the early 80's. I have a TRF seal, just too lazy to install it, especially after reading all the hoops I'll have to jump through....

I'll leave it to Don to determine the correct version.
 
After you slide the new top seal (use some soapy water to help it slide), leave the ends a bit long down each side. Then a day or so later when all the memory in the rubber seal has recovered itself put on the chromed side plates, pinching a bit of the seal between the side plate and the chromed window frame. Then take a sharp blade and trim off the rounded (tubular) bit of the seal so that only the flat part of the seal is pinched between the chromed strip and the window frame.

This will keep the ends of the seal looking neat and it'll keep the rain out better. See how I did mine in 1990 exactly as it was originally when I bought my TR3A brand new in 1958.
.
 

Attachments

  • 28907.jpg
    28907.jpg
    20.3 KB · Views: 315
Impressive how many BCFer's have hard top attachments on their windscreens! Great shots too, I'm interested because I just picked up a nice hardtop and will need to figure out how to install it.
 
Here's how NOT TO CUT the ends of the top seal.

Believe it or not, this red TR3A is the one on display at the Gaydon Heritage Center Museum in England. I took the photo last summer.
 

Attachments

  • 28908.jpg
    28908.jpg
    21.4 KB · Views: 318
Thanks gentlemen.

I removed the windscreen and dug out the crispy critter remnants of the old seal.

I cleaned out the slot and put soapy water in the track, but ...

Where the heck do you start sliding the "t-head" of the new seal? Someone said to remove the bottom of the frame. Then I assume you start sliding the seal at the beginning of the slot at the bottom of the frame side, then slide the seal up the side, over the top and down the other side.

But see picture - how do you remove the bottom of the frame?

Is there a way to get the new seal into the slot, without removing the bottom of the frame?

Thanks.
Tom
 
There is a corner bracket on each side that holds the bottom to the side. It is held to the side frame and bottom frame by 4 screws, two on each leg. Look at the diagram in the Moss catalog. I recall that the screws are flat head and that the corner bracket is attached to the inside of the side and bottom. The heads of the screws are thus flush with the bottom of the insertion track and the rubber passes thru the track over the heads of the screws. After a closer look, it looks like yours is held together with wire, not the bracket and screws. You need moss part 802-675. And you may find that the bottom rubber needs replacement in order to get to the place where the corner bracket screws go thru it into the bracket. I lubed mine, bothe tracks and rubbers, with crisco and worked them in by "inchworming". Wasn't hard at all.

Bob
 
I don't see the bottom part of the frame in your picture. As Bob mentioned there should be a corner bracket on each side. And yes you need to start at the bottom and slide it over accros the top.

If you don't have the bottom part of the frame let me know, I think I have one you can have for freight only, maybe even the corner brackets. The threads in the brackets are BA thread. I know I don't have enough of the correct screws.
 
Done! Decided to gird my loins and push the T-strip of the seal down into that channel, using a small flat blade scewdriver. Inch by inch (step by step ...).

Now I'll let it rest overnight, and follow Don's recommendation on cutting the edges to fit the chromed side plates.

Thanks to all!

Tom
 
Looks great! Now come over and do mine....
 
mrv8q said:
Looks great! Now come over and do mine....

Kevin - I'm packing now. Send first class tickets and I'll be *glad* to come and do it (the supervision and nitpicking).

Tom
 
12 noon EST. Back on the car.
 
TR4nut said:
I'm interested because I just picked up a nice hardtop and will need to figure out how to install it.

Hopefully you won't find, as I did, that I would rather get wet than drive with the hard top in place! To me, it makes the car way too claustrophobic. Mine hasn't been out of the rafters in oh, 25 years now!
 
Back
Top