
-
 Hey Guest!
British Car Forum has been supporting enthusiasts for over 25 years by providing a great place to share our love for British cars. You can support our efforts by upgrading your membership for less than the dues of most car clubs. There are some perks with a member upgrade!**Upgrade Now**
(PS: Upgraded members don't see this banner, nor will you see the Google ads that appear on the site.)

Tips
- We have a special forum called "Member Articles" where you can submit actual articles for consideration for publication. Learn More
- Don't have an Avatar? If not, your avatar will default to the 1st character in your username. Go into "Account Details" to change your Avatar.
- Some basic forum navigation info: click
 Hey - did you know if you click on the title of a thread it will take you to the first unread post since you last visited that thread?
- Hey Guest - Is your British Car Club in our Clubs database? If not, send me a PM - Basil

- Looking for a local club? Click the "Clubs" tab above and browse hundreds of clubs world-wide.
- Add Android or iPhone APP: click
- Did you know - any picture or video you add in your posts in any marque-specific forum will also get added to the Media Gallery automatically.
- A few more tips about posting and replying: click
- Hey there Guest - be sure to keep your profile page up to date with interesting info about yourself: learn more
- More tips and tricks on Posting and Replying: click
 but were afraid to ask:
  STOP!! Never post your email address in open forums. Bots can "harvest" your email! If you must share your email use a Private Message or use the
  smilie in place of the real @
- Want to mention another member in a post & get their attention? WATCH THIS

- So, you created a "Group" here at BCF and would like to invite other members to join? Watch this!
- Hey Guest - A post a day keeps Basil from visiting you in the small hours and putting a bat up your nightdress!
- Hey Guest - do you know of an upcoming British car event?
 Pretty Please - add it to our Events forum(s) and add to the calendar! >> Here's How <<
- Hey Guest - you be stylin' Change the look and feel of the forum to fit your taste. Check it out
- If you run across an inappropriate post, for example a post that breaks our rules or looks like it might be spam, you can report the post to the moderators: Learn More
- If you would like to try some different "looks" or styles for the site, scroll to the very bottom, on the left and click the Style Selector.
You are using an out of date browser. It may not display this or other websites correctly.
You should upgrade or use an alternative browser.
You should upgrade or use an alternative browser.
TR2/3/3A TR3A Radiator Duct
- Thread starter CJD
- Start date
Don Elliott
Obi Wan
Offline
Don Elliott
Obi Wan
Offline
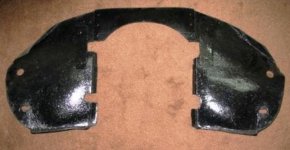
Ignore the 4 rectangular notches which I made to clear the brackets for my front electric pusher fan. It comes as three pieces. One for each side and one that goes across the top of the radiator. They are held together with 4 (or are there 6 ?) brass tab holders like you might use to keep pages together like for a three-leaf binder. There are two (or three) at the top right and two (or three) at the top left which hold it all together. The air deflector must be sprayed the same colour as the car.
Some people screw the lower flanges to the "deck" but they never move the way I have them without screwing them down.
Some people screw the lower flanges to the "deck" but they never move the way I have them without screwing them down.
Attachments
MGTF1250Dave
Jedi Knight
Offline
Aloha John,
Your description is how I installed mine. Bend along the scores before installing and fold the side inward and push it in through the grille opening. There should be four rivets to connect the cross piece to the two side panels. I think the four screws and washers are included to go through the flange edge on the bottom of each side, two per side. You should see punch-out holes there. I did not use them because I didn't want to drill holes in the front apron.
Some people paint the card board to add weather proofing. I used Thompson's Water Seal, mainly because I had a small amount and wanted to get ride of the can.
Geo Hahn
Yoda
Offline
I am under the impression that the originals were painted body color -- but perhaps I have never seen an original so I can't be 100% certain of that.
I'm thinking I found holes in the pan at the bottom of the apron for those 4 screws -- in any case I screwed it down there as well as having it clamped in place by the bumperette support.
I did use Thompsons on my TR4 shroud -- a sound idea for durability.
I'm thinking I found holes in the pan at the bottom of the apron for those 4 screws -- in any case I screwed it down there as well as having it clamped in place by the bumperette support.
I did use Thompsons on my TR4 shroud -- a sound idea for durability.
Don Elliott
Obi Wan
Offline
The colour should be the same as the body colour to meet the judging standards from TRA. I did mine that way in 1990 but from 1958 to 1990, I had no air deflectors. The TR2 and the TR3 has the small-mouth with the steel sheetmetal sidewalls which forces all the air to go through the radiator.
But when they introduced the TR3A in late 1957 right through to about mid-summer of 1958, the TR3A was produced with no air deflector. Mine was built in February and all TR3As built between late 1957 to summer 1958 never overheated because it was winter. But by mid-summer, everyone was complaining about overheating. I can see a dozen Triumph Engineers working till after midnight - more than a few days and nights - to come up with a cheap (low-cost) retrofit deflector to solve the overheating problem. The factory started to use them painted body colour from that point but all TR3As from TS22000 to well after mine (TS 27489 LO) could have been any colour because they were retrofitted by the local dealer if anyone complained. I never complained so I never had one until I bought one and installed it in 1990. But I must have blown about 4 head gaskets from overheating in the first 80,000 miles from new.
"Now you know the rest of the story" as Paul Harvey used to say.
Twosheds
Darth Vader
Offline
PeterK said:Just as alternative to the original, I used the original as a template and fab'ed my own out of sheet stainless.
I made one for the TR3 racecar from .025 2024-T3 aircraft aluminum. I painted the grille side body colour, and polished the engine side.
PeterK
Yoda
Offline
Twosheds said:PeterK said:Just as alternative to the original, I used the original as a template and fab'ed my own out of sheet stainless.
I made one for the TR3 racecar from .025 2024-T3 aircraft aluminum. I painted the grille side body colour, and polished the engine side.
Great minds think.