 but were afraid to ask:
 I'm assisting an elderly friend restore his 1959 TR3A that he has owned for 55 years. I am in the process of restoring the hardtop but I discovered that he is missing the three middle "L" brackets that secure the rear of the top to the body. Both of the outside brackets are there. I noticed that in the Moss catalog, it shows that these are listed separately (NLA) and I assume that the middle brackets are of different lengths and/or different angles. If there is anyone out there that can provide me with the approximate lengths of the three middle brackets and the angles that they are bent, I can fabricate the brackets that are missing. Thanks in advance for any help that is out there.

-
 Hey Guest!
British Car Forum has been supporting enthusiasts for over 25 years by providing a great place to share our love for British cars. You can support our efforts by upgrading your membership for less than the dues of most car clubs. There are some perks with a member upgrade!**Upgrade Now**
(PS: Upgraded members don't see this banner, nor will you see the Google ads that appear on the site.)

Tips
- We have a special forum called "Member Articles" where you can submit actual articles for consideration for publication. Learn More
- Don't have an Avatar? If not, your avatar will default to the 1st character in your username. Go into "Account Details" to change your Avatar.
- Some basic forum navigation info: click
 Hey - did you know if you click on the title of a thread it will take you to the first unread post since you last visited that thread?
- Hey Guest - Is your British Car Club in our Clubs database? If not, send me a PM - Basil

- Looking for a local club? Click the "Clubs" tab above and browse hundreds of clubs world-wide.
- Add Android or iPhone APP: click
- Did you know - any picture or video you add in your posts in any marque-specific forum will also get added to the Media Gallery automatically.
- A few more tips about posting and replying: click
- Hey there Guest - be sure to keep your profile page up to date with interesting info about yourself: learn more
- More tips and tricks on Posting and Replying: click
 STOP!! Never post your email address in open forums. Bots can "harvest" your email! If you must share your email use a Private Message or use the
  smilie in place of the real @
- Want to mention another member in a post & get their attention? WATCH THIS

- So, you created a "Group" here at BCF and would like to invite other members to join? Watch this!
- Hey Guest - A post a day keeps Basil from visiting you in the small hours and putting a bat up your nightdress!
- Hey Guest - do you know of an upcoming British car event?
 Pretty Please - add it to our Events forum(s) and add to the calendar! >> Here's How <<
- Hey Guest - you be stylin' Change the look and feel of the forum to fit your taste. Check it out
- If you run across an inappropriate post, for example a post that breaks our rules or looks like it might be spam, you can report the post to the moderators: Learn More
- If you would like to try some different "looks" or styles for the site, scroll to the very bottom, on the left and click the Style Selector.
You are using an out of date browser. It may not display this or other websites correctly.
You should upgrade or use an alternative browser.
You should upgrade or use an alternative browser.
TR2/3/3A TR3A Hardtop Rear Mounting Brackets
- Thread starter tedwone
- Start date
mastaphixa
Jedi Trainee
Offline
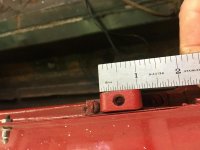
Thanks for responding, but the brackets I need are the ones that are attached to the top itself. The two side brackets are about 1" wide and bent at about 45+ degrees with a length of about 2 3/4". I don't know if the other three brackets are the same length or bent to the same angle.
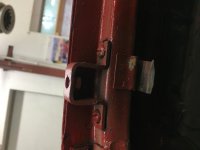
There are 5 total and they are all 90 degrees like the one in the photo. The back 3 are a little smaller than the front left and right side. The front ones are key, maybe and 3/16 wider. They are all very simply made out of iron 90 stock. I have my top hung up in the attic now, but I think I have some extra brackets that I will look for and try photo. The thing is they do adjust up and down some and you will probably find putting a rubber washer under the bracket on to chrome piece helps stop the rattle and offers more adjustment because the top does not fit like a glove.
There was a nice installation kit for sale on evilbay, but I do not remember if it had good pictures or not, maybe google and see if someone showed the top brackets.
There was a nice installation kit for sale on evilbay, but I do not remember if it had good pictures or not, maybe google and see if someone showed the top brackets.
mrv8q
Luke Skywalker
Offline
Hey, Ted, my top is in the rafters as well. The three back brackets under the window look smaller than the front brackets. I went to unscrew them to check but they are unmovable right now; hopefully my application of some PB Blaster will remedy the situation and I can measure tomorrow.
I am missing a front bracket. While you are fabricating some, I would gladly pay you to make an extra for me if you are so inclined.
I am missing a front bracket. While you are fabricating some, I would gladly pay you to make an extra for me if you are so inclined.

Kevin, The two brackets I have are slightly different. One is identical to the one you showed for comparison. The other is about 3/4" on the threaded side of the bracket. I will be more than happy to make you the bracket you missing at no cost. One more bracket isn't going to spoil my day. Just let me know which size you will need. Also I noticed that your bracket is slotted. Neither of the brackets I have are slotted. However, I was told that fitting the original tops in England was basically a custom fit from car to car.
Ted
Ted


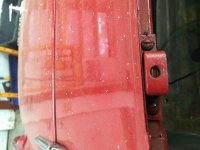
Yes the slot is there to let the bracket slid down. The slot on the bottom is probably a good idea. Set the front seal first because that is where you are going to get the rain and wind plus that is the windshield curve. The top will bend and move as you tighten the 5 brackets down and that is why the 2 by the door are so important, so the door will close. I found out the hard way the side-curtains sit about an inch lower with a hard top; had to refit the curtains to the hardtop. The hole for side curtains on my top was nice--- but-- a tight fit and with the overhang of the channels of the top made a up good seal.
PeterK
Yoda
Offline
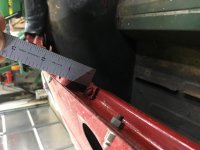
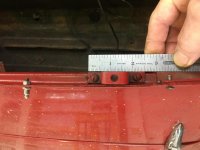
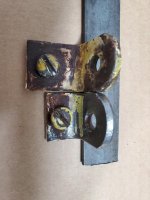
Mine are thick metal like yours and slide snugly into the top. When I made new, I bent a longer piece of stock in my vise to get the correct radius. Cutting angle iron was too sharp a bend. I purchased new screws with the large head and short threaded section from one of the big 3, probably Moss. IIRC they are threaded 10-28 but don't quote me on that, it's been a while. Need slots for adjustment.My front bracket, for comparison.View attachment 63332


The part that attaches to the body is about 1 3/8", but as you can see, the distance where they attach to the top is different. Obviously one goes to the side mounts on the top and the other goes to one of the middle mounting points on the top, I just don't know which is which.
Attachments


Great Kevin! Now I know which brackets go where and I can proceed with getting the raw material this week to fabricate what I need. I will make an additional outside bracket for you in addition to the ones I am making for my old friend. Thanks again for all of your help. I will let you know when I have the brackets completed.