• Hey Guest!
    British Car Forum has been supporting enthusiasts for over 25 years by providing a great place to share our love for British cars. You can support our efforts by upgrading your membership for less than the dues of most car clubs. There are some perks with a member upgrade!

    **Upgrade Now**
    (PS: Upgraded members don't see this banner, nor will you see the Google ads that appear on the site.)

TR2/3/3A tr3 steering boxes

TexasKnucklehead

Jedi Knight
Offline
I have dissassembled 3 steering boxes. Each has it's own problems and I'm trying to guess what parts could be used to make the best one out of all the parts.

#1 came with the car -when it sank in 20' of salt water, the seal at the top of the split column allowed water to get in, but the seals at the bottom did not let water escape when the water receded. In any case, a worn peg and two large cracks in the cam gear make me think the peg slipped over it at some earlier point. I think the month and year is stamped near the upper bearing of the worm as 10 58.

#2 was given to me and I think the car was driven into a wall or something. The splines on the rocker shaft appear twisted and also the splines on the top that connect it to the coupler are nearly missing as if it spun a few times inside the coupler. It is dated 7 59. So even though the cam is perfect, the other end of the shaft is not safe to use.

#3 came with a frame front end that was cut (with a torch) I bought off ebay. It is dated 7 56. The cam has some evidence of rust but no large voids or cracks. The entire frame section was covered in mud and (like the other housing) is full of rust on the inside. The rocker shaft is not smooth and does not turn smoothly in the bush/housing.

#1 and #3 have a collar stuck on them near the top of the housing (just above the oil fill plug) where there should be a rubber seal that mates to two holes in the housing. I do not see this seal in Moss, TRF or VictBrit. Anyone know where I can get a new one?

I had #3 soaking in mystery oil for several months before taking it apart. Like #1, the box was full of rust and the drop arm was very hard to get off. I read a bunch of previous posts and found the puller I used, combined with a hammer worked pretty well. I hope my pictures show up and I'd appreciate any advice.

Jerry
 
Mornin Jerry:
I would say that the box itself is salvageble but you really need a better worm gear, and probably a better drop arm and peg. You can find them on ebay quite often. Both the worm gears you pictured were in bad shpabe which will translate into lousy steering performance. Plus they will eat up the peg. Steering boxes seem to be readly available at used parts sources, if you don't know of any, PM me and I will give you one. To clean out the box you need to bead blast it, which will take care of the rust.
Anyhow, good luck with it.

Tinkerman
 
All look unsalvagable. I guess the one with the chip must have been in contact with the peg when the car hit the wall.
 
I agree, both worms shown look too far gone to use. You might be able to mate the 'perfect' cam with one of the other shafts, tho.

TexasKnucklehead said:
#1 and #3 have a collar stuck on them near the top of the housing (just above the oil fill plug) where there should be a rubber seal that mates to two holes in the housing.
The "collar" and "seal" are actually supposed to be a unit, which is a bushing rather than a seal. Moss P/N is 525-020 but TRF carries it as well. There are actually 2 per car (tho the old Moss catalog I'm looking at says only one), the other is in the lower end of the upper steering housing.

If you try to use those shafts, you'll have to cut or drive the collar off, and smooth the surface under it.
 
Hi Jerry-

Too bad about box #2, it looked pretty good on the outside.

Where'd you get your puller? That looks nice and stout - can it be used for tie rod ends?

Randy
 
TR4nut said:
Hi Jerry-

Too bad about box #2, it looked pretty good on the outside.

Where'd you get your puller? That looks nice and stout - can it be used for tie rod ends?

Randy

Yes, of the 3 units I have, that one has the best housing and the best cam. But I wonder what happened to twist the splines on the rocker shaft that far and strip off the splines of the steering shaft.

The puller came from Hi-Lo. I got it years ago and could have borrowed it with a deposit, or purchase it for the same price. I recall about $20 -and bought it. It works for a lot of stuff because the block can be turned to allow for two different widths of the jaws. It's a "performance tool W80653 pully puller". Since the jaws are held in place by thumb screws, it's easy to use a BFH to get stuck stuff unstuck. To steal someone's verbage "it's one of the tools in my cave man box" and is really handy to have.

Randy and Tinkerman, thanks for the input. I see the bushing listed now and will get a set (and remove/polish the remnants). I think my best cam looks much worse in a picture than it does in real life. The "rust evidence" is very dark and looks like a lot of material has been eaten away, but in reality I can barely feel it with a finger nail. I wish I could remove the cam from the shaft with the splines missing. But I think I'm still going to try to get the best box with the parts I have for now. The original is bent, rusted and chipped, so I can only make it better.

Does the peg simply press into the rocker shaft?
Thanks again,
Jerry
 
TexasKnucklehead said:
I wish I could remove the cam from the shaft with the splines missing.

Doesn't the cam come apart from the shaft?

I have a couple good cams on bad shafts.
 
Twosheds said:
Doesn't the cam come apart from the shaft?
Supposedly yes, but I haven't tried it myself (yet).

Wish I could remember who sent me this photo of their cam change.

The peg presses out, but you may want to add some staking and/or Loctite to the new one, to be sure it stays secure.
 
Aloha,

There was a discussion here a while back about removing the worm (cam) from the inner steering column. I copied and save the pertinent post from Harry Ward. here it is:

REMOVAL & REPLACEMENT OF TR3 STEERING WORM

"Wim Betzel, Netherlands
Hi all, ok the salesman told me it is piece of cake to replace the worm. Well, his brother the craftsman was not pleased on first attempt, because the old one didn't come off easy. His press is to short for the Rigid (one-piece adjustable) type column i have. The end of the rod is conical and holds the worm tight on the column which has a splined end. Because it was to late a had to leave it in the shop, so no pictures alas. Whats the trick. You need a heavy piece of pipe a little bigger in diameter as the column. Slide this pipe over the column and catch the end of the column in a good bench-vice. Then heat the end red hot and knock the old worm of with the pipe. So don't file the conical end of, because after installing the new worm you need to fasten it on the column again with a conical punch! A weld can brake easel when you hit a pavement.
Next Monday i will pick up the column, so i can take some pictures.
Regards, Wim."
From British Car Forum, Triumph Forum, Steering Box TR3, #199695 10/11/06

Here is a link to another discussion regarding the removal/replacement of the worm gear.

https://www.tr-register.co.uk/forums/lofiversion/index.php/t4450.html

It seems to be possible if you have a torch, a good vise and some black smithing skills. Perhaps you should practice on the worm with the nicked sides first.
 
Hmmm, heating a ball-bearing race (on the end of the worm) red hot doesn't sound like such a good idea to me. Generally heat-treat is fairly critical to ball bearings and I wouldn't want to mess it up. Seems like that worm is likely heat treated as well.

I like the TR Register version better.

But YMMV of course. Thanks for the info, Dave.
 
Aloha Randall,

I am pretty sure that your assumptions that the worm is heat treated or at least case hardened is correct. I think that perhaps the description "red hot" is an exaggeration. I think the heat needed to expand the worm and loosen it from the inner steering column would be less than that. Another concern would be the potential damage to the bearing race from the piece of pipe used as a slide hammer battering against it. I think for peace of mind some type of collar or washer should be used as a sacrificial piece to hammer against.
 
Thanks, Dave.

I'm glad I kept those worms on bad shafts now.
 
Aloha John,

A quick check with "ask Jeeves" seems to indicate the temperature for tool steel to glow red is about 1000 degrees F. I would think heating the worm to about 350 to 400 degrees F, a pale yellow to straw color would be sufficient to remove it from the inner steering column. Reinstalling it might be easier using an oven to heat the worm and some ice or dry ice to chill the shaft.

I was getting ready to try this myself, to put a good worm from a non adjustable steering column on an adjustable steering column. I have since discovered it seems easier convert to a non adjustable steering wheel. I have been taking notes and photos so I can document the conversion.
 
A friend with a TR3A had a sportscar repair shop replace the worm. They "said" that they had to send it out to a machine shop who turned it off in a lathe. They put on the new one he supplied and they charged him a fortune for the job. Shop around.
 
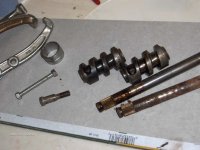
From the trf forum "Once the old worm is off thats the worse bit over" -if that's the case, then the worse bit is over. I used a regular 3 jaw puller and had an old shoulder bolt that fit inside the cam, but pressed against the shaft. On the other end I used a cut off part of a foot peg (that spins onto the axle of the front wheel of a BMX bike) because it fits around the bearing race, but against the cam. As expected, the shoulder bolt wasn't long enough, but it's tightest at the begining, and once the shoulder bottomed out a, piece of all-thread with nuts got it off the rest of the way. No heating at all.

Haven't tried getting it back on (yet), but I was able to pull two cams off without damaging anything.

The only down side to all this is that it encourages me to save all the scrap bits from everything because you never know when they might come in handy.

Thanks for all the insight, and I'll keep you-all posted.
Jerry
 

Attachments

  • 8916.jpg
    8916.jpg
    76.8 KB · Views: 133
Nice work... you make it sound almost easy. I love that you posted the results a bit after midnight... basking in the afterglow of success?
 
Back
Top