• Hi Guest!
    If you appreciate British Car Forum and our 25 years of supporting British car enthusiasts with technical and anicdotal information, collected from our thousands of great members, please support us with a low-cost subscription. You can become a supporting member for less than the dues of most car clubs.

    There are some perks with a member upgrade!
    **Upgrade Now**
    (PS: Subscribers don't see this gawd-aweful banner
Tips
Tips

TR2/3/3A TR3 Steering box rocker shaft and drop arm

mallard

Luke Skywalker
Country flag
Offline
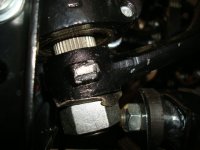
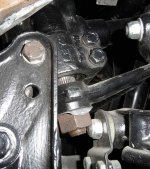
I want to make sure this is correct before I tighten everything up. I know the shaft has a tapper to it, but I don't remember that gap being this big between the drop arm and the bottom of the trunion bracket. I have pictures before I took it apart but it also has 50 years of grease on it.

The gap measures 1/4"
 

Attachments

  • 29385.jpg
    29385.jpg
    84.1 KB · Views: 248
Does that gap close up as you work the steering wheel left & right?

My concern is that it will be a source of slop in the steering as the force of the peg against the cam causes the peg to rise.

But... I am far from being knowledgeable on the steering box subject so consider this 'something to look at while waiting for an answer'.

<span style="font-style: italic">Edit -- Or possibly not... mine has some movement there but I just remembered I have one of those spring-loaded adjustment screws which may be the reason I see that.</span>
 
The gap does not change when you turn the wheel, but thanks Geo. I took it all back apart only to determine that's the way it should be. I got it back in the car and saw that it was 112 in the garage, that's enough for today.
 
Seems kind of large to me, but as long as the Pitman arm is tight on the splines it should be OK. The vertical peg position is controlled by the adjustable stop in the top cover. And I don't think you'd get the arm on even that far if it wasn't engaged with the splines or was upside down.
 
That sounded a bit large to me as well, so I looked through a few hundred of my dissassembly pictures to find that all the boxes I took apart had much more dirt caked on them than I remembered. (pic attached) Finally, I waltzed out to the garage with my camera and a ruler, bent down real far and see mine is about the same.
 

Attachments

  • 29386.jpg
    29386.jpg
    63.3 KB · Views: 189
  • 29387.jpg
    29387.jpg
    113.2 KB · Views: 191
TK thanks for the pictures, mine looks the same.
 
Back
Top