 but were afraid to ask:
 The 56 TR3 that I'm restoring was hit in the left rear were the overrider would be. After spending 3 hours with a hammer and other tools I think I'm getting close to the right shape. My question is about the profile of the curve between the spare tire cover and the edge of the fender. I made numerous templates of the good right side and they are off by about 1/4" from the left. When the factory stamped the rear trunk panel were the two sides exactly the same? The curve on the upper part of the area does not look like it has been damaged but it is not the same. I'm going to try to attach some pictures of the area but I have not had much luck with pictures yet. I can't seem to be able to attach more than one picture.
-
 Hi Guest!
If you appreciate British Car Forum and our 25 years of supporting British car enthusiasts with technical and anicdotal information, collected from our thousands of great members, please support us with a low-cost subscription. You can become a supporting member for less than the dues of most car clubs.
There are some perks with a member upgrade!**Upgrade Now**
(PS: Subscribers don't see this gawd-aweful banner

Tips
- We have a special forum called "Member Articles" where you can submit actual articles for consideration for publication. Learn More
- Don't have an Avatar? If not, your avatar will default to the 1st character in your username. Go into "Account Details" to change your Avatar.
- Some basic forum navigation info: click
 Hey - did you know if you click on the title of a thread it will take you to the first unread post since you last visited that thread?
- Hey Guest - Is your British Car Club in our Clubs database? If not, send me a PM - Basil

- Looking for a local club? Click the "Clubs" tab above and browse hundreds of clubs world-wide.
- Add Android or iPhone APP: click
- Did you know - any picture or video you add in your posts in any marque-specific forum will also get added to the Media Gallery automatically.
- A few more tips about posting and replying: click
- Hey there Guest - be sure to keep your profile page up to date with interesting info about yourself: learn more
- More tips and tricks on Posting and Replying: click
 STOP!! Never post your email address in open forums. Bots can "harvest" your email! If you must share your email use a Private Message or use the
  smilie in place of the real @
- Want to mention another member in a post & get their attention? WATCH THIS

- So, you created a "Group" here at BCF and would like to invite other members to join? Watch this!
- Hey Guest - A post a day keeps Basil from visiting you in the small hours and putting a bat up your nightdress!
- Hey Guest - do you know of an upcoming British car event?
 Pretty Please - add it to our Events forum(s) and add to the calendar! >> Here's How <<
- Hey Guest - you be stylin' Change the look and feel of the forum to fit your taste. Check it out
- If you run across an inappropriate post, for example a post that breaks our rules or looks like it might be spam, you can report the post to the moderators: Learn More
- If you would like to try some different "looks" or styles for the site, scroll to the very bottom, on the left and click the Style Selector.
You are using an out of date browser. It may not display this or other websites correctly.
You should upgrade or use an alternative browser.
You should upgrade or use an alternative browser.
TR2/3/3A TR3 Rear Body Damage
- Thread starter mallard
- Start date

Tinkerman
Darth Vader
Offline
Mallard, when you say that they are off by 1/4", how do you mean that. I'm sitting here looking at my rear panel and both sides look the same. I have attached a picture of my left rear panel and included measurements. both of mine are the same.
Hope this helps. I can take more pictures and more measurments and 3email them to you but I have to know where you are measuring. The important thing is that the rear fenders fit!
Cheers, Tinkerman
Hope this helps. I can take more pictures and more measurments and 3email them to you but I have to know where you are measuring. The important thing is that the rear fenders fit!
Cheers, Tinkerman
Attachments
TR3driver
Great Pumpkin - R.I.P
Offline
The early bodies did tend to be somewhat asymmetrical. Later ones (especially after the tooling was replaced at TS60,000) were much better, but still a long way from perfect.
We had a speaker at the club meeting once who had visited the factory 'back when'. I've forgotten his name, but I'll always remember him talking about the hammers that were everywhere. Big ones, little ones, funny shaped ones ... the workers literally beat on any piece that didn't fit until it did fit.
He also talked about watching a worker drill holes in the frame, with no template, no markings, no measurements of any kind. Not so much as a center punch to keep the drill bit from walking around, just poke a hole in the general area, then move on to the next one.
Wow, looking that good after only 3 hours ... you're a better body man than I, Gunga Din!
Generally by then, I've thrown the hammer through the window and gone inside for a cold one
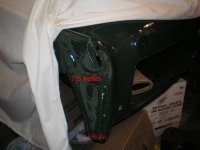
The fender will fit fine, the edge needs more work but the shape is good. The problem area is with curve behind the overrider. The picture shows the template up against the body with the gap showing. I would not be happy with this difference between the two sides. it looks like a tuff fix.
Attachments
prb51
Luke Skywalker
Offline
Keith...hope these help, if you want a specific angle just ask.
https://i216.photobucket.com/albums/cc138/prb51/DSC01244.jpg
https://i216.photobucket.com/albums/cc138/prb51/DSC01245.jpg
https://i216.photobucket.com/albums/cc138/prb51/DSC01246.jpg
https://i216.photobucket.com/albums/cc138/prb51/DSC01247.jpg
https://i216.photobucket.com/albums/cc138/prb51/DSC01248.jpg
https://i216.photobucket.com/albums/cc138/prb51/DSC01249.jpg
https://i216.photobucket.com/albums/cc138/prb51/DSC01250.jpg
https://i216.photobucket.com/albums/cc138/prb51/DSC01251.jpg
Thank you Dick and Pat for the great pictures. It seems that my car is going to need more hammering. The curve on the left side is to deep. It's stange to see what happens to metal when it takes a hit. The upper part of the curve feels so smooth but it still may have distorted. O well I hope the neighbors will put up with another day of hammering without turning me into the HOA.
crj7driver
Jedi Trainee
Offline
I think the metal in that area has stretched so you will need to shrink it. I attempt all my own body work but when it comes to shrinking metal I leave to the professionals just because once you heat the metal and quench it (one technique for shrinking as I am sure you know) the metal is more rigid and will create problems if not done correctly.
If you know of another way I would love to hear of the results/technique.
If you know of another way I would love to hear of the results/technique.
CraigLandrum
Jedi Hopeful
Offline
I'm not even close to a bodywork guy, but if I recall correctly there is a "shrinking hammer" that looks like a meat tenderizer - instead of a flat head, the head has a bunch of triangular protrusions thatstick up 1/32 to 1/16 or so. Never used one, but did bang out some sheet metal as you have done.
In the very recent past we repaired worse damage than this on a 3 by carefull drilling of the welds on the close-out panel,removing it to access the area behind the bumperette.This also lets you work that nasty little under panel and treat the metal worms that hide in this spot from the factory!!When you have this panel off put fresh nuts in the cages that hold the rear edge of the fender...its good Karma
MD(mad dog)
MD(mad dog)