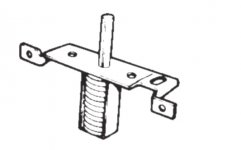
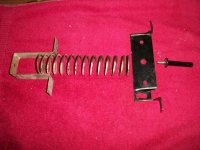
I found some TR3 hood latch assembly parts in my spare parts bin. It's missing the shaft or 3/8 rod that goes inside the spring and extends out to become the latch "pin". I found the pin part and one end is threaded....looks like it would thread into the missing shaft that goes inside the spring? I can't tell by looking at the assembly on my car. Does anyone know if the shaft is a 2 piece design where the the upper and lower pieces screw together?
-
 Hi Guest!
You can help ensure that British Car Forum (BCF) continues to provide a great place to engage in the British car hobby! If you find BCF a beneficial community, please consider supporting our efforts with a subscription.
There are some perks with a member upgrade!**Upgrade Now**
(PS: Subscribers don't see this gawd-aweful banner

Tips
- We have a special forum called "Member Articles" where you can submit actual articles for consideration for publication. Learn More
- Don't have an Avatar? If not, your avatar will default to the 1st character in your username. Go into "Account Details" to change your Avatar.
- Some basic forum navigation info: click
Hey - did you know if you click on the title of a thread it will take you to the first unread post since you last visited that thread?
- Hey Guest - Is your British Car Club in our Clubs database? If not, send me a PM - Basil

- Looking for a local club? Click the "Clubs" tab above and browse hundreds of clubs world-wide.
- Add Android or iPhone APP: click
- Did you know - any picture or video you add in your posts in any marque-specific forum will also get added to the Media Gallery automatically.
- A few more tips about posting and replying: click
- Hey there Guest - be sure to keep your profile page up to date with interesting info about yourself: learn more
- More tips and tricks on Posting and Replying: click
 STOP!! Never post your email address in open forums. Bots can "harvest" your email! If you must share your email use a Private Message or use the
  smilie in place of the real @
- Want to mention another member in a post & get their attention? WATCH THIS

- So, you created a "Group" here at BCF and would like to invite other members to join? Watch this!
- Hey Guest - A post a day keeps Basil from visiting you in the small hours and putting a bat up your nightdress!
- Hey Guest - do you know of an upcoming British car event?
 Pretty Please - add it to our Events forum(s) and add to the calendar! >> Here's How <<
- Hey Guest - you be stylin'
Change the look and feel of the forum to fit your taste. Check it out
- If you run across an inappropriate post, for example a post that breaks our rules or looks like it might be spam, you can report the post to the moderators: Learn More
- If you would like to try some different "looks" or styles for the site, scroll to the very bottom, on the left and click the Style Selector.
You are using an out of date browser. It may not display this or other websites correctly.
You should upgrade or use an alternative browser.
You should upgrade or use an alternative browser.
TR2/3/3A TR3 hood latch assembly?
- Thread starter karls59tr
- Start date
TR3driver
Great Pumpkin - R.I.P
Offline
Are you talking about the bonnet lift assembly? Big spring-loaded pin near the center that lifts the bonnet up a couple inches, so you can get your fingers in to push the safety catch? It's not a "latch", which is why I'm confused.
If so, the pin on mine is solid. It's also not the same diameter all the way. The bottom half is smaller than the top.

If so, the pin on mine is solid. It's also not the same diameter all the way. The bottom half is smaller than the top.

My mistake... I meant the bottom lift assembly. If the pin is solid then It looks like someone was attempting to fabricate a two piece affair because the part of the pin I mentioned ,that's the part above the attachment bracket ,is identical to that part of the pin on my car. Looking at the pin on my car it appears to have some kind of large washer under the bracket which I assume is welded to the rod to push the spring downward. I suppose I could fabricate the lower portion of the pin to make the lift assembly functional

2liter4cyl
Senior Member
Offline
counting down from bracket: 1. larger washer 2. spring cap (round plate stamped to contain spring) 3.smaller threaded shaft going thru springs and out hole in u-shaped spring container. Above the bracket is the larger pin, tapped to contain item 3. Holes in items #1&2 of such a size to travel up and down as an ass'y of both rods. Le T.Are you talking about the bonnet lift assembly? Big spring-loaded pin near the center that lifts the bonnet up a couple inches, so you can get your fingers in to push the safety catch? It's not a "latch", which is why I'm confused.
If so, the pin on mine is solid. It's also not the same diameter all the way. The bottom half is smaller than the top.
View attachment 47896
2liter4cyl
Senior Member
Offline
What is missing are the 2 spring caps ( one for each end).and the smaller rod (approx. 4") thru the spring. The black rod you have is fed up thru bracket and joined to smaller rod. Le T.
M_Pied_Lourd
Darth Vader
Offline
My pin is solid as well. You can see all the components on the left side of this photo.

Cheers
Tush

Cheers
Tush
2liter4cyl
Senior Member
Offline
Great pix, Tush. Mine may be one piece also, but total length can made by adding to upper black rod. I presumed the thinner lower rod was threaded into upper. The hole diameter in your lower spring container bracket will tell you what size lower rod you need. Length just enough to stay in lower bracket. Le T.
CJD
Yoda
Offline
The only thing is that the lower threaded portion in Karl's plunger is already the diameter the lower rod should be. To use that you'd have to get an even larger rod to thread onto it, and then either machine it down or open up the hole in the lower bracket. In other words, the lower rod is normally thinner than the upper plunger...so the PO's decision to thread it is a mystery!
If I were going to use that rod I'd cut off the stub and weld a proper sized lower rod onto it. Of course it wouldn't be too hard to find a replacement plunger either!?!
If I were going to use that rod I'd cut off the stub and weld a proper sized lower rod onto it. Of course it wouldn't be too hard to find a replacement plunger either!?!
Something like a coupling nut and a bolt with the head cut off might make an easy ad-hoc solution.
That seems like the way to go. Never thought of that. I'll see if I can locate the right size of coupling nut.

