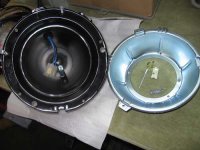
The relationship of the parts in the top photo is roughly correct with top actually being top -- lucky shot!
The two slotted brackets on the rim of the bright bowl fit over the two headlight aiming adjuster screws at 9:00 & 12:00 on the black bowl. The spring runs from the hole in the bright bracket in the black bowl to the hole in the bright bowl at about 5:00.
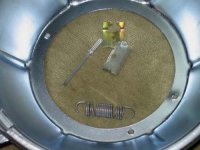
The pop rivet holds the yellow cad plated bracket to the black bowl. I believe the rivet goes through the small hole in the black bowl near the rim at 5:00. Check this one out before riveting. The bracket will be where the tab in the bottom of your chrome trim ring locates as you snap the top of the ring on at the top of the black bowl.
Sorry I can't post a picture, but I don't have the right stuff to do that at this computer...
EDIT: By the way, Art, I'm going to assume you got the car with no headlamp buckets, and use this opportunity to advise all other restorers to NEVER throw anything away -- no matter how decrepit and rusted/rotted to bits it may appear -- until the new parts are ON THE CAR and PROVEN... If nothing else, they are often an aid in just this sort of situation.

 Hey Guest!

 Hey - did you know if you click on the title of a thread it will take you to the first unread post since you last visited that thread?
 but were afraid to ask:
  STOP!! Never post your email address in open forums. Bots can "harvest" your email! If you must share your email use a Private Message or use the
  smilie in place of the real @
 Pretty Please - add it to our Events forum(s) and add to the calendar! >>