• Hi Guest!
    You can help ensure that British Car Forum (BCF) continues to provide a great place to engage in the British car hobby! If you find BCF a beneficial community, please consider supporting our efforts with a subscription.

    There are some perks with a member upgrade!
    **Upgrade Now**
    (PS: Subscribers don't see this gawd-aweful banner
Tips
Tips

TR2/3/3A TR3 door fitting tips?

CraigLandrum

Jedi Hopeful
Offline
Getting ready to bolt the door back on the TR3 and would welcome any door fitting tips. The initial test fitting looks like I will be OK with all the gaps, but I'm mainly worried about getting the latch correct. I've replaced all of the latch hardware with new Moss parts, and it appears that there will be some fiddling needed.

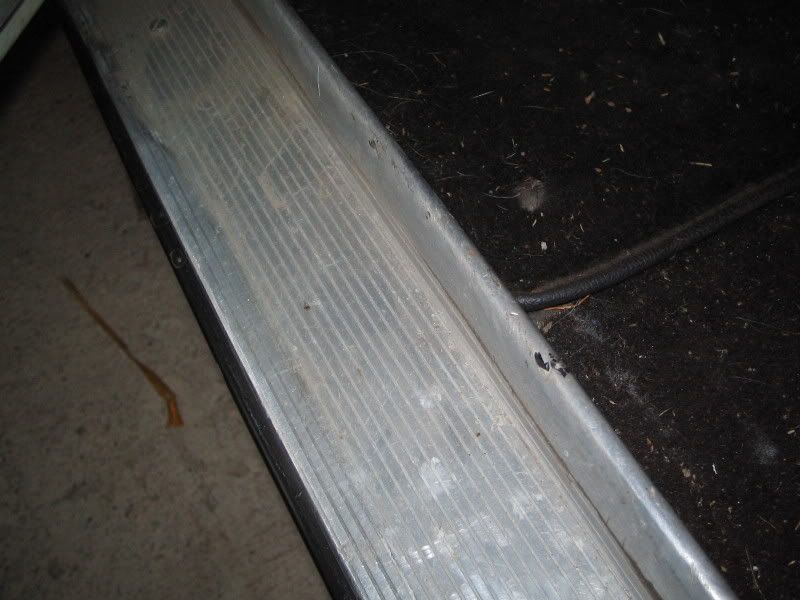
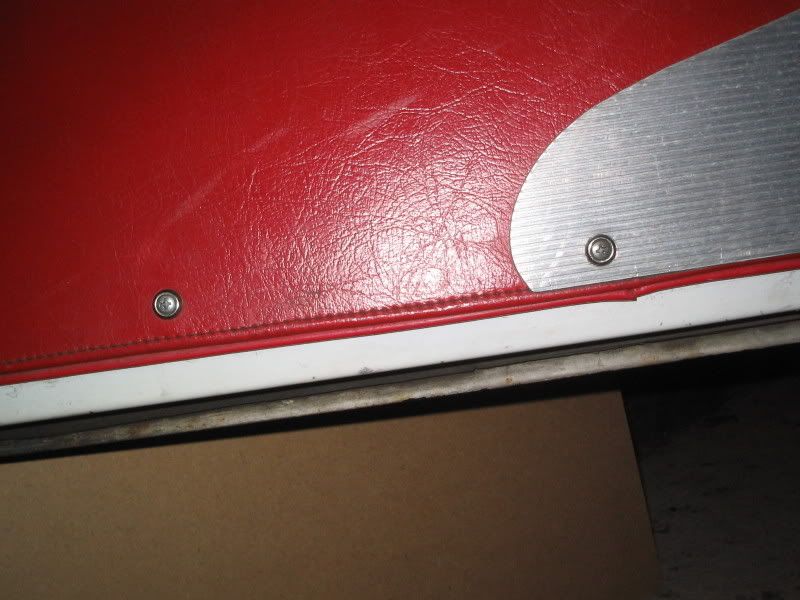
Also, I mounted the Moss interior stainless sills - the ones that just curve over the interior lip and down the inside to the floor, and the bottom of my door panel seems to be hitting the curved over section of that sill. This might be fixed by squeezing that curved over portion closed against the thin lip to give the door more room to close, but I hesitate to do that until I know if that is standard practice. Could be that the vinyl-covered panel that I had to make from scratch for the inside of the door is simply too long and should end above the lip of the sill instead of coming to rest against it, but the old screw holes in the door suggest I have things pretty close.

If you have installed new door hardware/panels and have gone through this, and especially if you have those stainless sills, would appreciate any advice you have to offer. A picture or two of the inside bottom of the door both opened and closed would be useful just to get some perspective on things.
 
Craig,
Not sure if this will be a great deal of help as my door cards have been replaced some time in the past and are obviously not the original ones. My car is fitted with aluminium sill plates, but again, I am not sure of their origin. Anyway here are some pictures. The door card is about 1/2 inch above the bottom of the door frame and I have a gap about 1/4 inch horizontally between the sill cover and the door frame.
IMG_0011-1.jpg

IMG_0016.jpg

IMG_0020-1.jpg
 
I think that Philips head screws are incorrect fasteners if that matters. The originals were all slotted #4 screws. ISTR that there were no Philips on the TR3s anywhere. I'm sure that someone will correct me if I'm wrong ... Don?
 
Peter --
You are correct -- slot heads are "correct."
Nick and I are pragmatists, however. Philips heads are WAY easier to use. And I don't think either of us is planning to take our cars near people who would notice/care about our panel affixing screws.

Craig --
Sorry, no tips. Mine just kind of went together. A little push here, loosen this, tighten that -- and it was done...
 
Craig: this applies to many of the fitting issues on these cars, and I have learned from Brian S, the guy who has been working on my 3A, that it is important to simulate the weight of the driver , passengers and even fuel when fitting panels and other parts. it may make a difference when you are trying to get uniform gaps - just a thought. we used sand bags (lots of them).
 
PeterK said:
I think that Philips head screws are incorrect fasteners if that matters. The originals were all slotted #4 screws. ISTR that there were no Philips on the TR3s anywhere. I'm sure that someone will correct me if I'm wrong ... Don?

All of my car's intimate little details are slowly being exposed on this forum! Although much of my car is very original the interior was completely redone by the previous owner. Sometimes I think it would be nice to replace it with the correct trim and leather seat covers, but then I think that with an 8-year old daughter and 10-year son climbing in and out, two cats that enjoy sleeping in the car, a chocolate labrador that enjoys the odd trip in it and competing in historic rallies it is a lot more relaxing to have a scruffy vinyl interior. I never noticed that even the screws are wrong!

What about that little Philips screw that holds the condenser on (or has that been replaced at some time?)
 
Peter and Moses - You are both right. All are #4 screws with a straight slot.

Because my 1958 TR3A was totally separate (see photo in topic on dum-dum) and because the repro outer sills were too short, the opening for my doors came out a bit too close. The gap is good, but the latches interferred. The latch plates that are secured to the "B" posts interferred when I tried to close the doors. So I used my power file and removed about 1/16" from the back of the latch plates where they usually have parallel grooves. Also, I shortened the rectangular latch bolt that protrudes from the door, keeping the same angle. Then I sent them for chroming. I have had no issues since then.
 
Nick that little philips head screw you mentioned for the condensor hold down is actually a BA metal thread, whereas all the sheet metal (self tapping) screws in a TR3A were slotted head.

I know, they'll say who gives a toss, but seeing you asked......

Cheers,

Viv.
 
This is not intended to correct anyone, but I'm wondering if the phillips screws that hold the grill on my TR3A are original or replacements???
 
mapleaf said:
I'm wondering if the phillips screws that hold the grill on my TR3A are original or replacements???
I believe the originals on a 3A were phillips or "cross recess" as the factory hardware catalogue calls them.
 
FWIW, I replaced the long lower seal on the bottom of the door with a new one from MOSS. It must be thicker, as now I have to slam the passenger door to get it closed, which always bothers me when I do it. I decided not to replace the driver's side seal, and the door closes easily with a little, delicate "snick". I was hoping after 3 years the new seal would compress some, but it hasn't. Ordered new seals from TRF, but never put them in.....
 
I had the same problem, many years ago with my 3A. The seals also made the doors stick out at the bottom when they were closed. I think the problem was not the dimensions, but the firmness of the rubber. The foam in the center of the originals was noticeably softer rubber than the hard 'skin', while the Moss seals appeared to have the foam formed with the same rubber that formed the skin.

With luck, I'll be putting new seals from TRF onto the TR3 in the next few weeks. We'll see how that goes.
 
TR3driver said:
With luck, I'll be putting new seals from TRF onto the TR3 in the next few weeks. We'll see how that goes.

Randall, post back on how the TRF seals fit. I tried to use the Moss seals, but had trouble even closing the door. Right now, I have nothing on the bottom of the doors.
 
I couldn't close the doors with new rubber seals along the bottoms, both on my 1958 TR3A in 1990 as well as on the late TR3A I finished in 2006. So I took them off. The doors close fine. On bumpy roads they would rattle and one TRA judge told me the doors shouldn't be "loose" like that. I asked how he knew. He replied that he had rattled the door and that's how he found out. I told him "JUDGES ARE NOT PERMITTED TO TOUCH A CAR THEY ARE JUDGING". I still lost a point for rattling doors, but he missed the lack of the rubber seal along the bottom. You win some - you lose some.

So I put some of those clear vinyl disks about 3/8" diameter on the inside of the bottom door flange where the rubber seal normally goes and the doors no longer rattle.

And who needs a seal along the door to keep the rain and snow from coming in, when I try not to drive too often in the rain and never in the snow.
 
OK, now I'm officially worried since I just went through the pain of restoring the doors and installing all new Moss rubber door seals with all those pain-in-the-neck clips....I'll try bolting on a door this weekend and see what's what.
 
I used TRF door-bottom seals recently. They seemed to work for me. Don't need to kick the door shut. And, they don't rattle -- even though I never intend to get close enough to a "judge of door rattles."
 
CraigLandrum said:
OK, now I'm officially worried since I just went through the pain of restoring the doors and installing all new Moss rubber door seals with all those pain-in-the-neck clips....I'll try bolting on a door this weekend and see what's what.

Once you get the seal on with all the clips, it's very easy to pop the clips out with the seal still attached to the clips, and very easy to pop back on. I would take the seals off, fit the doors, and then you can pop the seals back in with the door still in place. I had mine on and off several times before I decided to just leave them off!
 
Back
Top