• Hi Guest!
    You can help ensure that British Car Forum (BCF) continues to provide a great place to engage in the British car hobby! If you find BCF a beneficial community, please consider supporting our efforts with a subscription.

    There are some perks with a member upgrade!
    **Upgrade Now**
    (PS: Subscribers don't see this gawd-aweful banner
Tips
Tips

TR2/3/3A top frame bracket

dbenichou289

Member
Offline
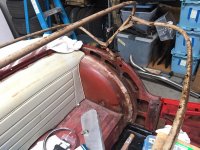
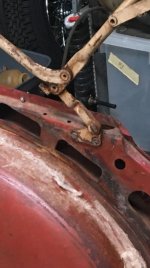
Could someone verify I have this top frame mounted in the correct orientation? I am piecing this back together but have no reference as I did not take it apart.

On an associated side note: Is there book or assembly guide available that shows assembly order or process of how the top is installed to the frame? Or maybe a member has documented how they did theirs? Thanks
 

Attachments

  • IMG_7605.jpg
    IMG_7605.jpg
    85.7 KB · Views: 150
  • IMG_7606.jpg
    IMG_7606.jpg
    46.6 KB · Views: 125
John, that is perfect! Thank you. I will also be needing to go through the entire thread as I am also working on the full interior - I see lots of great reference material.
 
On the hood/top fasteners do one at a time working from the center line out. I used masking tape to mark where my fasteners were going.

David
 
Thanks for the tip. On a side note concerning the hood/top, having not seen one in person yet installed on a car, is the hood/top not actually attached to the frame bracket?

Meaning, the process to install the top is to pull up the frame bracket into position, then lay the top over it and snap all the studs around the back and windshield?
 
Essentially, that's it. The arms are left in the "broke" position, to give some relief as you install, otherwise it would be too tight to hook the dots into place. So, top frame up but in the "lowered" position. Then install the top tenax and dots. And finally snap up the frame legs into the upper position. Locking the legs can be a bear, and it helps if you have 2 people doing it at once, otherwise you have to inch it up one side at a time until both sides lock.
 
One tip I found was to leave the bottom bow loose with no little screws or little metal piece through the cloth. Then after you popped the arms up--- slid the back bow into place by pulling it down into the spot on the top for it; it will stay. When you take the top off, pull that last bow up and it will give wiggle room to move the other bows down easily. One man job that way and very tight.
 
One tip I found was to leave the bottom bow loose with no little screws or little metal piece through the cloth. Then after you popped the arms up--- slid the back bow into place by pulling it down into the spot on the top for it; it will stay. When you take the top off, pull that last bow up and it will give wiggle room to move the other bows down easily. One man job that way and very tight.<br><br type="_moz">
 
Back
Top