Hey Guest!

 Hey - did you know if you click on the title of a thread it will take you to the first unread post since you last visited that thread?
 but were afraid to ask:
  STOP!! Never post your email address in open forums. Bots can "harvest" your email! If you must share your email use a Private Message or use the
  smilie in place of the real @
 Pretty Please - add it to our Events forum(s) and add to the calendar! >>
DornTRoriginal
Jedi Hopeful
Offline
This is a procedure that I have never completed so any advise is appreciated!
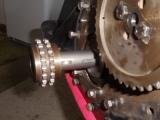
I am trying to figure out the best way to properly install the timing chain on the camshaft sprocket and crankshaft sprocket. There is a mark on the camshaft sprocket but can not find one on the crank shaft sprocket. It seems that I can install the camshaft sprocket two ways (180 degree) so that the mark is on either side of the camshaft. How do I go about determining which side is the correct alingnment or does it matter? I watched the videos from Moss Tech that are very informative but I will need to study it in greater detail to completly understand it. I have read the shop manual and I am feeling a bit anxious about this, Yikes! I think this has to be correct or more trouble later to deal with and I would like to avid that if I can.
Do I need to get a degree wheel or is there another way? Do I "open" the chain and install it or slip it onto the camshaft sprocket and bolt it on? I should have marked it when I took it off but I am not certain it was ever installed correctly in the first place... Help is appreciated, Thanks!
.JPG")
I am trying to figure out the best way to properly install the timing chain on the camshaft sprocket and crankshaft sprocket. There is a mark on the camshaft sprocket but can not find one on the crank shaft sprocket. It seems that I can install the camshaft sprocket two ways (180 degree) so that the mark is on either side of the camshaft. How do I go about determining which side is the correct alingnment or does it matter? I watched the videos from Moss Tech that are very informative but I will need to study it in greater detail to completly understand it. I have read the shop manual and I am feeling a bit anxious about this, Yikes! I think this has to be correct or more trouble later to deal with and I would like to avid that if I can.
Do I need to get a degree wheel or is there another way? Do I "open" the chain and install it or slip it onto the camshaft sprocket and bolt it on? I should have marked it when I took it off but I am not certain it was ever installed correctly in the first place... Help is appreciated, Thanks!