Hi Guest!

 Hey - did you know if you click on the title of a thread it will take you to the first unread post since you last visited that thread?
 but were afraid to ask:
  STOP!! Never post your email address in open forums. Bots can "harvest" your email! If you must share your email use a Private Message or use the
  smilie in place of the real @
 Pretty Please - add it to our Events forum(s) and add to the calendar! >>
RAC68
Darth Vader
Offline
Hi All,
In my attempt to have my '64 BJ8 Phase 1 better noticed by other drivers, day or night, I recently rebuilt my original Flasher Relay with (2) 8-terminal relays fitted within the original box, replaced my original Lucas flasher with an electronic unit, and installed high output 1157 socket-compatible LEDs in in tail and front lights to satisfy running/brake/signaling functions. Retaining the quite small lighting of all but the Phase 2 BJ8s, and wanting to improve signaling visibility, I had previously installed 1156 socket-compatible LEDs within my reflectors and, in this configuration, further enforces directional or brake signaling (which ever is appropriate for the side.
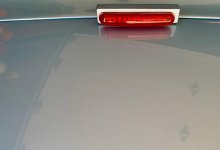
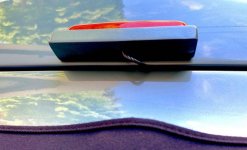
Although the high output LEDs did brighten my rear day or night illumination, over the years drivers have come to expect seeing much brighter and higher lighting. Recently we had a discussion on 3rd Brake Lights and it became clear to me that this was something I needed to address. Although a few high-positioned 3rd Brake Lights were presented that I really liked, my solution would need to be positioned with my luggage rack (purchased the day after I picked up my new Healey from the dealer) in place. The following presents what I came up with, keeping in mind that this 3rd Brake light is meant to compliment all other rear running/signaling. The following presents what will be presented by each set of lights:
`. Original rear light: Running and Directional or Brake Signaling.
2. Reflector lights: Directional or Brake Signaling.
3. 3rd Brake light: Running and Brake Signaling.
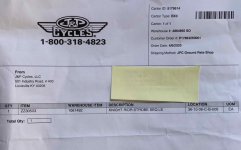
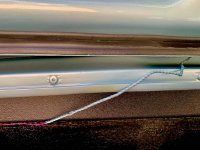
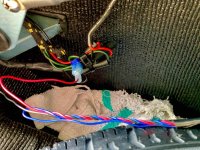
Installation of the 3rd Brake Light was made on the lower side of the luggage rack rear cross member to assure clear high visibility. Wiring was hidden by passing it through the tube and through the racks foot mount into the boot. The running light is powered from the fuse-protected license plate lamp with Brake light power from a separate brake peddle switch that operates in parallel with the original pressure switch. Last, the 3rd brake light can be easily unplugged and removed with the extraction of (2) screws and a plug inserted on the underside of the rack bar to eliminate the wiring hole. Cost of the light was $12 and a small mounting housing created.
.jpg")


Just my thoughts,
Ray(64BJ8P1)
In my attempt to have my '64 BJ8 Phase 1 better noticed by other drivers, day or night, I recently rebuilt my original Flasher Relay with (2) 8-terminal relays fitted within the original box, replaced my original Lucas flasher with an electronic unit, and installed high output 1157 socket-compatible LEDs in in tail and front lights to satisfy running/brake/signaling functions. Retaining the quite small lighting of all but the Phase 2 BJ8s, and wanting to improve signaling visibility, I had previously installed 1156 socket-compatible LEDs within my reflectors and, in this configuration, further enforces directional or brake signaling (which ever is appropriate for the side.
Although the high output LEDs did brighten my rear day or night illumination, over the years drivers have come to expect seeing much brighter and higher lighting. Recently we had a discussion on 3rd Brake Lights and it became clear to me that this was something I needed to address. Although a few high-positioned 3rd Brake Lights were presented that I really liked, my solution would need to be positioned with my luggage rack (purchased the day after I picked up my new Healey from the dealer) in place. The following presents what I came up with, keeping in mind that this 3rd Brake light is meant to compliment all other rear running/signaling. The following presents what will be presented by each set of lights:
`. Original rear light: Running and Directional or Brake Signaling.
2. Reflector lights: Directional or Brake Signaling.
3. 3rd Brake light: Running and Brake Signaling.
Installation of the 3rd Brake Light was made on the lower side of the luggage rack rear cross member to assure clear high visibility. Wiring was hidden by passing it through the tube and through the racks foot mount into the boot. The running light is powered from the fuse-protected license plate lamp with Brake light power from a separate brake peddle switch that operates in parallel with the original pressure switch. Last, the 3rd brake light can be easily unplugged and removed with the extraction of (2) screws and a plug inserted on the underside of the rack bar to eliminate the wiring hole. Cost of the light was $12 and a small mounting housing created.
Just my thoughts,
Ray(64BJ8P1)