• Hi Guest!
    If you appreciate British Car Forum and our 25 years of supporting British car enthusiasts with technical and anicdotal information, collected from our thousands of great members, please support us with a low-cost subscription. You can become a supporting member for less than the dues of most car clubs.

    There are some perks with a member upgrade!
    **Upgrade Now**
    (PS: Subscribers don't see this gawd-aweful banner
Tips
Tips

TR2/3/3A The light came on: my TR3 rear apron.

TexasKnucklehead

Jedi Knight
Country flag
Offline
Sometimes it takes a lot of clues, and when you least expect it, the light comes on.

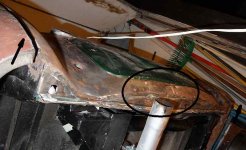
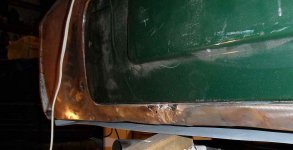
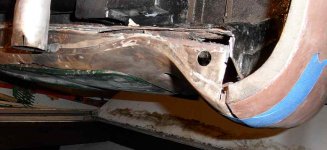
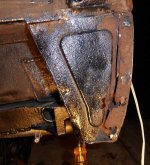
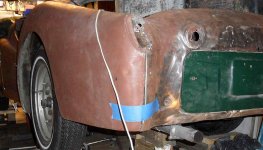
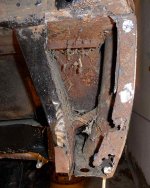
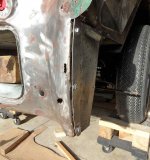
If you’ve followed my posts, you may remember my mentioning some of these issues. As I was removing paint from the rear apron, I noticed a lot of bondo along the bottom edge, but I wrote it off as an effort to make the spare tire cover fit better. Then I saw where the lower edge had been pounded and drilled and repaired as if it were hit just above the tailpipe. My driver side door opening was too narrow for a replacement door, and the original door had been ground to fit. I had to find two rear replacement fenders (for the same side) before I was satisfied with the fit –and still had an issue at the bottom rear where it should meet the rear apron. There is a 1” hole in the front bottom of the rear fender well (behind the seats) (that should have a rubber plug) in case the rear shock ever has to be removed; the bolt can come through (perhaps only on pre TS60000 cars?). The hole on my driver side is almost an inch forward from where it should be. Today, after securing my inner rocker panel patches and fender patch, for the fun of it, I tried the 1st rear fender I found. Now that most of the bolts can be installed, it looks great along the front edge where it meets the dog leg (and my new bolt hole lines up). The trunk line matches well. The tail light fits snug the whole way around. But the rear bottom sticks out about an inch farther back than the rear apron (just like both other fenders). That’s when it hit me. The lower rear apron was hit hard enough to bend it forward about an inch. Both rear fenders stick out an inch at the bottom but fit fine all the way until just below the taillights. If I try to bend the fender to fit, the fender will buckle outward.

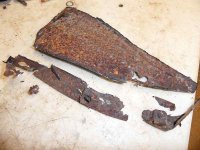
I happen to have a ‘bottom closing piece’ and when I put it against the car, I can see how the apron is significantly bent towards the same area as has been patched. It was ‘fixed’ last time by building up the apron with filler. I’m entertaining ideas on how to get this bent back to where it should be –hopefully without messing up what I’ve already done.
 

Attachments

  • 27728.jpg
    27728.jpg
    88.3 KB · Views: 554
As with all bodywork...a big a&$ crow bar. If you have access to a friend with a hydraulic body jack, that is easier, though.

Good luck!

John
 
I think that should have a plate welded to the damage area so it can be pulled out slowly and the stress around the area worked out while the pull is made. If the fender is not lining up the whole rear body is probably rolled in. I had a similar type dent in the area just below the tail light. I managed to get it out, but in hind sight wish I had taken it to a body shop,with the equipment to be pulled, as the metal ripped when I tried to push it out. drilling holes is the old fashion way. The panel can be saved, but paying a shop a few hours of labor to pull it would make a much better quality repair with less body filler needed.
 
There is a lot of structure there and it will take a lot of force to push or pull it back. A body jack can be had for relatively little money from HF and the like. I've used bottle jacks, scissor jacks, a pile of blocks and anything else I had on hand with varying degrees of success. The problem is finding some place to jack from that is stronger than the dent. Same with pulling. The body and chassis need to be firmly secured so that your pulling effects only the dent. A shop with a frame rack will have little difficulty getting it straight but it might be worthwhile to try on your own.
Tom
 
The key to prevent ripping is to never push at a point. Use substantially thick wood boards/plywood to spread the force over the largest area possible. Also, never push at the center of a panel...always have a board to spread the force to the welded edges. Bring plenty of beer and sit back and study the best way to work each push. I find it a fun challenge deciding the best way to approach each push.

I am a little concerned about your description of the entire left side of the car beeing pushed forward. If the door is short to compensate and the shock mount access hole is also forward...that means you really need to use strings to measure diagonals all over the car. With some time with the strings, you can get a feel for where the damage starts and where it ends. You can tell body twist by standing well back on on the centerline of the car and sighting at a good angle with one eye to get a feel for differences left to right. If you can visually see the twist, then you will need to find a level floor to measure the corners of the body for twist. You can actually fix minor twist with a couple big guys bouncing on the high corners with properly placed jack stands under the low corners. Major twist takes a frame machine.

The photo of your rear wing suggests a minor adjustment to the rear valance and cosing panel. If the whole side of the car is off...then you'll need a body shop with a frame machine to fix it. They strap the body down with chains and pull/push with jacks to bring the diagonals into alignment. It's not really that expensive...but you will need the car rolling to get it to the machine.

I wouldn't get too concerned about minor misalignments. These were hand built, so even a straight one has its share of misalignments. The key is, if there is a reference to visually see the difference in alignment, then it will be noticable. A lot of misalignments have no references to compare, so they will never be obvious.

Keep us posted!

John
 
Thanks all.
Maybe I'm making a mountain out of a mole hill. There is a lot of structure back there to bend, and not much to pry against. I do wonder about the tub being twisted or 'accordioned' but it would also explain why I had so much trouble getting the bolts back in when it went back on the frame. Having it bolted to the frame allows me to use the frame, but then I have little control of where the re-bending might occur.

Rust doesn't help, and the inside rear of the lower apron isn't very strong -this area can't be seen so I wouldn't care -if I didn't want to pry against it. Maybe I'll just weld some patches to the lower rear apron... First I need to check how the rear bumpers fit.
 

Attachments

  • 27737.jpg
    27737.jpg
    58.5 KB · Views: 446
Sometimes a little pondering can do the body good.

I kept thinking about all the 'structure' back there and how much it would take to bend it all back when it occurred to me; why? Aside from the banged up area above the tail pipe, all I want to do is get the fenders to align without using a ton of bondo.

So today I cut a slit along the rear of the lower close-out panel, being sure to leave that round drainage hole alone. Then I cut a slit along the rear apron and the box area where there should be 3 captive nuts (the PO had welded bolts to the surface that I also removed). Then I put the fender back on, stuffed an old fashioned tire tool inside that drainage hole, with the pointed end against the tail light housing, and gently pulled the lower apron to match the fender.

I still have to patch my cuts, and install some nuts, but thats nothing compared to reforming the rear apron. As you can see, it's close enough now that a piece of tape will hold it in place.
 

Attachments

  • 27774.jpg
    27774.jpg
    67.4 KB · Views: 375
  • 27775.jpg
    27775.jpg
    166.8 KB · Views: 150
  • 27776.jpg
    27776.jpg
    75.1 KB · Views: 370
So I just had to see inside that boxed in area. Plus, the broken bolts were still inside the captive nuts and I still need to drill the holes to be able to mount the rear of the fender -so I went ahead and opened up pandoras box and looked inside. It was better than I expected, and removing the captive nuts was simply a matter of trimming off a few welds at the edge of the box and the apron so the whole (-er whats left of it) inner/closing panel with the nuts could come off. (The apron edge had bolts welded to it, and I still need to locate where the holes should be a little closer.)

Obviously, I need to weld captive nut retainers to the inside of the closing panel before welding it in. I was wondering if it might be better to use these 'weld nuts' instead of the original retainers. I'm thinking the weld nuts have a little more length so are less likely to rust shut (if I use a shorter bolt), but the retainers allow for a little more 'slop' between the holes in the fender and the nuts. I plan to use all stainless bolts, but still think the weldable nuts will work better. Suggestions/comments welcome.
 

Attachments

  • 27791.jpg
    27791.jpg
    109.5 KB · Views: 283
  • 27792.jpg
    27792.jpg
    69 KB · Views: 285
  • 27793.jpg
    27793.jpg
    64.4 KB · Views: 277
I would go with the floating nuts; you'll likely need that extra adjustment.

I would also skip the SS bolts (SS itself causes problems in bolted connections, especially when joined with carbon steel); and instead use a nice coating of good copper-based anti-seize.
 
Well you know my vote - weld nuts! I think there would be enough play in the fender holes themselves, at least that's my plan..

ps add on - If you do use cage nuts, I recommend a beefier style that you can get from Macy's Garage or other places:
NewNuts.JPG


The original design cages are a real weak point in my opinion and this fully enclosed design is less likely to have the nut spin out later.
 
Well, I generally take advice from Randy and Randall as gospel, but I've considered this a bunch. The rear fender has slots for those three bolts. The bolts can be started, and turned most of the way in, before offering up the fender, starting at those bolts. Actually, I made a 2" wide plate of steel with the same shape as the rear fender and with matching holes. It's hard to see, but the bolts go thru it in the picture below. It makes installing the rear fender much easier. Anyway the point is, 'wiggle room' isn't needed here. Using beefier weld nuts would also illimate any 'wiggle room', but I think the ones I have will be plenty strong enough.

My original intention for the 2" plate was to be able to reform the fender and apron to match. But now I'm thinking I may leave it in there like a big, long washer. Will that be an invitation to rust?
 

Attachments

  • 27931.jpg
    27931.jpg
    114.3 KB · Views: 224
Back
Top