• Hi Guest!
    If you appreciate British Car Forum and our 25 years of supporting British car enthusiasts with technical and anicdotal information, collected from our thousands of great members, please support us with a low-cost subscription. You can become a supporting member for less than the dues of most car clubs.

    There are some perks with a member upgrade!
    **Upgrade Now**
    (PS: Subscribers don't see this gawd-aweful banner
Tips
Tips

Steering Box Peg Replacement

barnman

Senior Member
Country flag
Offline
Good afternoon Gents,
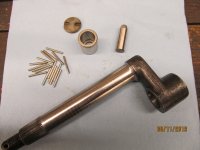
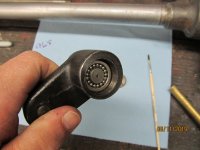
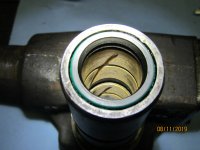
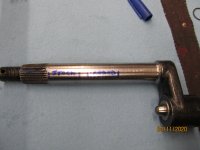
Does anyone have any experience of replacing the peg in a BJ8 steering box. The worm has been changed for an upgraded precision machined one. There is still too much play during driving. I have obviously tried to adjust with the screw on the cover after loosening the locknut but only slight improvement. Everything else has been changed except the peg....schoolboy error.
Any advice welcome re the peg change.
TIA
Alan
 
The peg is easily replaced - if you just want to replace the peg, it slides out the bottom after the pitman shaft is removed, if you want to replace the needle bearings and outer race you unscrew the top plate (last I looked, the outer races were n/a & had to search eBay for a while to find one). See pictures 1 and 2.

If you are still experiencing too much free play you may need to replace the bronze bushing that supports the pitman shaft. 30 years ago, I had local machine shop modify my box housing by extending the bore size for the busing up far enough to install a second bushing to spread the load and keep the shaft located better - it has worked out very well and kept the box nice and tight (when I restored the car a couple of years ago, the bushes were still good and did not need replacing). See picture 3 and 4 (marked in blue where the two bushes ride on the shaft).

BTW, IMO you will be better off with your stock worm - stock they were ground to produce a slightly tighter spot at the straight ahead position - this allows you to tighten the peg adjustment to the point where there is a very faint tightness when straight but no bind anywhere else. With the modern "straight" worms you are limited to any tight spot wherever it is and that may mean that straight ahead is looser than you like.....There was a reason they went to the trouble of making the slight taper in the worm.
 

Attachments

  • IMG_2340.JPG
    IMG_2340.JPG
    2.2 MB · Views: 11
  • IMG_2341.JPG
    IMG_2341.JPG
    2.1 MB · Views: 12
  • IMG_2352.JPG
    IMG_2352.JPG
    1.9 MB · Views: 11
  • IMG_3302.JPG
    IMG_3302.JPG
    1.2 MB · Views: 12
The peg is easily replaced - if you just want to replace the peg, it slides out the bottom after the pitman shaft is removed, if you want to replace the needle bearings and outer race you unscrew the top plate (last I looked, the outer races were n/a & had to search eBay for a while to find one). See pictures 1 and 2.

If you are still experiencing too much free play you may need to replace the bronze bushing that supports the pitman shaft. 30 years ago, I had local machine shop modify my box housing by extending the bore size for the busing up far enough to install a second bushing to spread the load and keep the shaft located better - it has worked out very well and kept the box nice and tight (when I restored the car a couple of years ago, the bushes were still good and did not need replacing). See picture 3 and 4 (marked in blue where the two bushes ride on the shaft).

BTW, IMO you will be better off with your stock worm - stock they were ground to produce a slightly tighter spot at the straight ahead position - this allows you to tighten the peg adjustment to the point where there is a very faint tightness when straight but no bind anywhere else. With the modern "straight" worms you are limited to any tight spot wherever it is and that may mean that straight ahead is looser than you like.....There was a reason they went to the trouble of making the slight taper in the worm.
Thanks so much for this reply, brilliant help!
 
Back
Top