• Hi Guest!
    If you appreciate British Car Forum and our 25 years of supporting British car enthusiasts with technical and anicdotal information, collected from our thousands of great members, please support us with a low-cost subscription. You can become a supporting member for less than the dues of most car clubs.

    There are some perks with a member upgrade!
    **Upgrade Now**
    (PS: Subscribers don't see this gawd-aweful banner
Tips
Tips

TR2/3/3A Stamping Numbers on a Commision Plate

Got_All_4

Luke Skywalker
Country flag
Offline
Just got new commission plates for my TR3 and TR6. Curious what process some of you used to make them look OEM. I'm concerned about too hard or too soft of a base while striking the punch which may distort the numbers. Possibly making the numbers look concaved if the base it too soft. Any help is appreciated.
 
I lay the plates on a maple workbench and use a small hammer. Practice on a scrap piece of metal of similar thickness to get a feel for it.
 
I used a hard surface (counter top) below and marked a 2x4 with lines to help me keep the punch vertical and get the spacing I wanted. Although some originals are not evenly spaced/aligned one usually sees the leading characters (TR nnn...) in a line as they were perhaps gang punched and the rest done as needed.

commission-stamp_zps4f053252.jpg
 
Cool Geo...that's a perfect solution to getting them aligned without a mandrel!
 
I was thinking about ganging them together too. However with a hammer I'm sure there won't be a even hit across the bunch and surely don't want to hit it several times. What about a press? I like your 2x4 spacer and was thinking of practicing on a piece of aluminum flashing first.
 
I used aluminum step flashing, comes in ~3x5" pieces for practice before tackling the new plate. I tried various bases, hard rock maple was good but so was my cast iron table saw top so experiment with that as well as softer/harder/lighter/heavier hammers. I used a rawhide leather-working hammer for best results. Not all the punches are the same size to practice helps get the spacing as you want as well.
 
I used a clamp and straight-edge, but didn't want it to look "too" perfect. The original characters are very un-uniform.
 
The things we can learn unexpectedly ! As I was reading about these men that did this work at the factory my thoughts were just like what is written in the quote box. You should read this. I will certainly look at commission plates differently.
 
I tried to duplicate my commission plate, but was never happy with the results. After examining the original I decided to try a restoration. Actually, it was a relatively easy task. A little black lacquer, 400 grit paper, and a clear coat to seal were all it took. Before and after pictures show the results.


DSC00621.jpgDSC01616.jpg
 

Attachments

  • AFTER2.jpg
    AFTER2.jpg
    22.5 KB · Views: 154
  • BEFORE.jpg
    BEFORE.jpg
    43.1 KB · Views: 164
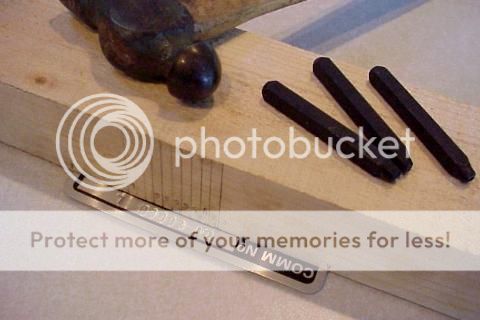
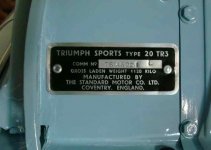
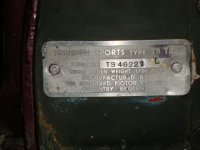
I was looking for someone to do the plate for my Midget and got this response from Clarke Spares. Part of the reason I was trying to find someone is that my original Midget plates were reverse stamped (from the back side). I ended up not having them do it partly because I was a little put off by the request for the registration info. They don't trust me but I don't know them either. And that I can purchase the needed stamps for little more than paying to have it done.

********

Tom,

Thanks for the inquiry.

I don't produce the VIN plates but I do offer the stamping service.
Service - Raised Figures - $25.00. Customer supplies the new
"blank" plate and original and/or copy of title/registration showing
the number, etc. Payment by check made out to "Clarke Spares".
All info. and new plate should be sent to P.O. Box 1501 Doylestown, Pa. 18901. No e-mail files please.

I believe the plate is the same type as used on the MGB and
they are available from companies like Moss Motors, Vic. British, etc.

Let me know how you want to proceed.

Regards,

Todd Clarke
 
Back
Top