Hey Guest!

 Hey - did you know if you click on the title of a thread it will take you to the first unread post since you last visited that thread?
 but were afraid to ask:
  STOP!! Never post your email address in open forums. Bots can "harvest" your email! If you must share your email use a Private Message or use the
  smilie in place of the real @
 Pretty Please - add it to our Events forum(s) and add to the calendar! >>
GTP1960
Jedi Knight
Offline
all five locks on my car needed a different key:
doors: different one each
(universal question: why bother having locking doors on a TR3?)
trunk
glovebox
ignition
When I was tightening down a wobbly door handle, I broke a stud.
That got the ball rolling. started looking closely at all the hardware and didn't like the pitting & rather dull chrome.
Moss offers a set that are all keyed the same. ($175.00). That was the catalyst.
the set consist of two door handles, trunk latch, glovebox latch & ignition switch barrel.
All good quality, fit easily and chromed very nicely. Also the key actually worked.
(which I was thankful for as I neglected to try each lock before hand.)
However, The downside is the set does not come with instructions or the nuts and bolts connections & internal door spring clips required to do the job. The instructions are a rather minor inconvenience, but I like instructions on anything I haven't done before. The fact it doesn't come with the rest of the hardware is a total PITA. If I am going to replace a decades old part, I do not want to finish it with a decades old connector. So a trip to the local ACE hardware was in order where I got everything I needed in stainless steel.
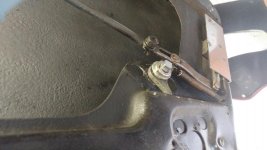
The spring clip that retains the internal door latch mechanism was another issue.
one old one was missing and the other was in poor condition.
A couple of good solutions were offered by John (CJD):
drill thru the shaft & use a cotter pin.
View attachment 44833
and Randall (TR3driver): use a split lock washer of the correct size.

I used the lockwasher as I happened to have just the thing in SS.
(that doesn't happen very often).
to finish it up, I put a rubberized bolt cover over the end of the shaft to minimize wear on the inner door panel.

The good thing about a little job like this is it opens the opportunity to inspect/correct other issues. So once I took the door panels off I wirebrushed, cleaned and repainted the inner doors.
(Johns pic of his cotter pin solution was a motivator here, as his inner door looked brand new)


doors: different one each
(universal question: why bother having locking doors on a TR3?)
trunk
glovebox
ignition
When I was tightening down a wobbly door handle, I broke a stud.
That got the ball rolling. started looking closely at all the hardware and didn't like the pitting & rather dull chrome.
Moss offers a set that are all keyed the same. ($175.00). That was the catalyst.
the set consist of two door handles, trunk latch, glovebox latch & ignition switch barrel.
All good quality, fit easily and chromed very nicely. Also the key actually worked.
(which I was thankful for as I neglected to try each lock before hand.)
However, The downside is the set does not come with instructions or the nuts and bolts connections & internal door spring clips required to do the job. The instructions are a rather minor inconvenience, but I like instructions on anything I haven't done before. The fact it doesn't come with the rest of the hardware is a total PITA. If I am going to replace a decades old part, I do not want to finish it with a decades old connector. So a trip to the local ACE hardware was in order where I got everything I needed in stainless steel.
The spring clip that retains the internal door latch mechanism was another issue.
one old one was missing and the other was in poor condition.
A couple of good solutions were offered by John (CJD):
drill thru the shaft & use a cotter pin.
View attachment 44833
and Randall (TR3driver): use a split lock washer of the correct size.
I used the lockwasher as I happened to have just the thing in SS.
(that doesn't happen very often).
to finish it up, I put a rubberized bolt cover over the end of the shaft to minimize wear on the inner door panel.
The good thing about a little job like this is it opens the opportunity to inspect/correct other issues. So once I took the door panels off I wirebrushed, cleaned and repainted the inner doors.
(Johns pic of his cotter pin solution was a motivator here, as his inner door looked brand new)