• Hi Guest!
    If you appreciate British Car Forum and our 25 years of supporting British car enthusiasts with technical and anicdotal information, collected from our thousands of great members, please support us with a low-cost subscription. You can become a supporting member for less than the dues of most car clubs.

    There are some perks with a member upgrade!
    **Upgrade Now**
    (PS: Subscribers don't see this gawd-aweful banner
Tips
Tips

Reconditioned head - proud papa

Boink

Yoda
Bronze
Country flag
Offline
Did it. Had my 12G1316 (smog version of the 12G940) reconditioned. Although I wanted to go with Hap (and spoke with him, receiving lots of good advice - but he was backed up a bit), I needed it quick - and a big firm here in Portland turned it around in 2 days! I removed it and took it all part (removing valves/springs/studs) and took it to Bearing Serices which is very close to my home. Next time I use Hap (hoping he's not too backed up). :yesnod:

a) magnifluxed and blasted (clean inside and out)
b) replaced all bronze guides (and seals)
c) installed hardened seats for the intakes (due to some pocketing of those valves)
d) cleaned up the previous added hardened seats for the exhausts(which really weren't done right)
e) installed my relatively new valves and ground in (and my existing springs which were nearly new)
f) skimmed the top of the head a bit
g) removed all brass plugs on the cylinder side and threaded the holes, then installed new ones (the MAIN REASON for the job)
h) skimmed entire head about .005 or was it .007"
i) pressure-tested and painted
j) they installed one of those overheating tab things at one end of the head (opposite the thermostat end).

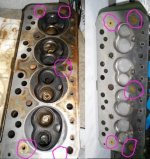
Here is a before and after of the cylinder side. A few holes have traces of some very limited corrosion. The pink circles are of those brass plugs (a few with holes); you may recall that the one that spans the gasket fire rings of #2 and #3 had recessed and caused a failure.

Obviously, I also took the opportunity to clean the top of the +.020 pistons and tidy up the top of the block (which is smooth and level). Confirmed TDC while it is open.

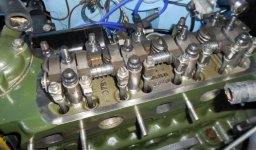
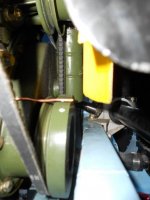
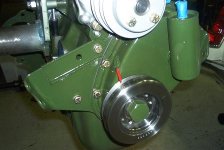
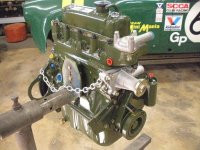
Planning to put it in my 1275 (er, 1293cc) tomorrow. Proud papa:
 

Attachments

  • 29410.jpg
    29410.jpg
    77.2 KB · Views: 536
It's a good feeling isn't it?

Be sure and post how the engine feels after you get it re-started. I'm sure you are going to feel very confident and happy.
 
dklawson said:
It's a good feeling isn't it? Be sure and post how the engine feels after you get it re-started. I'm sure you are going to feel very confident and happy.

Thanks Doug. And with a re-freshening of the carbs (with the addition of a Pertronix distributor to replace the VERY tired one), I'm not sure there's much left!

Here's a shot with the rocker assembly on it (today). It's all closed up now (with manifolds on) and ready for carbs.
 

Attachments

  • 29412.jpg
    29412.jpg
    94.6 KB · Views: 452
Looking real good.
 
Thanks Jack.
One value of having the head off was to finally determine, with serious accuracy, EXACTLY where top-dead-center is. :yesnod:
 

Attachments

  • 29432.jpg
    29432.jpg
    55.8 KB · Views: 400
startech47 said:

Um... well, my crankshaft pulley had absolutely no markings on it at all. All that was there was the standard multi-tooth marker on the bottom of the engine. So, I fashioned a copper pointer and added marks on the top side of the pulley (just a little to the side where it's much easier to see) and a filing on the bottom for the standard tooth-thing-marker. I have two places I can look now.

So, with the micrometer, I got to add a dead-on spot to mark and then added 5 and 10 degree markings. It was difficult to see TDC but the micrometer got it right on.

As for the engine restart, I'm briefly stalled with the HS2s (with tweaks) and then back together. Firing it up in a week?
 
dklawson said:
With that cylinder head I assume this is a 1275.

If you want a scale for the front pulley that can be read from the top, consider buying the timing tape kit from Jeff at Advanced Distributors.

https://advanceddistributors.mybisi.com/product/1275-midget-sprite-timing-tape-kit

Thanks Doug. Yes, I've seen that tape. I was considering making my own thinking I could pull that off (with a bit of simple math). It's a 1275 (bored to 1293), and that tape looks might easy. :yesnod:

I figured the diameter (to be double-checked) is 4.75" times PI divided by 360 degrees = 0.04145" per degree or about 0.42" per 10 degrees (or 10.5mm). I am going to see if this jives with the tooth marker thing on the under side of the engine. Still, the tape sounds easier.
 
My Mini (also a 1275) came with only its original timing marks... on the flywheel and visible only after removing a cover plate. Before I saw Jeff's kit I welded up a pointer that bolts on to the timing cover using two of the existing bolts. Once that was installed I turned the engine to the various degrees I wanted and I center punched the front pulley adjacent to the pointer at each of those angles. It's not as fancy as the tape but it sure works and it won't fly off when covered with oil.
 
dklawson said:
My Mini (also a 1275) came with only its original timing marks... on the flywheel and visible only after removing a cover plate. Before I saw Jeff's kit I welded up a pointer that bolts on to the timing cover using two of the existing bolts. Once that was installed I turned the engine to the various degrees I wanted and I center punched the front pulley adjacent to the pointer at each of those angles. It's not as fancy as the tape but it sure works and it won't fly off when covered with oil.

Similar to what I did/made... soldering a copper wire (10 gauge) to a copper plate and putting under an existing bolt. Works well; I did have to use some white modeling paint to make my marks. Here is an eary version (before I nailed the exact TDC). I now have a nice line right at TDC and a filing notch on a different part to line up with the tooth-thing on the bottom under the radiator.

The paint, I thought appropriate, is Testors's model paint. :yesnod: I liked the idea of a copper pointer because I can bend it when initially positioning it.
 

Attachments

  • 29440.jpg
    29440.jpg
    33.2 KB · Views: 341
  • 29441.jpg
    29441.jpg
    45.7 KB · Views: 349
It's a good idea to make top timing pointer out of something stiff enough not to be able to bump with your hand and accidently move it. I make mine out 1/4" steel dowel, and weld them to the timing cover. All I do for marks is TDC, because almost everyone these days has a dial timing light, or should get one.
 
Thanks Hap. This pointer is reasonably stiff, but your reason is why I also put a duplicate (secondary) mark on the pulley on the bottom in line with the existing tooth-thing.
 
Hap Waldrop said:
It's a good idea to make top timing pointer out of something stiff enough not to be able to bump with your hand and accidently move it. I make mine out 1/4" steel dowel, and weld them to the timing cover. All I do for marks is TDC, because almost everyone these days has a dial timing light, or should get one.

I would love to see a picture of this if you have one..
 
Jeff at Advance Distributors sells a nice kit for < $20 to do this. Works on 1275's. NFI.
 
JOeyKnapp said:
Hap Waldrop said:
It's a good idea to make top timing pointer out of something stiff enough not to be able to bump with your hand and accidently move it. I make mine out 1/4" steel dowel, and weld them to the timing cover. All I do for marks is TDC, because almost everyone these days has a dial timing light, or should get one.

I would love to see a picture of this if you have one..

Here ya go.
 

Attachments

  • 29470.jpg
    29470.jpg
    25.5 KB · Views: 213
It occurred to me that if you wanted to be extremely accurate you should have a "V" back to align the pointer (like a gun sight). Too much?
 
Back
Top