• Hi Guest!
    You can help ensure that British Car Forum (BCF) continues to provide a great place to engage in the British car hobby! If you find BCF a beneficial community, please consider supporting our efforts with a subscription.

    There are some perks with a member upgrade!
    **Upgrade Now**
    (PS: Subscribers don't see this gawd-aweful banner
Tips
Tips

Reassembling front suspension of BN6

* Understood the reason for the distance piece now. :encouragement:
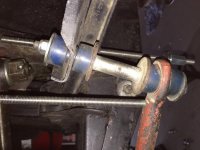
* Still unsure ift the rod connecting the anti rol bar and the plate may be in this sloped orientation or if a pure vertical orientation is expected. In the actual sloped orientation the bushings get in a bad shape.
 
Last edited:
* Understood the reason for the distance piece now. :encouragement:
* Still unsure ift the rod connecting the anti rol bar and the plate may be in this sloped orientation or if a pure vertical orientation is expected. In the actual sloped orientation the bushings get in a bad shape.
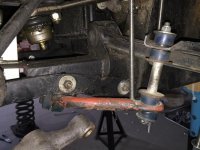
Here's what the swaybar link/bushes look like on my car__with the suspension at full droop.

When the wheels are on the ground and loaded with the weight of the car, the bar's ends are more nearly horizontal, and the bushes less strained.

IMG_7471.jpg


IMG_7473.jpg
 
Here's what the swaybar link/bushes look like on my car__with the suspension at full droop.

When the wheels are on the ground and loaded with the weight of the car, the bar's ends are more nearly horizontal, and the bushes less strained.

IMG_7471.jpg


IMG_7473.jpg

A little tougher to see, but with the car on the ground, at least the lower link bushes look more relaxed; I haven't been able to find a better picture yet of the upper link bush while in a static/loaded state...

IMG_7617.jpg


IMG_7618.jpg
 
By the way: thanks for the spring information. I am wondering if mine is too small.

Thay appear to be BN6 2197:
I would put those in the bin and order a new set from your available stockist.

Then follow the information provided in this thread.
 
Here is a picture of the bushes of my swayer link when the distance piece is in place, simulating the car on load.

IMG_1562.jpg

IMG_1564.jpg

The rod is for orientation only. It shows the pure vertical axis.

Does this look "healthy"?

Volker
 
I have a 57 100-6 I'm working on trying to remove the coil spring and having problems. Looking at this pic do I need to get some ALL thread and lower the coil out like this on my model? I have the coil compressed.
I'm trying to replace the rubber bushings on the A-Arm
Yes, I had already removed the block when putting this BJ8 back together:

IMG_2570.jpg
[/QUO
 
3/8" allthread. 3 - 4 @ 9" pieces.
With the car on stands...it helps to jack the lower trunnion with a bottle jack, then undo all a bit, then jack trunnion a little. In this way you can allow the pan to clear the frame rail as you undo the spring.

Look for previous threads on removing the rubber bushings - they can be the very devil to get out as the pin rusts to the metal sleeve inside the rubber. Mike Salter says it's very seldom necessary to replace these as they last for decades.

I replaced mine with poly bushings and am not happy - they squeak all the time. They are an inferior design as the metal sleeve rotates around the pin and any lubrication quickly goes away.

For a comprehensive discussion of rubber vs poly bushings, see this article in Salter's blog:
https://www.netbug.net/blogmichael/?p=103
 
Here's what the swaybar link/bushes look like on my car__with the suspension at full droop.

When the wheels are on the ground and loaded with the weight of the car, the bar's ends are more nearly horizontal, and the bushes less strained.

IMG_7471.jpg

Sorry to hi-jack your thread, but I love Randy's pictures and this one raises a question for him. Randy, I'm making some front steering and suspension mods on my 100-6 vintage racer and need to fab some adjustable tie-rods. What are you using, where did you source yours?

Thanks
 
Thanks for the reply Steve.
After reading your post I'm not going to replace the A-arm bushings.
They aren't showing any signs of being wore out, I just figured I was doing a good thing for the car replacing them with the "better" poly bushings.
Thanks again, you just saved me hrs of frustration work.

3/8" allthread. 3 - 4 @ 9" pieces.
With the car on stands...it helps to jack the lower trunnion with a bottle jack, then undo all a bit, then jack trunnion a little. In this way you can allow the pan to clear the frame rail as you undo the spring.

Look for previous threads on removing the rubber bushings - they can be the very devil to get out as the pin rusts to the metal sleeve inside the rubber. Mike Salter says it's very seldom necessary to replace these as they last for decades.

I replaced mine with poly bushings and am not happy - they squeak all the time. They are an inferior design as the metal sleeve rotates around the pin and any lubrication quickly goes away.

For a comprehensive discussion of rubber vs poly bushings, see this article in Salter's blog:
https://www.netbug.net/blogmichael/?p=103
 
Sorry to hi-jack your thread, but I love Randy's pictures and this one raises a question for him. Randy, I'm making some front steering and suspension mods on my 100-6 vintage racer and need to fab some adjustable tie-rods. What are you using, where did you source yours?

Thanks
IMG_7471.jpg


Those were just replacements that were commercially available way back when__back when functionality was more important than original appearance__probably sourced from Southern Carburettors, as they were once known.

The taper in the four (4) steering arm holes is all the same, so if you bought the (late BJ8??) center rod with the externally threaded rod & internally threaded rod-ends, you could conceivably have a machinist shorten and re-thread the RH-threaded end.

You'd have to buy two (2) assemblies, and cut them down to the length needed for the side rods. For the sake of alignment/parallelism, I'd recommend the threads be cut by turning the rod via a lathe into a suitable die/die-holder (as opposed to trying to align the threads by sight/by hand). Maybe even partially cutting them with a 60* cutter, and then finishing/final dressing with a die; the machinist would be the best to consult for how to go about it.

Edit: Cessana TPA, I used Energy Suspension urethane inner/lower bushes, installed around 2002, and they have yet to make a peep! Off the top of my head, I do not believe these had an inner steel sleeve, but rather pivoting on the pin itself. Note that my lower control arms were "bored straight" about thirty (>30) years ago, to accept MGB Delrin bushes (then marketed by Huffaker) so I do not know if Energy Suspension markets a bush specifically for the Healey's original taper. Maybe Dougie can answer that question?
 
Back
Top