Hey Guest!

 Hey - did you know if you click on the title of a thread it will take you to the first unread post since you last visited that thread?
 but were afraid to ask:
  STOP!! Never post your email address in open forums. Bots can "harvest" your email! If you must share your email use a Private Message or use the
  smilie in place of the real @
 Pretty Please - add it to our Events forum(s) and add to the calendar! >>
martx-5
Yoda
Offline
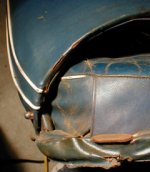
I just got done recovering my seats. The driver's (stationary) seat went without a hitch. The problem I'm having is with the passenger's seat...the one where the back folds forward.
The problem involves the piping as it wraps around the bottom of the seat back. It interfers with with the seat back from resting on the two small platforms on the seat bottom. Did I put this together incorrectly?? I carefully checked the original covers, they were installed the same way, but they weren't original to the car. Should the piping be snipped (relieved) at this contact point? They didn't appear to be that way on the originals.
The problem involves the piping as it wraps around the bottom of the seat back. It interfers with with the seat back from resting on the two small platforms on the seat bottom. Did I put this together incorrectly?? I carefully checked the original covers, they were installed the same way, but they weren't original to the car. Should the piping be snipped (relieved) at this contact point? They didn't appear to be that way on the originals.