• Hey Guest!
    British Car Forum has been supporting enthusiasts for over 25 years by providing a great place to share our love for British cars. You can support our efforts by upgrading your membership for less than the dues of most car clubs. There are some perks with a member upgrade!

    **Upgrade Now**
    (PS: Upgraded members don't see this banner, nor will you see the Google ads that appear on the site.)
Tips
Tips

Problem w/ New Alternator -need help

T

Tinster

Guest
Guest
Offline
Still trying to install a new wire harness in
my dead TR6. I need experienced advice with a
problem concerning the new wire harness.

As instructed by just everyone, I traded in the Lucas
generator for the recommended upgraded GM alternator.
Being told in advance "some reworking" of the mounting
brackets would be needed.

That's cool-, I fine with designing steel shapes. The
new top mounting bolt arm piece came out ever so nice.

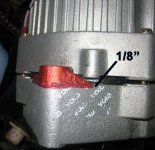
The problem is the bottom bolt hole stubbie. The entire
alternator is well over 1/2" out of true with the other
two pulleys or flywheels, whatever they are.

Can I shave off the excess steel with my bench grinder and
flat file? Or do I need to take the new alternator to a
machine shop and have it milled ever so smooth and accurate?
Photo attached for viewing.

WHEW!!! An extupido like me trying install a brand new
wire harness is ever so difficult. One obstacle after
another.

Thanks everyone.

Tinster in Puerto Rico
 

Attachments

  • 242565-SHAVE.jpg
    242565-SHAVE.jpg
    41.8 KB · Views: 154
To claify photo- I need to remove all the
steel highlighted in red marker pen including
about 1/8" down into the housing itself.
 
Tinster- there is a site with the detailed area that needs to be ground off. I am unavailable to find it right now. It might be a dan Masters page somewhere. Somebody on this site must have it. It will take care of your problem.
don
 
I have the Dan Masters book but did not see
the alternator grinding technique in it.
I will look again.

Thanks,

Tinster
 
Thanks Bob!! I think??
Exactly what I need for the job.

My Lord, I had no idea what I was getting myself
into with this entire car rewire. But I had no choice
when the car died on us.

The engine has to be unbolted and jacked up just to
replace the freakin' fan belt I cut off? I paid $139.
for the GM alternator here on the island.

I sure am happy my TR was "Just about totally restored"
when we purchased it 8 months ago. I cannot begin to
imagine what a TR in need of any work might entail?

BLARGHHH!!! /ubbthreads/images/graemlins/eek.gif /ubbthreads/images/graemlins/eek.gif /ubbthreads/images/graemlins/eek.gif /ubbthreads/images/graemlins/eek.gif
 
Advice needed: Sould I purchase a Lucas generator
and try to mate it into the Dan Master wire harness??
 
I picked up on a local saying that is appropriate when looking at a used car.
"That depends on whether you're pitchin or catchin"
Keep it in mind when you hear "Just about totally restored." The pitcher knows this is enticing, the catcher needs to see through the smoke before handing over his money.
Does anyone remember the GT40 kit cars from the 1970s? I remember seeing several for sale over the years. All said they were nearly finished. One in particular sat for years in front of a nearby gas station. It had a hot rodded 327 with a Corvair transmission. I can't remember what it had for a chassis. I do remember looking inside and wondering where they could possibly put the seats. The engine was pretty far into the passenger compartment. It was advertised as 95% complete.
 
The alternator that you bought is either a GM 10SI or 12SI. Both are excellent alternators, and wire up the same. If you are using a Dan Master's wiring harness, there will be no problem wiring up the GM alternator. As a matter of fact, the wiring diagram in his instruction manual shows a GM alternator. /ubbthreads/images/graemlins/thirsty.gif

Edit: I see that you are worried about the grinding of the drive end on the alternator. Get past that!! Grind away and use the file and you will be fine. That GM unit has it all over the Lucas alternator. You won't regret it.
 
One more thing, back on the subject...
I say go ahead and work with the GM alternator. You have an idea of how to go about the modifications. The end result should be worth the effort. Plus you'll have the knowledge to share.
 
Then Saturday will be grinding day!!
If I accomplish this altered alternator
task, I'll post some how-to photos.

Yes, I have had the Masters new wires connected
to the GM unit. It kinda threw me when the unit was
so far off plumb and I saw how much metal needed to
be removed.

Kinda like Christmas eve trying to to put together
a gift for your kids with "some assembly required".
Gift goes into the attic after 4 eggnogs ....??

Tinster
 
[ QUOTE ]
The engine has to be unbolted and jacked up just to
replace the freakin' fan belt I cut off?

[/ QUOTE ]

No unbolting should be needed, the engine usually just needs to be gently lifted a bit. Use a wide, flat piece of wood to protect the sump pan and jack it up slightly, until there is just enough clearance.

If this works easily, it usually gives a clue that at least the front motor mounts need replacement. Sorry if I'm adding another item to your Things-To-Do list! It's not a difficult job, though.

An exception is that on some TR models (TR3, I think, but am not sure about TR6) even a brand new motor mount put in *upside down* it can cause clearance issues.

Try to buy motor mounts from a well-known source, to be sure they are well made and won't soften and sag quickly.

If necessary, it's possible to shim up the engine a little at the motor mounts, with some large washers. Don't get carried away. Just add a few washers until there is enough room to work a belt under the pulley without jacking under the engine.

[ QUOTE ]
I paid $139.
for the GM alternator here on the island.

[/ QUOTE ]

OUCH! It's been a few years, but if I remember correctly the last one cost me $60-65 without a core (would have been $50-55 with core) here in Silicon Valley.

On the brighter side, you can probably get the alternator rebuilt locally, should it ever need repair. The darn things are so common there are quite a few shops that work on them. A local rebuild/repair allows you to keep the modified case, once the alt has been fitted to your car.

[ QUOTE ]
I sure am happy my TR was "Just about totally restored" when we purchased it 8 months ago. I cannot begin to imagine what a TR in need of any work might entail?


[/ QUOTE ]

On the one hand, older cars do require more frequent maintenance than the more recent stuff. But, LBCs require a bit more than some, so I've always suspected the British just like to fiddle with their cars! I'm sure it's changed now, I haven't been to England in about ten years. But lived there as a kid (we're talking multiple decades ago!) and at that time it seemed to me that most bought only one or two cars in a lifetime, didn't drive them very much and even then only for short distances.

Look at the bright side... your TR6 doesn't have any computers onboard, which would be easily fried during electrical system fiddling and tend to cost a small fortune to replace in modern cars.

/ubbthreads/images/graemlins/cheers.gif
 
Well **** !! It looks like I wrecked the new alternator
before I even got it over the bench grinder to try to
get it to attach to my TR..

When I split it in half to get access to grind off the
mounting holes- 2 tiny springs popped out on the floor
and I have no idea where they fell from. Also it looks
like two little rectangles of black material attached
with very tiny braided copper wires came loose as well.

Should I throw the new GM in the trash and order an
ancient tech Lucas to go with the Dan Masters wire
harness? It does not appear I have the skills to
change out the alternator. I know zero, zip, nada
about anything electrical.
 
NO, you don't have to throw it in the trash. If you didn't break those two "black things" (they are the brushes) you can put it back together without a problem.

The brushes should now be dangling from a white plastic thing called the brush holder. What you have to do is get a paper clip and straighten it out. That is what you will use to hold the brushes and springs in place when you reassemble everything. Put one spring into the lower cavity (as you're looking down into the alternator back) and the push the lower brush into the same cavity with the wire oriented so it slides along the slot in the brusholder. Hold it in with your finger and from the back of the alternator push the paper clip in through the access hole back there. You'll have to push the brush down enough to get the paper clip in front of the brush. Push the paper clip in only far enough to catch the middle section of the brush holder. Now insert the second spring and brush and pusH the paper clip through the last hole in the brush holder. You now have the brushes set and can easily re-assemble the alternator when you're down grinding.

When you have the alternator re-assembled, just pull the paper clip out, and you will hear the brushes pop against the rotor slip ring. /ubbthreads/images/graemlins/cheers.gif

If anyone else ever has to do this job, if you have an air compressor, take the rotor nut off, the pulley and fan, then you can slip the drive end housing from the alternator, leaving the rotor behind, and not have to deal with the brushes popping out.

Edit: If you have trouble setting the brushes with the brush holder in the back, you can always take out the three screws holding it and the voltage regulator in. Since the diode trio is attached to one of the screws, just go ahead and remove the three nuts and take out the stator and trio. The only thing you have to watch is the insulators on the three screws that you take out when you remove the brush holder. IIRC, one of them is NON-INSULATED, so make a notation of where that one goes.

But, you should be able to set the brushes without removing everything.
 
Thanks Martx- I'll print this out for future reference.
I sounds very tricky and perhaps outside of my skill
levels.

I did in fact try to get the pulley nut off. No luck
even with a pipe wrench. Any possibility the pulley
nut is reverse threaded?

I cannot grind off the mounting hole nub with the pulley
in place.

I am kinda stalled right now.

thanks

Tinster
 
No, it's not a reverse thread. It's a normal righty tighty -- lefty loosey. You should be able to put that alternator back together from all the other things I've seen you do. Once you see what's going on in there, it will all clear up. I got faith in ya. /ubbthreads/images/graemlins/thirsty.gif
 
[ QUOTE ]


The engine has to be unbolted and jacked up just to
replace the freakin' fan belt I cut off?


[/ QUOTE ]

As posted a few weeks ago, you shouldn't have to move the engine to change a belt. Can you imagine being on the road and doing this. (you do carry a spare?) Just slightly loosen the front mounts and the rear mount at the tranny and pry the engine back just enough to clear the thickness of a belt. It works.


Bill
 
Hey Tinster,
Thought I'd trow my 2 cents worth into the frey. I owned a 69 TR6 from 1973 thru 1985 with no problems with the origional wiring, alternator or anything else electrical.
I added high intensity lights, air horns and sterio(cassette at that time). Last year I bought a 73 TR6 that had a GM alternator installed, but the wiring was a total basket case. I considered installing an "upgraded wiring harness" but because of the fact that I never had problems with the origional set up I went with a new harness from British Auto Wire and a rebuilt alternator from The Roadster Factory. Even went so far as to use Lucas relays to wire up my high intensity and fog lights. I have no problems with upgrading to make the car better but if the origionally provided system works why change? Phil
 
Back
Top